Episode 1: London Scene
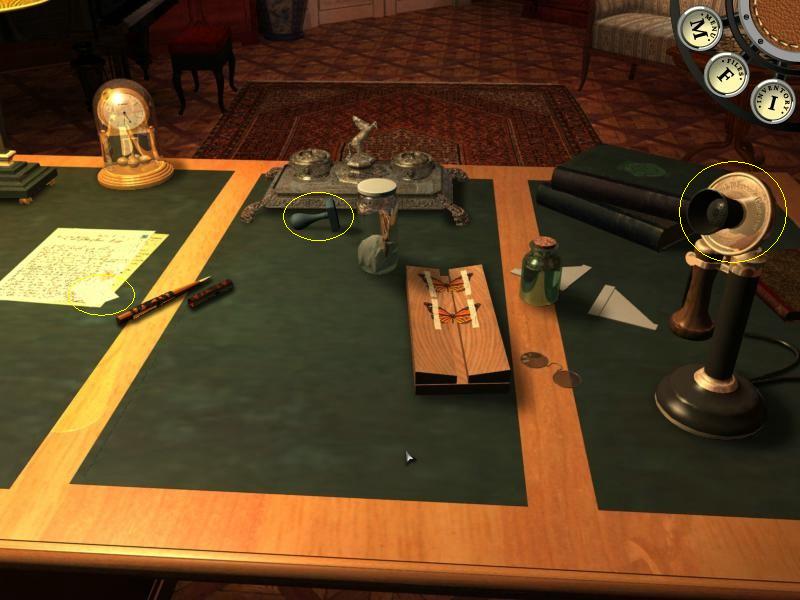
You will start the game in your office. Take a look at the papers lying at the corner of your desk. Click on the newspaper and read the article. Now click on the letter lying between the newspaper and the envelope. Make a note of the phone number 55-623 on the second page. Finally, click on the envelope to open it. After you read the letter, click on the second piece of paper inside the envelope.
Walk out of the room. Turn left and walk to the end of the corridor. Click on the door of the directorĺs office. Samuel will realize that the door is locked. Turn around and walk to the opposite end of the corridor. When you turn left, you should see a door labeled ĹBack Staircaseĺ. Walk through this door and down the stairs. Climb down four flights of stairs and you will end up in front of a door. Enter into the next room.
Talk to the guard seated at the desk. When the conversation is over, take the inventory file from the desk. Note that you can scroll through the inventory report a couple of times to see all of its pages. Talk to the guard again. He will give you the keys to the directorĺs office. Walk up the stairs and all the way back to the directorĺs office. Use the key you got from the guard on the office door. Once you are inside, turn on the light switch behind you.
Walk up to the cabinet underneath the window. Click on it to take a look at its contents. Take the bottle of whisky from the cabinet. Now take a look at the documents lying on the desk. You will see an inventory order form on the far left corner of the desk. Samuel does not currently have the information required to complete the form. We will come back to it later. For now, go through the side door to the unexplored area. Once again, you will have to turn on the light switch behind you.
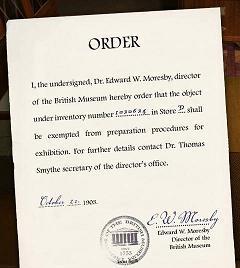
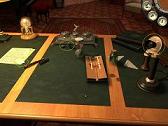 You are now in Moresbyĺs office. Walk up to the directorĺs desk to take a closer look. Click on the phone on the right side of the desk. Dial Smytheĺs number: 55-623. After the conversation, take the rubber stamp from the desk. Finally, take a close look at the business card on the left side of the desk.
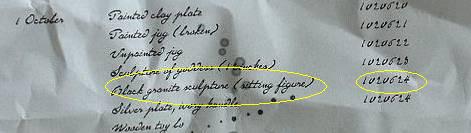
Before you walk away from the desk, take a close look at the trashcan standing next to it. Take the piece of paper inside the trashcan. Smythe mentioned a black granite sculpture when we called him on the phone. The list of items on the piece of paper does refer to a black granite sculpture! Make a note of the item number next to the entry for the sculpture: 1020624. Also note that the date October 1st next to the list of items where the black statue is mentioned.
Walk up to the fireplace next to the desk. There is a matchbox on the shelf above the fireplace, next to the candle. Put the matchbox in your inventory. Leave the office and go all the way back to the guardĺs desk on the lower floor. The good professor will ôaccidentallyö leave the office door unlocked.
Once you are back at Swansonĺs desk, talk to the guard. Samuel will return the key and give the guard the bottle of whiskey. Now take a second look at the inventory report on the desk. The inventory report contains two entries about sculptures. The sculpture shipment from November 6th is in Store B. The shipment from October 1st is in Store D.
 Piecing together the information from Smythe, the paper in Moresbyĺs office, and the inventory report on Swansonĺs desk, we know that a black granite statue was delivered on October 1st. The item was placed in Store D and was assigned the number 1020624. Now it is time to put this information into good use.
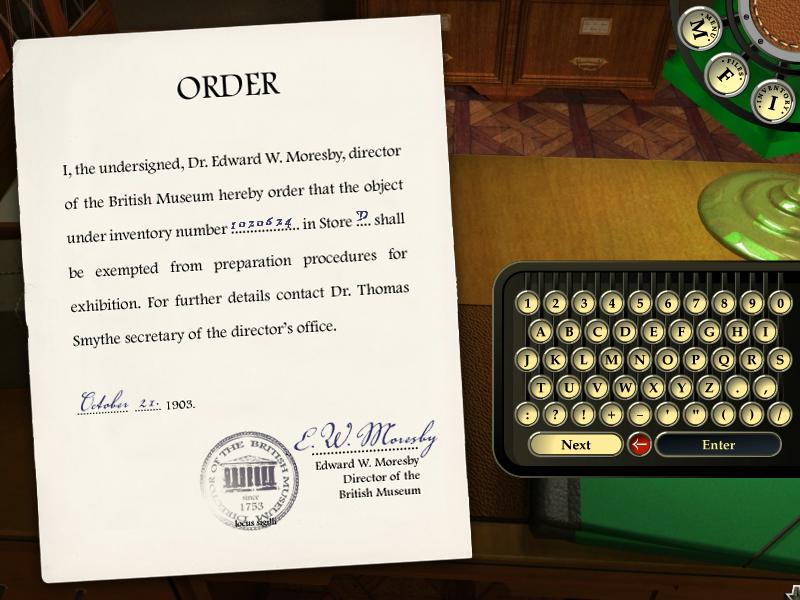
Go up the stairs and return to the door leading to Moresby and Smytheĺs offices. Walk up to Smytheĺs desk and take a look at the sheet of paper that is on the far left corner. This is an inventory order form. Complete it using the information we have about the black granite statue. Type 1020624 for the inventory number. Enter D as the storage location. Click on the enter button. Use the rubber stamp in your inventory on the bottom portion of the form. Samuel will enter the date and stamp the form.
Go down the stairs and back to Swansonĺs desk. The guard should be asleep. Before we can solve the next puzzle, we need to read make a few notes about the locks on the doors. The following entries can be found on the last pages of the inventory report:
| - |
"Leak in store A. Lock needs to be changed!" |
| - |
"New upper safety lock on store C since January." |
| - |
"Mrs. E. von Dĺs legacy was placed in the special glass cabinet (keys attached)." Going back to the second page of the inventory report, you will also see that Mrs. E. van D.ĺs materials are in Store B. |
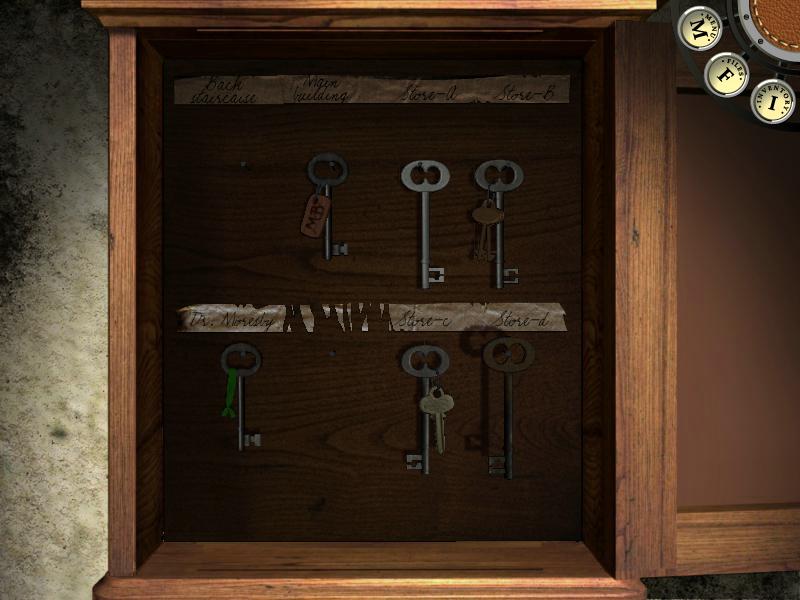
Go back to Swansonĺs desk. Stay close to the wall on the left side of the desk. Walk forward directly towards Swanson. Samuel will trip on Swansonĺs bag and come close to waking up the guard. Now that you are right next to Swanson, you can take a closer look at the box of keys on the wall to your left. We will have to organize the keys:
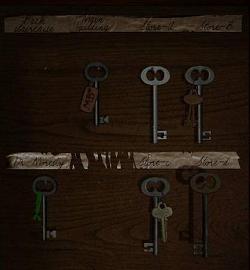
| - | We already know that the key with the green ribbon belongs to Dr. Moresty. We used the key earlier to unlock his office. Take the key with the green ribbon and place it under Dr. Morestyĺs name. |
| - | One of the remaining keys has a small tag labeled M. B. It should be safe to assume M. B. stands for Main Building. Put this key under the Main Building label. |
| - | We read a note about Storage Room A being in need of a new lock. Put the newest looking single key under the label A. |
| - | We read a note about Mrs. E. van D.ĺs notes being placed in a special cabinet with separate keys. We also found out that her materials are in storage B. One of the large keys has two small keys attached to it. Place this large key under the label B. |
| - | We know that store C has a new upper safety lock. There is one more large key with a smaller key attached to it. Put this set of keys under the label C. |
| - | Put the remaining rusty key under the label D. |
Once you solve the puzzle, Samuel will put the Storage Room D key in his inventory. Walk down the corridor to the right of the guardĺs desk. After moving forward twice, you will be next to a lantern on your left. Click on the lantern to put it in your inventory. Continue down the corridor until you get to the wooden door along the right wall. As you should see from the label next to the door, this is Storage Room D. Use the key in your inventory to unlock the door. Samuel will automatically enter.
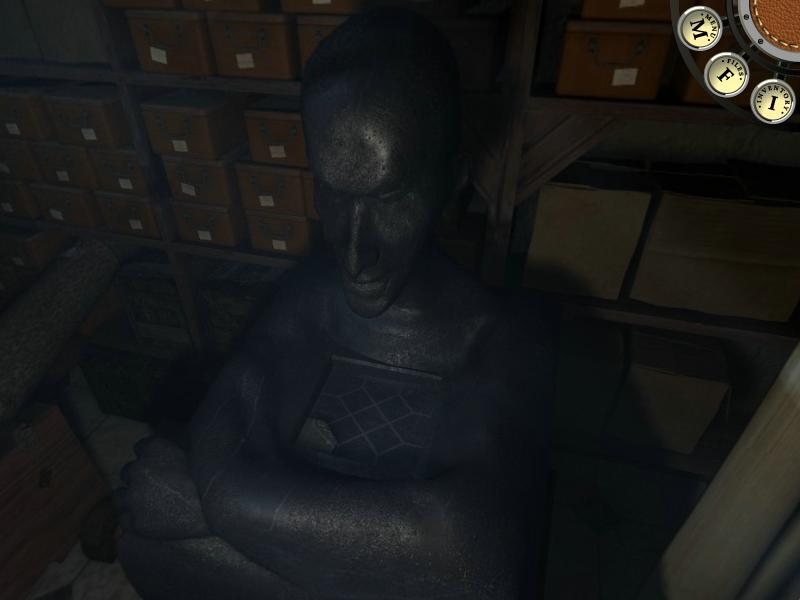
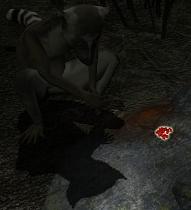
 In your inventory, combine the lantern with the matchbox. Go to the far left side of the storage room. Walk down the aisle closest to the wall on the left side of the room. When you get to the end of the aisle, you will be able to turn right and continue forward. At the end of the path, you will finally find the elusive black granite sculpture.
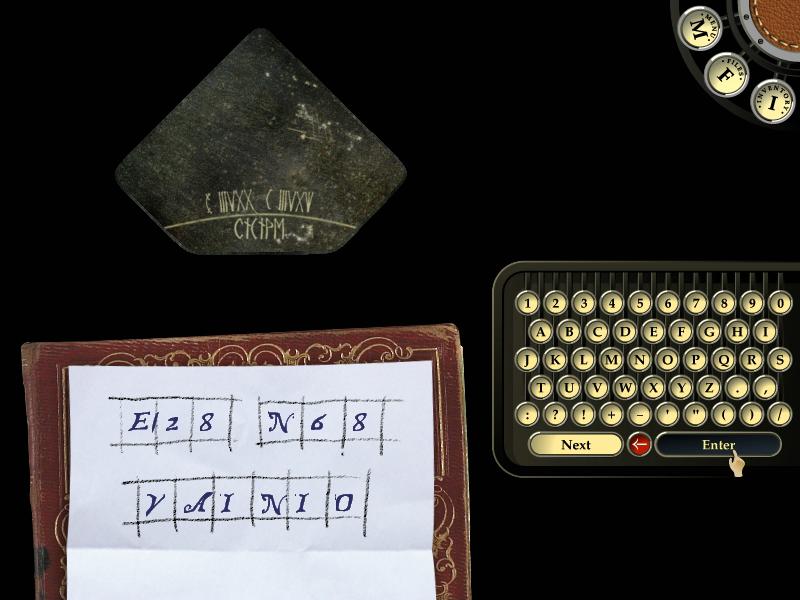
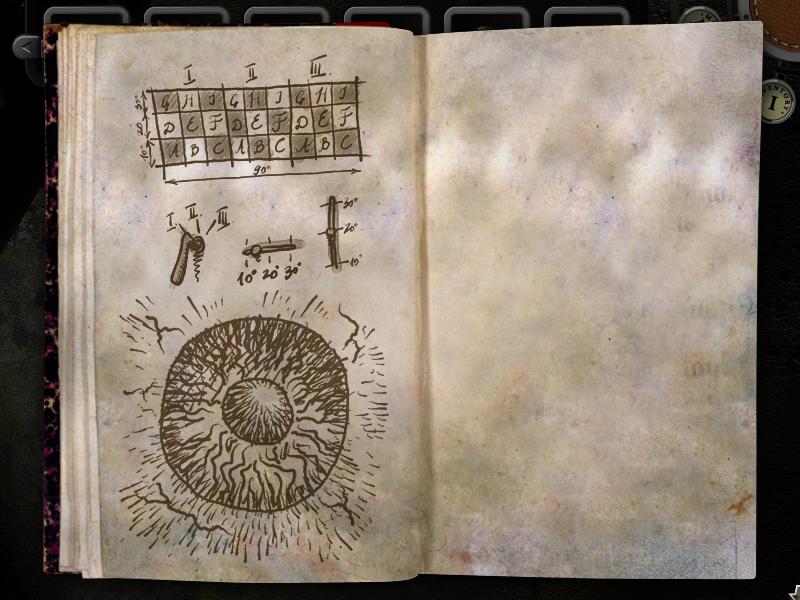
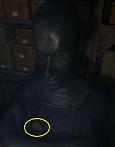
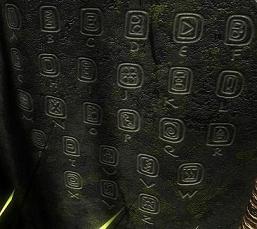
Click on the pattern at the center of the statue to take a closer look. Click on the tile on the left bottom corner. Samuel will pick up the stone and comment on the message engraved on the stone.
Return to Samuelĺs office. This is the room where you started the game. It is time to do some decoding. There is a multitude of books along the left wall. Take a look at the very first bookcase as you enter the room. There is a single green book on the second shelf from the bottom. Click on the book and Samuel will open it. The book seems to contain information about a number of different alphabets. Skip through to the page discussing Hungarian runes. Using these Hungarian runes, you can decipher the meaning of the message engraved in the stone.
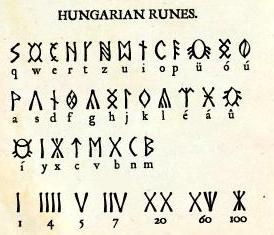
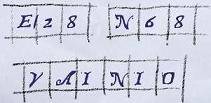
The characters on the stone can be deciphered as follows:
| - | The entry on the top left: E 3 5 20. 3+5+20=28. |
| - | The entry on the top right: N 3 5 60. 3+5+60=68. |
| - | The entry along the bottom: OINIAV |
 The book on the runes also notes that Hungarian runes were traditionally written ôin boustrophedon style (alternating direction left to right then right to left)ö. Open your inventory and take a look at the stone. Combining the information we decoded with what we found out about the writing style for the runes, enter the following as the puzzle solution:
| - | Enter E28 as the first set of 3 characters. |
| - | Enter N68 as the second set of characters. |
| - | Reversing OINIAV, enter VAINIO as the last set. |
| - | Click on the enter button. |
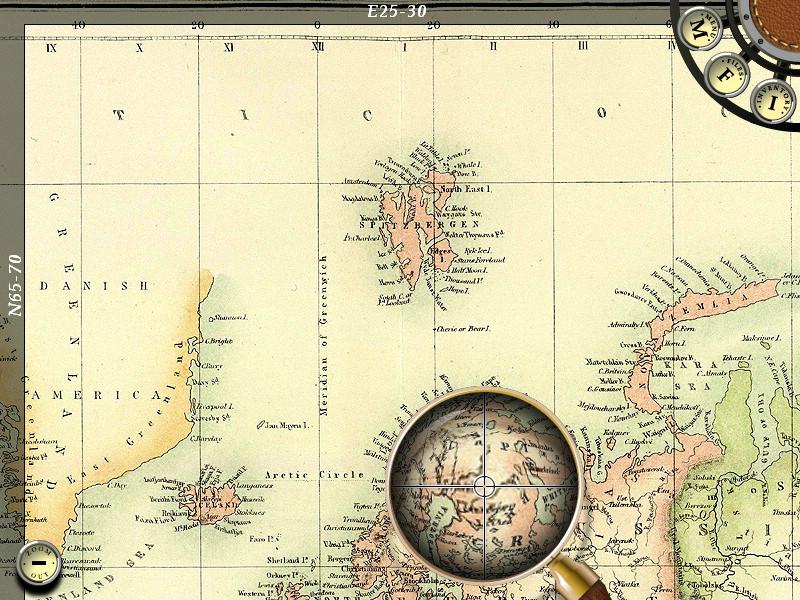
Walk up to the map on the far wall of Samuelĺs office. Take a close look at the map. Samuel will be able to inspect it with a magnifying glass. Try to find the coordinates you decoded:
| - | Move your magnifying glass around Europe until you find E 20-30 and N 60-70. Click on the map to zoom in further. |
| - | Now look for the coordinates E 25-30 and N 65-70. Click on the map to zoom in one more time. |
| - | You can finally move your magnifying glass over E28 and N68. Click on the map. Samuel will realize that he needs to go to Lapland. |

Return to the directorĺs office. From the directorĺs desk, dial Smytheĺs number for a second time. The correct number is 55-623.
Congratulations! You just completed the first episode of Agon. Enjoy the ending movie and get ready to explore the next location.
Episode 2: Adventures in Lapland
Train Station
The professorĺs journey will be illustrated along the map. Click on the letters and postcards that appear around the desk to read them. These documents provide detailed information about Samuelĺs journey and what Smythe was able to find out about the codex in the professorĺs absence. When you are done reading the documents, click on the exit button to start the episode.
You will arrive at a small train station. You should see a door to your left. Click on it and Samuel will knock. Click on the door again and Samuel will enter the room. There is a map on the wall close to the door. Click on it to see the names and the locations of three small villages and the train station. Remember the coordinates E28 N68 from the first episode. The village closest to these coordinates is Borgesiida.
Note the illustrations on the walls around the desk. Take a close look at the illustration the wall to the left of the desk. Note the word Kaira and the circled letters c-f-c-f-c-d-c.
Zoom into the desk and read the letter at the center. It seems like Kaira is the name of the stationmasterĺs pet. Make note of the hint: ôů She will wait patiently after three identical sounds. If however one of the sounds is higher than the other two, she knows she should start with the baggage. The wider the difference between the sounds and the two others, the more North she will turnůö There is a sealed envelope on the far left corner of the desk. Take a look at this as well.
Walk up to the sleeping man on the bed. Click on him to try to wake him up. There is a bookshelf on the wall to across from the bed. Click on the right side of the bookshelf for a closer look. Click on the books to separate them. Find the box of matches lying between the books.
Go over to the wood-burning heater close to the entrance door. There are logs of wood to the left of then heater. Click on the logs to take one. Zoom in on the heater to get it started:
| - | Click on the small handle to open the heater. |
| - | Put your log of wood inside. |
| - | Now put in the newspaper in your inventory. |
| - | Finally, use the box of matches to start the fire. |
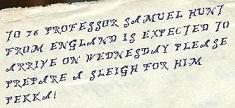
Across from the heater, there is a telegram machine. If you click on the strip of paper that is still attached to the machine, you can see a message from Smythe. Unless you already know how to read Morse Code, you will need some help decoding the message. Note the books on the shelf directly above the bed. The blue book on the right will teach us how to decipher Morse Code. Flip through the pages until you see a chart with the translation of each letter. Use this information to decipher the message in the telegram machine.
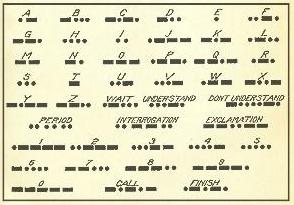
Decode the message as follows:
| - | The message starts right at the beginning of the strip. The first character is denoted by a single line: _ . This represents T. |
| - | Note that there is a noticeable space before the next character. The second character is three lines: _ _ _. This represents an O. |
| - | Note the bigger space between the characters before the second word starts. The second set of characters spell out 76. |
| - | Continue down the strip to decipher the rest of the message. The complete message is: |
| ôTo 76 Professor Samuel Hunt is expected to arrive on Wednesday please prepare a sleigh for him Pekkaö |
| - | Enter the message on the piece of paper using the keypad. To leave a space between words, click on the ôNextö button. When the entire message is typed in, click on the ôEnterö button. |
Walk out of the room. Take a moment to survey the station area. Note the water tower next to the main building. Also, walk around to station building to discover a locked door on the back side. Finally there is an intriguing looking wheel on the side of the building facing the water tower.
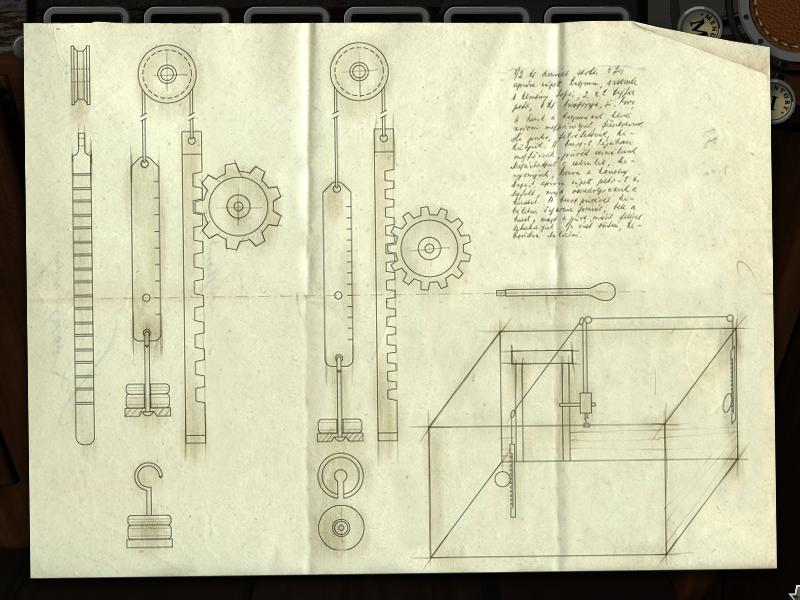
Return to the room where we deciphered the Morse Code. The stationmaster will have turned over in his bed. Take a close look at him. There is a key in his pocket. There is a small cabinet next to the desk. Use the key you just found to open the cabinet. Take the bottle of medicine. Read the letter that was underneath the bottle. There is a diagram attached to the letter. Note the positions of the two geared wheels illustrated in the diagram. The one on the left is on the second slot from the top. The wheel on the right is on the fifth slot from the top. Also note that the diagram is showing an illustration of a room. There is one geared mechanism to the right side of the room. There is a second one on the back side of the room.
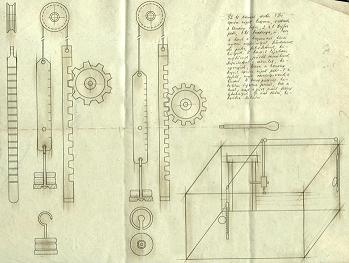
Walk back to the door. It is time to unlock the door on the back side of the building. To do this, we have to adjust the geared wheels from the diagram to the right position. Unfortunately, the gears are not immediately visible. There are three plates on the wall across from the entrance door. One of these plates controls the gear illustrated on the right side of the diagram. There is also a wheel outside on the side of the building facing the water tower. This wheel controls the gear that was on the left side of the diagram. To unlock the shed, use the following steps:
| - | Take a look at the stool underneath the three plates across from the door. Move the stool to the left. Zoom in on the plate on the left side. |
| - | Turn the plate to the left until you cannot turn it any more. Now turn it to the right once. This should put the gear on the second slot as illustrated in the diagram. |
| - | Walk outside and find the second wheel on the side of the building facing the water tower. Turn the wheel to the left until it cannot be turned any more. Now turn it to the right four times. |
| - | Now we need to go behind the building and take a look at the locked door. Zoom in on the hole on the wall next to the lock. It appears that moving the two gears managed to reveal the lock. We just need to find a key. |
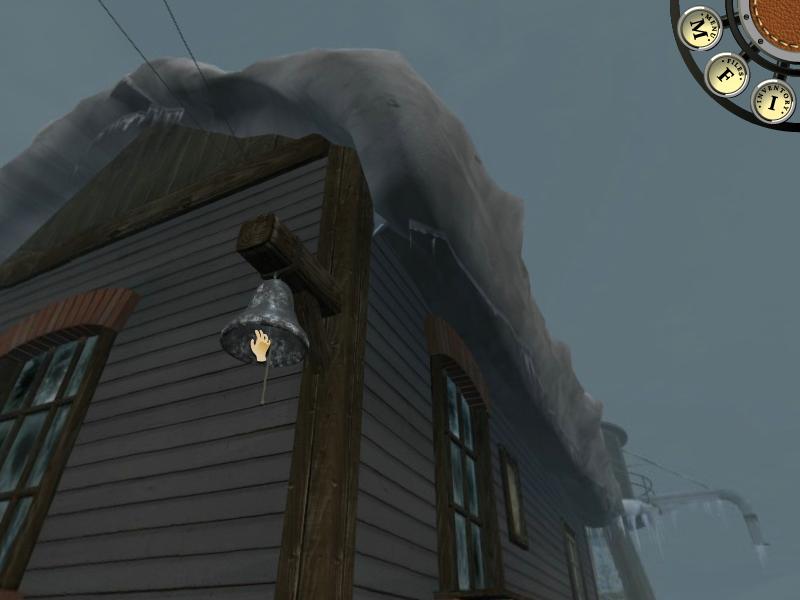
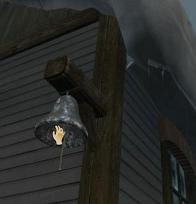
| - | Walk around the station to the bell hanging on the side of the building away from the water tower. The key is hidden inside the bell. In order for Samuel to see it, you need to look at the bell from underneath it. |
| - | Use the key on the lock to finally enter the shed. |
There is a strange organ inside the shed. Walk up to it for a closer look. If you remember the notes we read inside the stationmasterĺs room, there is a way to get Kaira to deliver mail by playing notes on an instrument. But before we can operate the organ, we need to provide it steam:
| - | There is a valve on the wall of the shed across from the door. Click on the valve once. |
| - | Walk up to the water tower next to the station. Climb up the ladder all the way to the top. Once you are at the top of the water tower, circle around it. You will get to a valve attached to a pipe on the floor. Click on the valve. |
| - | Return to the room where the stationmaster is sleeping. Take another look at the heater. There are two gauges at the top of it. To the right of the gauges, there is a valve. Click on it once. |
| - | Return to the room where we saw the organ. It looks like we managed to supply steam but it is escaping the pipe. There is a shelf on top of two barrels and underneath the pipe. Take the lint from this shelf. |
| - | Use the lint on the spot where steam is escaping the pipe. Now the organ is finally operational. |
Remember the illustration we saw inside the stationmasterĺs room earlier. There was a set of circled letters: c-f-c-f-c-d-c. Play these notes on the organ. Walk outside. It looks like an exceptionally clever horse answered the call of the organ.
We had read a note about Kaira being able to travel to the north if you play two identical notes and a third different note. The higher the difference between the notes, the father north Kaira will travel. We had taken a look at the map inside the stationmasterĺs room earlier. The village closest to the coordinates E28 N68 from the first episode was Borgesiida. That village also happens to be the one farthest note of the train station. So letĺs instruct Kaira to go far to the north. Go back to the organ and play C ľ F ľ C.
When you walk outside, you will notice that Kaira is turned towards Borgesiida. Click on the horse to take a ride to the village.
Borgesiida
You can try clicking on the doors, but nobody will answer. Go down the center road. After you move forward four times, you should end up next to a door with a black circle. Click on this door. Nobody will answer, but a moment later Samuel will enter anyway. Try talking to the barkeep and the woman. They will not respond to your questions.
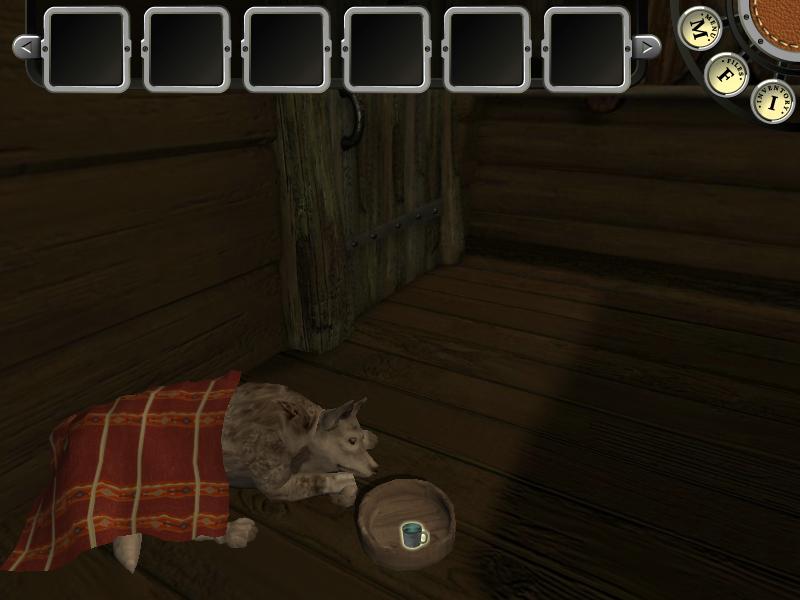
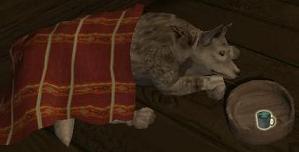
Across the room, there are three stools along the far wall. Take the cup from the shelf over these stools. Go outside and face the door. Take one of the icicles from hanging to the left of the door. Go back to the bar. Use the icicle on your cup. Use the cup with the icicle on the stove. Now combine the cup of water with the medicine. There is a sick dog lying next to the door. Use the dissolved medicine on his bowl.
After the cut scene, walk outside. The mysterious woman is waiting for you to the right. Talk to her and she will tell you about Vainio.
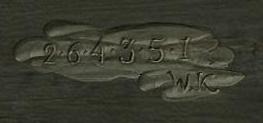
Before leaving, return to the location where we first arrived at Borgesiida. Walk down the left road. When you get to the second house, walk around it. You will be able to see a pile of logs. There is a message etched on the wall over the logs. The numbers 2-6-4-3-5-1 are carved into the wood. The message is signed W. K. This is the solution to a puzzle we are about to encounter.
Go back to the pub. Click on the fence at the spot where you talked to the villager. Walk through to the next area. Take the oilcan next to the sleigh. Click on the sleigh to ride it. Unfortunately, a bridge that you need to pass will collapse just as you are about to reach it.
Walk across the crumbling bridge. It will completely collapse behind you. All we can do now is to press forward. Once you get across, go down the path on the right. Continue to walk forward until you get to a large rock. There is a wheel stuck in the snow and propped up against the rock. Put it in your inventory.
Now go back to the bridge and take the path on the left. When you move forward once you should see a hill with a strange device on top of it. Walk all the way up the hill and take a closer look at the device.
You need to enter the number we saw etched to a wall in the village. Clicking on the buttons under the zeroes will cycle through the numbers. Enter 264351. Use the oilcan on the left side of the contraption. Now use the wheel you found earlier on the left side as well. Click on the wheel. A drawer will open up and reveal a parchment. Read the document.
Make your way back to the bridge and take the path on the right one more time. Go all the way to the rock where you found the wheel. When you are back next to the rock, move forward once. Turn right and continue forward. You will eventually arrive at dock. Turn right at the dock and keep walking. You will eventually see a hut in the distance. Walk up to the hut and enter through the door.
Give the letter in your inventory to the man sitting by the fire. After the cut scene you will get to play a board game called Tablut.
Read the instructions to play the game. You will be playing as the defenders of the king. The game will of course pan out somewhat differently each time you play. The objective is to get the center piece, the king, to one of the corners. As a general strategy, try targeting your opponentĺs pieces on one side of the board. Try to maintain two pieces on two opposite sides of your king. Once you win the game, the episode will be over. Enjoy the short ending movie.
Episode 3: Pirates of Madagascar
Once again, you will be able to watch the progress of the professorĺs journey. Read the letters that appear around the desk. They will give you detailed information about Smytheĺs activities to aid with Samuelĺs expedition. Click on the exit button to start the episode.
The sunny shores of Madagascar are quite a change from Lapland. To the right, there is a path leading into the forest. Walk down this path and you will get to the entrance of a village. Talk to the guard at the gate. Ask him about entering the village and seeing Rakotonarivelo. New topics will become available after you ask about the first two. Samuel will eventually learn about an old man living in the forest. When you ask about navigating the forest, the villager will tell you that berries can be used to get lemurs to help you through the forest.
There is a container of berries next to the right. Click on the container to put some berries in your inventory. There are two paths behind you. One of them will take you back to the shore. The second one leads deeper into the forest. Go down this second path to look for the old man. You will encounter a lemur along the way. Click on the lemur to take a closer look. Put berries from your inventory on the rock in front of the creature.
The lemur will walk into the forest. Go after the creature to enter the forest maze. There will be four directions available around you. Move towards any of them. When you arrive at the second ônodeö, you should hear the lemurĺs cry repeatedly. Listen carefully and find the direction where the lemurĺs cry is loudest. Move forward in this direction. Repeat the process until you are out of the forest. A cut scene will follow as Samuel arrives at the clearing.
There are remains of a fire and a barrel in front of you. Walk up to the clearing. Take the rags on the log across from the remains of the fire. Approach the tree house and you will see some of the steps leading to it are missing.
Walk around the tree house and you will see two crates. A sculpture is on top of one of the crates. There is also a pile of wooden planks behind the crates. Click on the pile to take some slats. Now continue walking around the tree house. You will eventually get to a spot where plants are blocking your passage. There is some firewood in front of cactus-like trees. Put it in your inventory.
Combine the slats and the rags to make two ôtemporary stepsö. Return to the spot where we saw the missing steps leading to the tree house. Use your ingenious temporary steps on the empty slots. Climb the steps you just created. When you reach the first level above ground, you will be standing on your higher makeshift step. Remove the lower step from its spot and use it on the higher empty spot. Continue your ascent to the tree house. Enter through the door.
Take the box of matches from the desk. Take a look at the piece of paper that is also on the desk. It contains a few verses and it is labeled Enina. There are some wooden planks next to the desk. Click on them to take one. You will need it when you leave the tree house. Also take the piece of paper on the ground next to the planks. It is similar to the short poem we found earlier. The second piece is labeled Iray. There is a third piece of paper inside a stone column on the left side of the planks. This one is labeled Efatra. Finally, take a look at the painting on the wall across from the steps. Note the name of the ship in the painting: Abe.
There is a ladder on the back side of the room. Climb up to the next level. Enter through the door. Use your bottle of wine on the man. Take a look at the shelves on the opposite corner of the room from the bed. Take the bowl, some brown berries, and the lantern. Combine the lantern with the box of matches to light it. There is a small makeshift table next to the bed. Take a look at the note on this table. This one is labeled Dimy. There is yet another piece of paper on the shelves across from the bed. The paper is tucked behind the bag on the top shelf closest to the doorway. The poem is labeled Roa.
Go back to the entrance of the tree house. There is a basket of rice on the shelves next to the entrance doorway. Use your bowl on the basket. Leave the tree house and go down the steps. You will be stuck after you go down twice. Use the step in your inventory to complete the staircase. Return to the ground level.
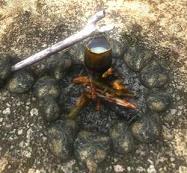 Note the pot that is hanging from a branch over the remains of the fire. Use your bowl of rice on this pot. Turn to your right. Note the trees where we found the firewood earlier in the distance. Take a step towards these trees and you will be next to a water barrel. Use your bowl on the barrel to fill it. Use the bowl of water on the pot of rice. Repeat the process to add one more bowl of water to the pot. Use the firewood underneath the pot. Use your matches to start the fire.
Leave the area for a while. You can take a trip around the tree house. When you come back a few moments later, the rice will be cooked. Use your empty bowl on the pot of rice. Return to the bed inside the tree house where the old man is sleeping. Use the bowl of rice on the man.
When our friend finally regains some energy, talk to him. When the old man asks who you are, tell him you are a scientist. Exhaust all conversation topics. The man will tell you the story of how he came to live on the island. He will also provide us vital information as to why the villagers no longer welcome strangers and reveal the author of the poems we have been finding. Make sure you talk to the old man for a second time after the initial lengthy cut scene and ask about all of the topics.
After talking to the old man, climb up the ladder to the third level of the tree house. There are some more poems nailed to the wall next to the telescope. Click on them to put them among your files. They are labeled Valo, Folo, Fito, and Sivy. You should now have a total of nine poems listed among your files.
There are many books scattered around the room. Two of them are especially important. The first one is a brown book close to the telescope. Click on it to reveal three questions: Where? What? When? This is one of the puzzles. We need to take care of a few things before we can solve the puzzle. The tenth and the last poem, Telo, is on the ground behind the brown book.
The second book is directly underneath the hammock. It is called ôVocabulary of the Malgasyö. This book offers us translations for the names of the poems we have found. The names of the ten poems can be translated as follows:
| - | Iray: One |
| - | Roa: Two |
| - | Telo: Three |
| - | Efatra: Four |
| - | Dimy: Five |
| - | Enina: Six |
| - | Fito: Seven |
| - | Valo: Eight |
| - | Sivy: Nine |
| - | Folo: Ten |
So the poem names were only the numbers one through ten after all. We will use this information to solve a puzzle.
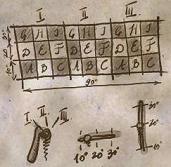
Look through the telescope. You will initially see a fuzzy image of the forest. You can use the three levers attached to the telescope to change what you are viewing. There are certain phrases you can see at some of the locations. The following is a list of all the phrases and the corresponding lever positions. The locations where you will not be able to see a message have been excluded:
|
| I | 10 | 10 | on the Beach |
| II | 10 | 10 | at midnight |
| II | 10 | 20 | at dusk |
| II | 10 | 30 | behind the village |
| II | 20 | 10 | the skull rock |
| II | 20 | 30 | at the baobab trees |
| II | 30 | 20 | bottle tree |
| III | 10 | 30 | after rain |
| III | 20 | 20 | at ebb of tide |
| III | 30 | 10 | the pebble hill |
| III | 30 | 20 | on the forest path |
| III | 30 | 30 | the pond |
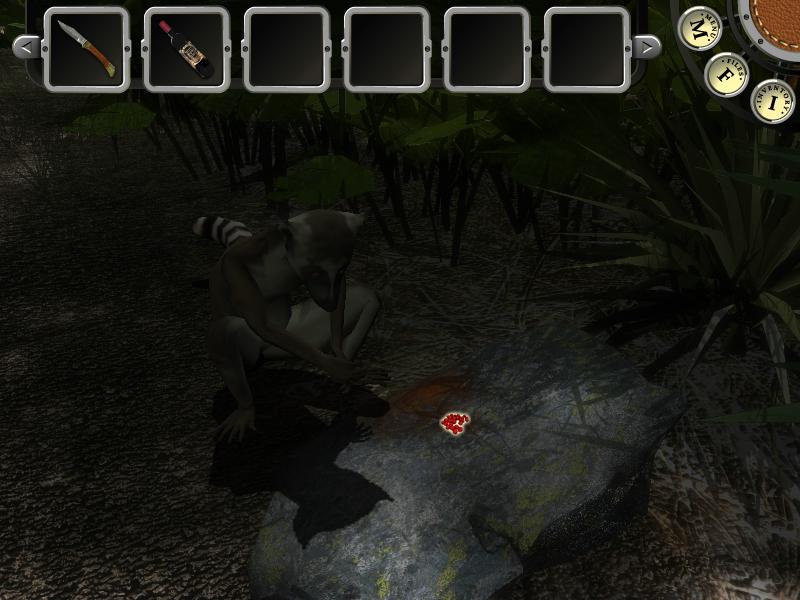
Climb down the tree house to the ground level. Walk around the tree back to the spot where we saw the two crates and the statue. Use your brown berries on the statueĺs mouth. Click on the lever on the back side of the statue. Take the red berries.
Go back to the spot where we first entered the clearing. Give some red berries to the lemur. Follow the lemur into the forest. If you follow the loudest lemur cries again, you will end up at the village. However, this is not what we want to do. We need to find the captainĺs grave so we can recover the treasure. So letĺs try reversing the logic this time around. Go into the forest and move forward once in any direction. You should start hearing the lemur at the next location.
Listen carefully to the cries of the lemur. Go in the direction where the cries are the faintest. When you do this correctly twice, you will completely stop hearing the lemur and Samuel will exclaim ôHave I lost my little friend?ö Move forward two more times and you should arrive at the captainĺs grave site.
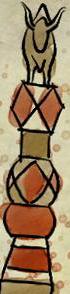
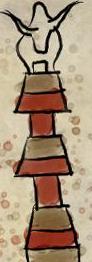
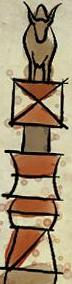
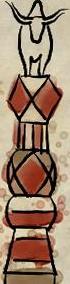
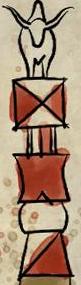
You can remove the grave posts around the captainĺs resting place. The goal is to put them in the correct order. To accomplish this, you will need to use the poems as a point of reference. Note the shapes carved underneath the bull on each sign post. You need to match the drawings on the poems to these shapes. Then you need to put the posts corresponding to the poems in the correct order. Starting with the post on the farthest left, put the posts in numerical order. You can use the following chart to match the numbers to the shapes carved on each post. Note that while there are a total of ten poems, there should be only nine posts for you to arrange. You will only use numbers 1 through 9:
| |
| Iray (1) | 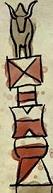 | Efatra (4) | 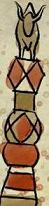 | Fito (7) | 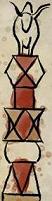 | Folo (10) | 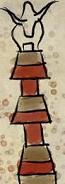 |
| |
| Roa (2) | 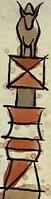 | Dimy (5) | 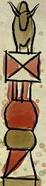 | Valo (8) |  |
| |
| Telo (3) |  | Enina (6) |  | Sivy (9) |  |
Once the posts are in the right order, Samuel will comment about who might have put them in an incorrect order in the first placeů If you thought organizing the grave posts was going to be enough, I am sorry to inform you that you were mistaken. Now that the ten posts are in order, we need to look at the runes engraved underneath them.
In order to decode the message, first walk around the tomb and take a look at the back of the tombstone. You will see some engravings matching the symbols on the posts along with their translation.
Use this information to decipher the message on the posts. The letters on each sign post are:
| 1- UN | 4- HO | 7- TE |
| 2- DE | 5- SE | 8- S |
| 3- RT | 6- DA | 9-WK |
Piecing together the letters we get UNDER THOSE DATES WK. Go back to the tombstone. When you click on the engravings behind it, Samuel will be able to enter the deciphered message. Use the keypad to type in the message and press ôEnterö to submit the answer.
 Go around the tomb. Look at the grave from the entrance of the area. Go to the right side of the grave. From this angle, you will be able to zoom in on the dates engraved on the front side of the tombstone. Use the knife in your inventory on the dates. Samuel will find another page of the mysterious codex and a journal. Read both of the documents.
The last page of the journal has illustrations resembling the levers of the telescope. There is also a chart with some letters. We need to combine the letters from the chart with the messages we saw through the telescope earlier. Using the labels of the chart, you can match the images as follows:
|
| I | 10 | 10 | on the Beach | A |
| II | 10 | 10 | at midnight | A |
| II | 10 | 20 | at dusk | D |
| II | 10 | 30 | behind the village | G |
| II | 20 | 10 | the skull rock | B |
| II | 20 | 30 | at the baobab trees | H |
| II | 30 | 20 | bottle tree | F |
| III | 10 | 30 | after rain | G |
| III | 20 | 20 | at ebb of tide | E |
| III | 30 | 10 | the pebble hill | C |
| III | 30 | 20 | on the forest path | F |
| III | 30 | 30 | the pond | I |
It is time to return to the tree house. Enter the forest area again. When you move into the forest, you will start hearing the lemurĺs cries. Go towards the direction where the sound is faintest.
When you reach the clearing, return to the room with the telescope. Open the brown book on the ground in front of the telescope. We can finally answer those where what when questions by using the messages we discovered using the telescope and the chart we saw on the last page of the answer. The final clue we will use is the ship name ABE we had seen earlier on a painting. The solution is:
| - | There are two messages that have the code letter A. The messages are ôon the beachö, and ôat midnightö. ôOn the beachö describes a location. Type it in as the answer to the where question. Click on the ôEnterö button. |
| - | There is a single message that has the code letter B. The message is ôthe skull rockö. Enter ôthe skull rockö as the answer to the what question. Click on the ôEnterö button. |
| - | There is also a single message that has the code letter E. The message is ôat ebb of tideö. Type this message as the response to the when question. Click on the ôEnterö button. |
As you can probably guess, we need to make our way back to the village. Take some more brown berries from the room where the old man is resting. Take the berries to the sculpture on top of the crate behind the tree house. Use the berries on the sculptureĺs mouth and pull the lever to crush them. Take the red berries to the entrance of the clearing. Give the berries to the lemur. The professor should automatically make his way back to the beach.
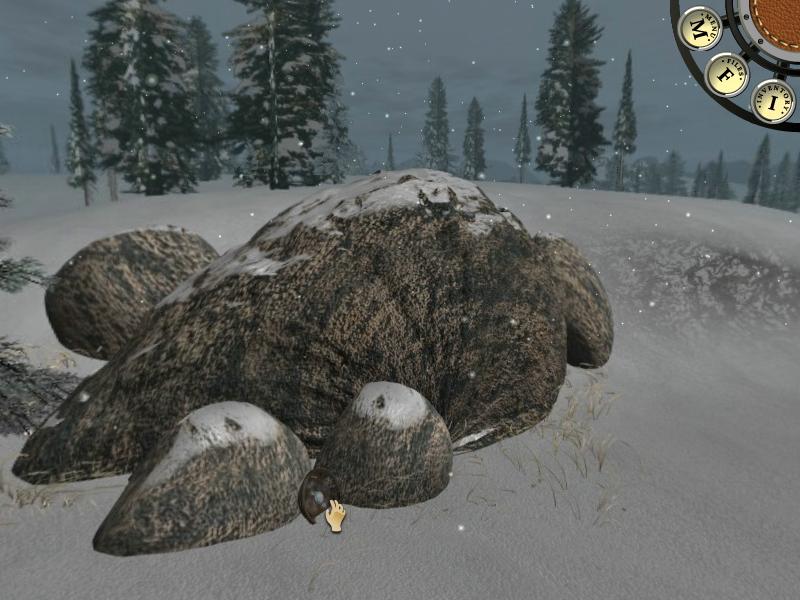
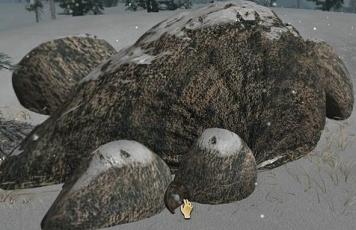
Turn left and move forward once towards the sea. Samuel will look towards the rocks in the distance and see the shape of a skull. Before leaving this spot, take two pieces of seaweed from the ground. Now walk up to the rock you saw in the distance. Walk all the way around the Skull Rock. You should see a cavern several feet ahead of you. Walk into the cavern.
Once inside, click on the bamboo sticks floating in the water. Walk back outside. Take the nine bamboo sticks lying around the palm tree near the cavern. There should be nine of them in total. Go back to the cavern. Use the nine bamboo sticks in your inventory on the two that are already positioned on the ground. Samuel will put all 11 sticks together as a makeshift raft. Use the seaweed to tie the bamboo sticks together. Click on your raft to use it.

Walk into the cavern. If you had not done so already, use matches on your lantern to light it. Walk through the cavern until you get to a treasure chest. Click on the chest to open it. Remove the rocks inside the chest by clicking on them. Finally, click on the board game to put it in your inventory. Continue down the cavern. Your path will be eventually blocked by boulders. Zoom in on the rocks. Try to take the tool. Samuel will be unable to remove it.
Go back to the chest. Click on the chest and Samuel will push it aside. Walk into the newly discovered tunnel. Continue down the long tunnel. You will eventually find yourself at the bottom of a well. Take the ladder to the right. Walk up the rope attached to the bucket. Look up and find the hotspot above you. Use the ladder on this hotspot to climb up the well.
Click on the bricks for a closer look. They have markings on them. Try clicking on the brick on the bottom right. You will not be able to move it with your bare hands. Click away from the bricks and look at the ground. Take the pick axe shaft. Go all the way back to the spot where we saw the rocks blocking our path earlier. Use the pick axe shaft on the pick axe blade stuck to the wall. Samuel will remove the axe head. Combine the shaft and the head.
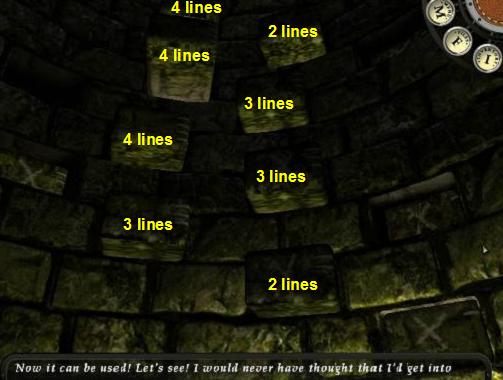
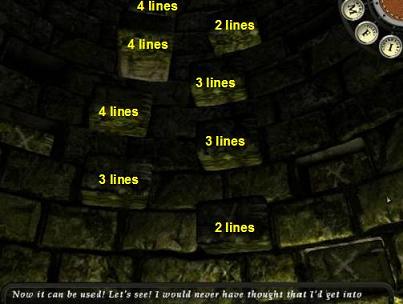
Go back to the marked bricks on the wall of the well. Use your pick axe on the marked brick to the bottom right of the screen. Now that we removed the first brick, make note of the actual symbols on them. A number of bricks should be marked with an X. These are the ones we can remove. However, there are also small lines on the sides of these bricks. There are one to four lines on any given removable brick. Solve the puzzle as follows:
| - | The idea is to reorganize the lined bricks to create steps. Trial and error will show you that certain bricks will slightly stick out of certain spots. Other bricks will fit the spot perfectly, while still others will be too small. The number of lines tells us the size of the brick. Pieces with four lines are the largest. Pieces with a single line are the smallest. |
| - | Note that there are a total of four columns of bricks. You need to organize pieces to create the steps in the two center columns. In general, replace any existing brick in the center column with a brick that contains one more line. Move smaller bricks to the far left and right columns as needed. |
| - | To start solving the puzzle, take the lowest one-lined bricks and put it in the empty spot. |
| - | This should leave an opening in the second row from the bottom. Fill it with the lowest two-lined brick. |
| - | Now move a three-lined brick to the spot where the two-lined brick used to be. |
| - | There is an unmoved two-lined brick on the fourth row from the bottom. Move it to the empty spot. |
| - | Fill the gap with any three-lined brick we havenĺt moved yet. |
| - | Now move any four-lined brick to the empty space. |
| - | Use an unmoved two-lined brick from one of the two center columns to fill the opening. |
| - | There should be one last three-lined brick we havenĺt touched yet. Move it to the empty spot. |
| - | Fill the gap with any four-lined brick from the far left or right columns. |
| - | Move a two-lined brick from the center column to the opening. |
| - | Move the last remaining untouched four-lined brick to the empty spot. |
| - | The last brick to replace has a single line. However, it is too small to even go into the empty spot. Temporarily fill the empty spot with a two-lined brick from the far left or right column. |
| - | Now move the one-lined brick to the empty position. |
| - | Finally, use any two-lined brick from the far left or right columns to fill the empty spot. |
Samuel will climb up the steps you just created. After the cut scene, talk to the village chief. When you exhaust all conversation topics, show him the board game. Talk to the chief again about all of the topics.
You will eventually get to play Fanorona with the chief. Read the rules to learn the game. You will be playing as the white side. The objective is to capture all of your opponents pieces or keep him from being able to move any of his pieces. You capture pieces by either moving your pieces directly towards or away from your opponents. You will be allowed to make multiple moves in a turn to capture several pieces. Remember that you can move and capture pieces diagonally as well as horizontally and vertically. In general, try to eliminate multiple pieces of your opponent in each turn. Assess the board before moving to determine which positions will allow you to continue moving and capture several pieces at once. When you win the game, the episode will be over.
Enjoy the ending movie and the surprise letter from Smythe. It is time to wait for episode 4.
|