|
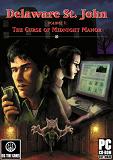
Delaware St. John Volume 1:
The Curse of Midnight Manor
|
Walkthrough by Wendy Nellius
|
There is a tutorial located on the main menu screen. It will walk you through general navigation and also show you how to use VIC. You will use VIC to contact Kelly, take photos and record sounds.
Story 1
Lobby --You are inside Midnight manor. You have immediate contact with Kelly through VIC. You need to get the lights on. Kelly informs you of a emergency generator in the basement. Turn left once and back again. A ghost of a little girl will appear and sing ōItÆs raining, ItÆs pouring, the old man is snoringģ. Go straight 3 times and open the basement door.
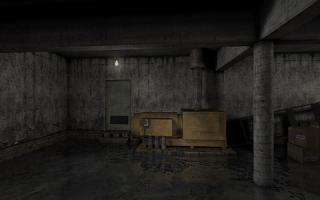
Basement -- Turn left and see lights flash. Go straight 2 times and turn left. See a chair move by itself. Go straight 2 times and open door. Try to enter the flooded room and Delaware will refuse. He needs protection. Exit and turn left. Examine the dark area to the left of the pole. Take the fishing boots. Return to the flooded room.
Flooded Room -- Go forward and examine the electrical boxes. Open elevator box and examine note on the door. Exit and turn left 2 times. Examine the generators.
The generator instructions on the note were: Eight marbels, two candels, three flowers, six beansģ line up backwards ¢obviously, spelling was not his best asset. Press the ōOnö button. Press 6,3,2,8. Your flashlight will go out and the generator will now begin operating. Exit the flooded room.
Basement -- Turn left twice and go forward once. Examine the box in the corner. ItÆs a keepsake box, but it is locked. Turn right and head for the stairs.
Lobby -- Watch the scene between the group of teenage ghosts. Go across to the other side of the room and enter the double doors.
Lounge -- Examine the fliers and bottles on the floor. Head towards the bar and see 2 teenage ghosts. One seems to be choking. Examine the bar and take the earring. Turn toward the stairs. Take the ladder. Go back to the lobby. Kelly will contact you. Turn right twice. Go straight to the broken stairway. Use the ladder on the broken stairway. Turn left and see scene between the teenage ghosts. It seems another one has died. Go down the hallway and enter room 111.
Room 111 -- Examine the shadow on the bed. Examine the earring. Use your earring from inventory with the earring on the bed. See the shadow disappear and hear thank you. Examine the book on the couch. ItÆs the journal of Heather Malcolm. Read the journal and exit the room. Kelly will contact you. Finish the conversation and head to the basement again.
Basement --- Head towards the elevator and see 3 ghosts. Go forward and turn right. See them at the broken door. Go to the broken door and Kelly will interrupt and scare you. Hover your mouse over the door to find the fist icon. Click it to get Delaware to break down the door. Enter the room and turn completely around to face the door you just broke down. Examine the shadows. See a vision of a plant. Go back to the Lobby.
Lobby --- take either staircase upstairs and examine the plant in the middle of the landing. Take the key to room 104. Go back to room 104. A ghost will appear and tell you that ōitö is coming for you ¢ run to room 104. Use the key on the door.
Room 104 --- Conversation with Kelly. Examine the room. Open the closet door. Examine shadow. Hear a ghost talking. Pick up the page of HeatherÆs journal.
Read the journal and exit the room.
Hallways --- The hallway seemingly has no end. Go forward twice and see a ghost on the wall. Examine the ghost. She will write directions on the wall.
The directions will be with arrows telling you which direction to go. Each direction must be completed at the 4 way hallway intersection. Listed below is how that would translate exactly from where you start step by step. It will always take 2 straight steps to get to the first hallway intersection. It always takes 3 straight steps to get from one intersection to the next.
→ → ↑ Straight, Straight, Right, Straight, Straight, Straight, Right, Straight, Straight, Straight, Straight, Straight, Straight. See girl enter door on right. Follow her through door.
↑ ← ← → ↑ Straight, Straight, Straight, Straight, Straight, Left, Straight, Straight, Straight, Left, Straight, Straight, Straight, Right, Straight, Straight, Straight, Straight, Straight, Straight. See girl enter door on left. Follow her through door.
← → ↑ ↑ → → ← ↑ Straight, Straight, Left, Straight, Straight, Straight, Right, Straight, Straight, Straight, Straight, Straight, Straight, Straight, Straight, Straight Right, Straight, Straight, Straight, Right, Straight, Straight, Straight, Left, Straight, Straight, Straight, Straight, Straight, Straight. See girl enter door on left. Follow her through door. You are now back on the staircase. Go downstairs and enter the lobby.
Lobby -- See the ghost of Heather on the couch. Listen to the conversation. Take the journal page from the couch. Read the journal page and then go to the lounge.
Lounge -- See the chair fix itself. Take the journal page from under the chair. Try to take the doll from under the chair. Delaware wants to check with Kelly first. Take a photo of the doll. Talk to Kelly. Pick up the doll. Move forward once. As soon as your cursor is available, pick up the doll. As each ghost appears, click your doll on the ghost to get rid of them. You will have to be quick. Do not allow them to get too close to you or Delaware will pass out and you will have to start all over. You will automatically move up the staircase. At the top of the staircase, examine the shadow on the floor. This is Heather. Use the journal on the shadow.
End of Story 1
Story 2
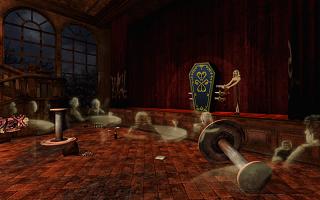
Lounge -- You are in front of the stage watching a recreation of a magic act. Go forward an examine the coffin with the knifes through it. The coffin opens and the magician is dead. You hear a voice asking ōWho did this to me?
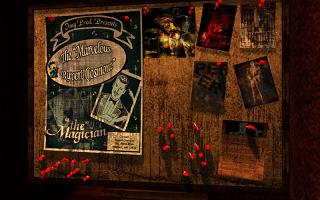
Turn right and go up the stairs on the right side of the stage. Examine the magicianÆs poster. Take a picture of the poster. Kelly canÆt see the poster. Examine the poster again and you will find a newspaper article. Examine the article. Take a photo for Kelly. Listen to conversation with Kelly. Exit the stage area and go to the lobby.
Lobby -- You need to get to room 204, but the elevator is broken. Go upstairs to the first floor. Try to operate the elevator. Click on Connect to talk to Kelly. Go to the basement
Basement -- Meet Katie. Listen to the conversation. Head towards the elevator. Examine the button to the right of the elevator. Read the note on the inside panel.
Ben thinks I hate him
1 4 3 1 2
Use the numbers corresponding to each word and apply to the next sentence.
I = 3, hate =1, him = 2
I hate him, I hate him = 31, 23, 12 Perhaps these are locations on the keypad.
3 1 2 3 1 2
3 across, 1 down = 3
2 across, 3 down = 8
1 across, 2 down = 4
Enter 384 on the keypad. The elevator will now work from the 2nd floor up.
1st Floor -- Go up to the first floor and use the elevator to get to the 2nd floor.
2nd Floor -- Go to room 204. Hear crying. Turn around and go back towards the elevator. See Katie on the couch. A cat tore one leg and one arm from her bunny rabbit. She wants you to find it. Have a vision of the bunny leg in the basement. Go to the basement.
Basement -- Left, forward, Forward, Left, forward, Left. Examine the boxes. Take the bunny leg. Go back to the couch on the 2nd floor.
2nd Floor -- Use the leg on the bunny. See a vision of the bunny arm location.
3rd Floor -- Head towards room 305. Take the bunny leg from the corner ledge next to room 305. Head back to the elevator. Examine the wall across from room 301. Go to the 2nd floor.
2nd Floor --- Go to the couch. Use the bunny arm on the bunny. Katie will appear and tell you to try room 204 again.
Room 204 -- Enter and see an office appear. Examine the desk. Examine the paper on the desk. See the name ōRoxanne Blackö. Turn towards the bed and hear a voice say ōIÆll never forgive himö. Exit the room.
2nd Floor -- A ghost appears telling you to get to the lounge. Chase scene occurs. Get to the lounge. Hear from Kelly. Learn about the destroyer, hunter (which just chased you) and the protector. Listen to the whole conversation. Exit and go to the lobby.
Lobby -- Katie appears and you have a vision of room 300 ¢ this is the wall where a door was missing. Go to room 300. Katie will appear and change to a skeleton. The door will appear for you to enter.
Room 300 -- Turn right and watch scene of Katie and her mother being kidnapped. Examine the small table and take the key. Kelly will interrupt with some information. Exit the room and head to the elevator. Press the elevator button. Another scene will occur. Go to the first floor and take the stairs to the basement.
Basement -- Turn left, go straight once and turn right. Use the key on the large trunk.
Examine the bags in the trunk. You have just found Katie and her mother. Go to the 3rd floor.
3rd Floor -- Go to the door to the stairway. Enter and see a shadow at the bottom of the steps. Hear a voice that you can not understand. Record the voice. Kelly will tell you that the voice is saying: Closet in room 306.
Room 306 -- The door is locked. Use your fist to break down the door. Turn back and face the door. Examine the closet on the right. A question will appear on the door. WhatÆs the magic word? What was it that the maid was carrying? Towels
Click on Towels and the door will open. Examine the open doorway and take the key to the keepsake box. The box is in the basement so head there.
Basement -- Turn left, forward 2 times, and right once. Examine the keepsake box. Use the key on the box. Try to take the picture. Delaware will comment that Kelly would love to see this picture. Take a photo with Vic. Talk to Kelly. Take the picture for your inventory. Go to the 3rd floor again.
3rd Floor -- Go to the stairwell. Use the photo from the keepsake box on the shadow. The maid will thank you and disappear. Exit and go to room 204 again.
Room 204 -- See another ghost appearance. Examine the radiator. Take the piece of paper. It is FayeÆs confession for killing Rupert. Exit room 204 and head to the lounge.
See the hunter down the hall. Kelly contacts you and tells you more about the hunter. You need to get to a protected room, but which one? Move forward and see a ghost and room 305 on the wall. You need to get to room 305 to trap the hunter. Get on the elevator. Go to the 3rd Floor
3rd Floor -- Turn left and go all the way to the end of the hall. Room 305 is on the right.
The door is locked. Use your fist to break the door down and enter. The hunter will confront you before he is destroyed. Exit the room and head back down to the lounge.
Lounge -- Examine the stage. See Rupert. Use the confession on Rupert. Rupert thanks you and is released. Have a final conversation with Kelly.
|
|
|