| Home | - | Reviews | - | Previews | - | Walkthroughs | - | Magazine | - | About Us | - | Forum | - | Buy Games |
|
Law & Order (2) : Double or Nothing Walkthrough Len Green 30th September 2003 lengreen@hotmail.com
PREFACE :-
{1} This walkthrough describes the absolute MINIMUM actions only which you must take in order to succeed … 1 or 2 non-essentials may have slipped in by mistake! However, please don’t use this walkthrough unless you absolutely have to. Many items, actions, and even some ‘secondary’ locations which are not absolutely essential have been omitted. A lot of these are interesting and provide the background story to the game. “Warning” :- The main purpose of this game is to examine clues, interview witnesses & suspects, etc. Some of these actions are essential, but many are fruitless or even red herrings … as in real life investigations. If you simply take this walkthrough in your hand and follow exactly what to do & not to do, you can probably finish the game in roughly 3 hours only. This would completely defeat its whole purpose! {2} The object of the first part of L&O_2 is for you to assist the detective (Lennie Briscoe) to arrest the correct suspect. Until you succeed in this you cannot advance to the second part of the game … the trial. In the second part of L&O_2, you help the Assistant District Attorney (A.D.A. … Serena Southerlyn) to obtain a “Guilty” verdict at the subsequent trial of your suspect. This part is more complex since it consists of several watertight consecutive sections which will be described fully at the beginning of part-2. {3} At some stage(s) in the game you may need to review exactly what you have done (&/or not done). EVERY action which has been performed is listed in your log book … at the right side of your navigation bar. {4} There is space for up to 84 items in your case file (‘inventory’)… which is actually a lot. However it accommodates [A] objects and photographs of various characters, but also [B] authorizations of the results of various tests, researches, and surveillances. If and when your case file gets filled completely, you can dump items into the trash can to make room if you need to store more. But be very careful how you do this. You CANNOT reclaim any [A] item once you have trashed it … and you might need it later for essential evidence, e.g. for obtaining warrants, etc. (You can replace [B] items if required). However, there will be many objects in your case file which you have picked up and sent for lab testing and research, and have produced ‘no results’. If you need more room, you can trash any of these without ‘danger’! {5} In several cases somebody who is being interviewed by the police refuses to cooperate. This situation is accompanied by a partial case file appearing on the right hand third of the screen. When you select (click on) the appropriate icon in this partial case file, the person interviewed will come clean! A similar method is used to open a locked door, or drawer, etc. {6} At the beginning of both halves of the game you are prompted to select either one or a maximum of two out of four ‘skills’ (‘strengths’) … the game will not permit you to select more than two! Once you have made your choice at the very beginning of each half, you will be UNABLE to change your selection without returning again to the beginnings. This walkthrough has made only one of the many possible selections (not necessarily the ‘best’!) which enable you to finish both halves of the game satisfactorily, and with scores of 100%. The choices suggested were as follows, and for the reasons given :- {a} Choose the “Evidence Collection” skill throughout the whole game to provide yourself with a magnifying glass which highlights all & only the items you can interact with … if you do not choose it, you will have to perform very frustrating pixel hunts over the whole areas of some screens. {b} Choose the “Teamwork” skill throughout the whole game in order to obtain some helpful built in hints. In part-1 of the game, if ever you are totally stuck you can generally obtain a vital hint from Van Buren on the chalkboard in the 27th Precinct. An equivalent situation applies in part-2 to faxes sent by the District Attorney, Douglas Wade, and received in the Assistant District Attorney’s office. The hints, and there are many, are NOT included in this walkthrough since they are built into the game itself {7} Whenever you see the cell-phone icon blinking you should click on it. You will be alerted to completed info from the various quarters where you have requested processing. (Occasionally you will also get hints on your cell-phone, as well as odd superfluous calls from ‘outsiders’!). As a result of these early prompt calls, you may find some belated instructions in the walkthrough have been performed already … e.g. to go to the Crime Lab or Records & Research etc., after you have already obtained the info available at these places. If you happen to get results ‘too early’, that’s perfectly OK. The only hold ups which are likely to occur are if you’re ‘too late’! No mention of any of these cell-phone calls is made in the walkthrough. {8} It’s more than likely that there may be times when the “technicians” are not yet ready to supply your requests, and you can’t continue until they manage to do so. In any such case(s) when the reports are still pending, simply mark time by visiting and talking to anybody. You may have to ‘talk’ to more than one person until the reports are ready. You’ll generally get a cell-phone call when the particular reports you are waiting for are available! {9} In order to see the whole map, don’t forget to scroll it down or up. All you need to do is to move your cursor to the bottom or top of the map. This will produce down or up black arrows, and scroll appropriately and automatically. (You can also use the slider bar and down/up arrows to the right of the map itself.) {10} You frequently have to add a witness to your case file. However, you can’t actually add the graphic of the witness. Instead, you add the ‘witness summary’, but obtain a ‘photo icon’ of the witness in your case file. {11} There are (only) two ‘standard’ puzzles in the game. If you happen to get stuck, their detailed and graduated solutions are at the end of this walkthrough. They are in text form for those who like to print walkthroughs without wasting much ink. For those who so wish, additional graphic solutions are included at the VERY end (and can be deleted by those who don’t want them!). {12} WARRANTS :- If you fail to obtain either a search warrant or an arrest warrant, enter your case file again and look beneath the box marked “Supporting Evidence & Witnesses”. The number of your correct items is always listed there. By adding &/or subtracting different icons , you can fairly easily determine which are necessary and which are not. In this walkthrough an occasional item may be listed which is not essential … but don’t take that for granted. If you enter ALL those listed you are certain to get your warrant! NOTE :- If you want to use more than 6 items, you can easily do so by utilizing the slider on the right side of the box marked “Supporting Evidence & Witnesses”. {13} If/when you repeat any part of the game :- Note that when interviewing witnesses or suspects, the same choices of questions will be displayed but in different random ‘orders’ each time. {14} You may sometimes think that you have not achieved the best result(s) when interviewing somebody. In that case you can use the eraser which appears on the navigation bar. It deletes that interview and allows you to make (hopefully) better choices! N.B. The selection and order of displayed questions is as described in {13}. {15} In general SAVE FREQUENTLY. It is very easy to make a wrong or redundant move! You have 15 save-slots. If you like you can save batches of up to 15 ‘permanently’ (zipping if you like) before overwriting.
PART-1 … DETECTIVE
Select “Evidence Collection” and “Teamwork” ‘skills’, and then “Done”. Then watch the cut scenes displaying the discovery of the body at the crime scene. Crime Scene. [001] Click on the car ‘s passenger window and get a close-up. [002] Add the passenger window to your case file. [003] Click on the passenger car door and enter the car. [004] View the close-up of the keys in ignition. [005] Add the car keys to your case file. [006] Select (click on) the glove compartment (inside the car) and get a close-up. [007] Select (click on) the car keys icon … See the Preface {5} ). [008] Click on the close-up of the wallet and see the ID of the vic(tim), William Ramos. [009] Exit the car through the passenger door. [010] Question Al Bartkowski (Doorman) … outside the hotel entrance :- (A) “When did you discover the body?” (B) “If you’re the doorman here, why were you coming from inside the building? “ (C) “Did you hear a gunshot while you were upstairs?” (D) “Did you notice anybody unusual outside the building?” (E) “Have you ever seen the victim around here before?” (F) “Who lives in apartment 4-B?” (G) “Have you seen Linda Keller today?” Select the case file. [011] Submit the car window for lab tests. Choose the map and go to Linda Keller. [012] Question Linda Keller :- (A) “Do you know a William Ramos?”. (B) “Were you expecting Ramos to come by your apartment?”. (C) “What did you do for Mr. Ramos?”. (D) “How long have you worked for Dr. Ramos?”. (E) “How much did Ramos owe you?” (F) “Did you ever go to Ramos’ home or office?” (G) “Were you waiting for Ramos here all evening?” (H) “How did the doorman miss you entering the building?” [013] Add Linda Keller to your case file ( See the Preface {10} ). Choose the map and go to the Victim’s residence. [014] Question Mrs. Celia Ramos :- (A) “When was the last time you spoke to your husband?” (B) “Where did your husband work?” (C) “Did your husband work late often?” (D) “Who would know more about his stress at work?” (E) “Were you aware your husband was in Midtown carrying five thousand dollars in cash?” (F) “If you don’t mind my asking, how were things between you and your husband?” [015] Add Celia Ramos to your case file ( See the Preface {10} ). Choose the map and go to Diana Quinn ( See the Preface {9} ). [016] Question Diana Quinn :- (A) “Did you work closely with Ramos?” (B) “Was your research with Dr. Ramos a part of some kind of secret project?” (C) “Is it possible somebody else might have resented his idiosyncrasies?” (D) “Why was Dr. Ramos in Midtown yesterday with five thousand dollars?” (E) “Who’s Donald Kent?” Choose the map and go to Donald Kent ( See the Preface {10} ). [017] Question Donald Kent :- (A) “When was the last time you saw Dr. Ramos?” (B) “How was progress at Avery Labs?” (C) “Can you tell us anything about the doctor’s personal life?” (D) “Is it possible Ramos’ late night last night could have been about the affair he was having?” (E) “Which hotel was he staying at?” [018] Add Donald Kent to your case file. Choose the map and go to the M.E.’s office (Medical Examiner … Kathleen McDonnell, M.D.) [019] View the autopsy report. [020] Add the autopsy report to your case file. [021] View the bullet fragments. [022] Add the bullet fragments to your case file. [023] View the hotel key card (in the dark colored tray), and get a close-up. [024] Add the hotel key card to your case file. Choose the map and go to the J. Robbie Hotel ( See the Preface {9} ). [025] See the Preface {5} … Select the key card icon. This will allow you to enter the locked room # 218. [026] View CAREFULLY the close-up of the invitation on the circular table, to the right of the ice bucket. [027] View the close-up of the drinking glass on the bedside table. [028] Add the drinking glass to your case file. [029] View the safe in the closet. [030] Press in the appropriate code # followed by <Enter>. [031] If you’re stumped, return to {026}. [032] If you really can’t do it, the code # is 2439. [033] View the check. [034] Add the check to your case file. Select the case file. [035] Submit the check for lab tests. [036] Submit the glass for lab tests. Choose the map and go to Philip Wright. [037] Question Philip Wright :- (A) “When was the last time you talked to Dr. Ramos?” (B) “Did Dr. Ramos ever talk about pressures at work?” (C) “Why was Ramos keeping his project a secret?” (D) “Did Ramos give you any details about this breakthrough project?” (E) “Why was Ramos going behind Kent’s back to seek investors?” (F) “Was Ramos involved with anyone besides his wife?” [038] Add Philip Wright to your case file ( See the Preface {10} ). Choose the map and go to Martin Tanner. [039] Question Martin Tanner :- (A) “What was your relationship with the victim” (B) “How did you choose Ramos as an investment?” (C) “Isn’t $20,000 a lot of money to dabble with?” (D) “Was Dr. Ramos soliciting investments from others?” [040] Add Martin Tanner to your case file. Select the case file. [041] Submit Martin Tanner for research (a background check). Choose the map and go to the Crime Lab (Paul Kim). [042] View the results of the lab tests on the drinking glass. [043] Add the lab results on the drinking glass to your case file. [044] View the results of the lab tests on the check. [045] Add the lab results on the check to your case file. [046] View the results of the lab tests on the car window. [047] Add the lab results on the car window to your case file. Choose the map and go to Diana Quinn. [048] Question Diana Quinn :- (A) “Were you in Dr. Ramos’ hotel room the night he was murdered?” [049] See the Preface {5} … Select the drinking glass lab test result icon. [050] Continue questioning Diana Quinn :- (B) “How long has the affair been going on?” (C) “Did Dr. Ramos know his wife suspected him of cheating?” (D) “Did you make demands on Dr. Ramos?” (E) “Did you have any interest in cashing in on Dr. Ramos’ secret project?” [051] Add Diana Quinn to your case file. Choose the map and go to the Victim’s residence. [052] Question Mrs. Ramos :- (A) “Why did you lie to us about your husband’s affair?” (B) “Were you angry enough to divorce your husband?” (C) “With the insurance payout, isn’t your husband worth more to you now that he’s dead?” Select the case file. [053] Obtain a search warrant for Avery Labs (See the Preface {12}). (A) Click on the (yellow) search warrant tab … on the right. (B) Drag your ‘suspect’ into the “Search Warrant Request” window. (C) Drag into the box marked “Supporting Evidence & Witnesses”, whatever icons you think are necessary. (D) Click on “Submit”. [054] (B) should be Donald Kent. [055] (C) should be {i} Philip Wright; {ii} Celia Ramos; {iii} Martin Tanner; {iv} Linda Keller. Search the Avery Labs. [056] View the close-up of the paper shredder. [057] Solve the ‘Shredded-note (paper shredder) puzzle’. {Not a difficult one!} … [ If you have difficulties :- See the Preface {11}, and the solution(s) at the end of this walkthrough ]. “Drag the strips of paper to reassemble the document. Double-click a piece to flip it”. As a result of solving this ‘paper shredder puzzle’ you obtain an anonymous (warning) note. [058] Add the anonymous note to your case file. [059] View the laptop computer a little to the left of the paper shredder on Ramos’ desk. [060] View the laptop screen to get a close-up. [061] Add the laptop to your case file. Select the case file. [062] Submit the laptop for research (a background check). [063] Submit the anonymous note for lab tests. Choose the map and go to Records & Research (At the 27th Precinct … Scott Donovan). [064] View the results of the research on Martin Tanner. [065] Add the results of the research on Martin Tanner to your case file. [066] You may(??) have to mark time here for a very short period … if so, see the Preface {8}. Choose the map and go to the Crime Lab. [067] View the results of the lab tests on the anonymous note. [068] Add the lab results on the anonymous note to your case file. Choose the map and go to Martin Tanner. [069] Question Mrs. Cindy Tanner :- [070] See the Preface {5} … Select the lab results on the anonymous note. (A) “What did Ramos have that you wanted back?” (B) “Why the forceful tone of the note?” (C) “How could you expect to get any money back once you’d invested it?” (D) “Why was there such a rush to get your money back?” (E) “Where was your husband the night Dr. Ramos was killed?” Choose the map and go to Shirley Cho ( See the Preface {9} ). [071] Question Shirley Cho :- (A) “Did you work as an accountant for Avery Labs?” (B) “Why did you get fired exactly?” (C) “Do you know anything about an investment being refunded to a Martin and Cindy Tanner?” (D) “Do you know anything about Linda Keller?” (E) “Was there any documentation on what Keller was doing for Dr. Ramos?” [072] At the end of this discussion, Shirley Cho hands over the key to Ramos’ office desk at the Avery Labs. [073] Add this key to your case file. [074] Add Shirley Cho to your case file ( See the Preface {10} ).
Choose the map and go to the Avery Labs. [075] Look at the locked drawer in Ramos’ desk. [076] See the preface {5} … select the key to open the drawer (i.e. click on the key and the drawer opens). [077] View the medical waiver. [078] Add the medical waiver to your case file. Choose the map and go to Linda Keller. [079] See the Preface {5} … Select the medical waiver icon. [080] Question Linda Keller :- (A) “What can you tell us about the research project Ramos was working on?” (B) “Why not tell us about this before?” (C) “How much were you getting paid?” (D) “When was the experiment supposed to start?” (E) “If you haven’t been paid, how are you making ends meet?” Select the case file. [081] Submit Linda Keller for surveillance. Choose the map and go to Records & Research (At the 27th Precinct) . [082] View the results of the research on the laptop. [083] Solve the ‘Encryption (laptop encoded email) puzzle’. … [ If you have difficulties :- See the Preface {11}, and the solution(s) at the end of this walkthrough ]. “Decipher the encrypted email … Type letters in the squares to crack the code of this encrypted email. The letter you type will appear in every square below every instance of that letter in the message”. As a result of solving the ‘encryption puzzle’ you obtain the full email on the laptop. [084] Add the anonymous note (i.e. the laptop with the above research results) to your case file. Choose the map and go to Donald Kent. [085] See the Preface {5} … Select the laptop with its research report. [086] Question Donald Kent :- (A) “How long has Avery Labs been working on cloning human beings?” (B) “Did you know Ramos was taking this project to outside investors?” (C) “How close was the cloning project to completion?” (D) “Is it possible that Dr. Ramos completed successful cloning tests and you didn’t need him any more?” (E) “Was Dr. Ramos ready to start human testing with the cloning project?” Choose the map and go to surveillance (At the 27th Precinct … Mark Rawlins). [087] View the surveillance report on Linda Keller. [088] Add the surveillance report on Linda Keller to your case file. [089] Obtain a search warrant for Linda Keller’s residence (See the Preface {12}). (A) Click on the (yellow) search warrant tab … on the right. (B) Drag your ‘suspect’ into the “Search Warrant Request” window. (C) Drag into the box marked “Supporting Evidence & Witnesses”, whatever icons you think are necessary. (D) Click on “Submit”. [090] (B) should be Linda Keller. [091] (C) should be {i) Medical Waiver; {ii} Surveillance report on Linda Keller; {iii} Shirley Cho. Search Linda Keller’s residence. [092] View the CD in the living room below a table lamp (lit). [093] Add the CD to your case file. [094] View the pamphlet on a closed carton to the right of the table lamp. [095] Add the pamphlet to your case file. Select the case file. [096] Submit the CD for lab test. [097] Submit the pamphlet for Research. [098] You may possibly(??) have to mark time for short periods around here and afterwards … if so, see the Preface {8}. Choose the map and go to the Crime Lab. [099] View the results of the lab tests on the CD. Select the case file. [100] Submit (“new”) Brenda Lyons (aka Linda Keller) for research. Choose the map and go to Records & Research (At the 27th Precinct). [101] View the results of the research on the pamphlet. [102] View the results of the research on Brenda Lyons … ( You may have to mark time before you can receive these results … if so, see the Preface {8} ). [103] Add the research results on Brenda Lyons to your case file. … Choose the map and go to Linda Keller (Brenda Lyons). [104] Question Brenda Lyons :- (A) “Why are you in such a hurry to leave town?” [105] See the Preface {5} … Select the Brenda Lyons research icon. [106] Continue questioning Brenda Lyons. (B) “Did you target Dr. Ramos’ cloning project for some kind of sabotage?” (C) “Would you say the mission was successful?” (D) “How do you expect us to believe you had nothing to do with Dr. Ramos’ murder?” (E) “Why would Martin Tanner call you and threaten you?” [107] Receive Brenda Lyons’ answering machine tape and add it to your case file. Choose the map and go to Martin Tanner. [108] See the Preface {5} … Select the answering machine tape. [109] Question Martin Tanner :- (A) “How do you know Linda Keller?” (B) “Why did you threaten Keller?” (C) “Did you threaten Dr. Ramos to get him to return your investment money?” (D) “Were you in Linda Keller’s neighborhood the night of the murder?” (E) “What time did you get to work on the night of the murder?” Choose the map and go to Donny Morales. [110] Question Donny Morales :- (A) “What does Martin Tanner do for you?” (B) “During the night of the murder, what time did Tanner arrive for work?” (C) “Did Tanner seem upset or distracted?” (D) “Notice anything else unusual that night?” (E) “Does Tanner have a work station?” [111] Add Donny Morales to your case file. He opens Martin Tanner’s Locker in the ‘Airways Delivery’ break room. [112] In the open locker view Tanner’s work boots. [113] Add the work boots to your case file. [114] In the open locker view the photograph stuck to the inside of the door. [115] Add the photograph to your case file. Select the case file. [116] Submit the work boots for lab test. [117] Submit the photograph for lab test. Choose the map and go to the Crime Lab. [118] View the results of the lab tests on the boots … ( You will probably have to mark time before you can receive these and the following results … if so, see the Preface {8} ). [119] Add the lab results on the boots to your case file. [120] View the results of the lab tests on the photograph. [121] Add the lab results on the photograph to your case file. [122] Obtain a search warrant for Martin Tanner’s residence (See the Preface {12}). (A) Click on the (yellow) search warrant tab … on the right. (B) Drag your ‘suspect’ into the “Search Warrant Request” window. (C) Drag into the box marked “Supporting Evidence & Witnesses”, whatever icons you think are necessary. (D) Click on “Submit”. [123] (B) should be Martin Tanner. [124] (C) should be {i) The anonymous note to Ramos; {ii} The lab test on the anonymous note to Ramos; {iii} The lab test on the Tanner check; {iv} The work boots from Tanner’s locker; {v} The lab test on the work boots from Tanner’s locker. Search Tanner’s residence. [125] View the financial report for American Motors on the table in the kitchen. [126] Add the financial report to your case file. [127] Obtain an arrest warrant for Martin Tanner. (See the Preface {12}). (A) Click on the (yellow) arrest warrant tab … on the right. (C) Drag into the box marked “Supporting Evidence & Witnesses”, whatever icons you think are necessary. NOTE :- If you want to use more than 6 items, you can easily do so by utilizing the slider on the right side of the panel! (D) Click on “Submit?”. [129] (C) should be {i) The anonymous note to Ramos; {ii} The lab test on the anonymous note to Ramos; {iii} The lab test on the Tanner check; {iv} The work boots from Tanner’s locker; {v} The lab test on the work boots from Tanner’s locker; {vi} The lab test on the victim’s car window; {vii} The lab test on the photo from Tanner’s locker. [130] If you’ve submitted suitable items, the District Attorney (Douglas Wade) will agree, somewhat reluctantly, to send Tanner for trial. Watch the cut-scenes which will lead you to part-2 (Lawyer) of the game. If not, you will have to repeat with an improved selection of items. ( See the Preface {12} ).
If you’ve done EVERYTHING ‘correctly’ in part-1, you will obtain :- “Detective Score: ………..…. 100%”. But don’t worry if you got less than this! So long as you’ve succeeded in progressing to part-2 (the trial), the “Detective Score” will have no influence (one way or the other) upon your finishing the game successfully.
PART-2 … LAWYER
FOREWORD :-
The object of the second part of L&O is for you to help the Prosecution’s Assistant District Attorney (A.D.A. … Serena Southerlyn) to obtain a trial verdict of “Guilty”. It is actually divided into 7 watertight sections. They are in a fixed order … if/when you succeed in one section, you can proceed to the next. …….. So keep Saving; frequently! N.B. Remember to “Object” VERY QUICKLY whenever the Defense is out of line!
PART-2A :- The Prosecution investigates before the actual trial itself begins. PART-2B :- The trial begins:- The Prosecution selects its witnesses & items of evidence. The A.D.A. questions all its witnesses and presents its evidence. Defense Attorney, Miles Duncan, cross examines some of the Prosecution’s witnesses. Then the A.D.A. rests its case. If you have not presented your case well enough, it will be summarily dismissed … FAILURE. If however you have presented your case satisfactorily, you’ll have further time for investigation … SUCCESS. PART-2C :- The Prosecution carries out further investigation before the Defense presents its case. PART-2D :- The trial continues:- The Defense questions all its witnesses and then rests its case. PART-2E :- The Prosecution carries out a final investigation before presenting its Rebuttal Subpoena. PART-2F :- The trial continues:- The Prosecution again selects its witnesses & items of evidence. The A.D.A. presents its Rebuttal Subpoena. Then the Prosecution rests its final case. PART-2G :- Cut-scenes :- The Prosecution and the Defense make their closing summaries. The jury retires and then delivers its judgment of “Not Guilty” (BAD) or “Guilty” (YOU’VE “WON”!) … you will also be given your %age score.
* ~ * ~ * ~ * ~ * ~ * ~ * ~ * ~ * ~ * ~ * ~ * ~ * ~ *
Select “Evidence Collection” and “Teamwork” ‘skills’, and then “Done”. Then watch the cut scenes displaying the trial preliminaries. You finish up (interactive again) in the …….. Assistant District Attorney’s office. [131] View the indictment document. [132] View the Instruction sheet from Douglas Wade to A.D.A. [133] View the Law Computer … particularly the sections on “Questioning the Witnesses in Court” & “Hearsay Rule”.
Part-2A :- PROSECUTION INVESTIGATION~1. Select the case file. [134] Submit Martin Tanner for psychological evaluation. [135] Submit Diana Quinn for surveillance (N.B. The result will not be available until the beginning of part-2C.) [136] Submit the financial report for Research. [137] You will almost certainly have to mark time around here and afterwards … see the Preface {8}. Choose the map and go to Records & Research (At the 27th Precinct). [138] View the results of the research on the financial report. [139] Add the results of the research on the financial report to your case file. Choose the map and go to the psychiatrist’s office (Ann Galloway, M.D.) [140] Learn about the psychological makeup of Martin Tanner. [141] Add the psyche evaluation of Martin Tanner to your case file. Choose the map and go to Dr. Richard Blythe (at the Amsterdam Hospital). [142] Question Dr. Richard Blythe :- (A) ”Did you treat the Tanners' son after he was injured in an accident?” (B) “What was Jamie's prognosis?” (C) “What did you do for Jamie?” (D) “What did you recommend the Tanners do?” (E) “Did Jamie die before Mr. Tanner was able to contact Dr. Ramos?” [143] Add Dr. Richard Blythe to your case file. [144] Watch the cut-scene with Duncan. Then listen to a VERY IMPORTANT cell-phone message from Records & Research (Scott Donovan) concerning info on the Tanner’s Financial Report. Choose the map and go to Josh Berman. [145] Question Josh Berman :- (A) Why would Martin and Cindy Tanner have an American Motors financial report? [146] See the Preface {5} … Select the research-icon on the Tanner’s Financial Report. (B) “What were the terms of the settlement?” (C) “What were the Tanners holding out for?” (D) “Why did American Motors settle if the Tanner case had little going for it?” (E) “If the Tanners were on a crusade, why would they settle for so little?”
Part-2B
:- THE TRIAL. Select case
file. [147] GO TO TRIAL. (A) Click on (yellow) subpoena tab … on the right. NOTE :- If you want to use more than 6 items, you can easily do so by utilizing the slider on the right side of the panel! [149] (C) should be {i} anonymous note; {ii} lab test on anonymous note ; {iii} check from Tanner; {iv} lab test on Tanner’s check; {v} autopsy report from M.E.’s office; {vi} bullet fragments from M.E.’s office; {vii} answering machine tape; {viii} lab test on car window; {ix} lab test on photograph; {x} research report on Martin Tanner.
CASE FOR THE PROSECUTION.
[150] Question Brenda Lyons :- (A) ”Ms. Lyons, can you identify this voice?” [151] The Defense objects with “This clearly would be a violation of my client’s Fifth Amendment right against self incrimination”. The Prosecution must respond with :- “The protection against self incrimination does not apply since it will be used for identification purposes, and not for testimony”. This is accepted by the judge with “The Prosecution is right. The Defendant must comply”. [152] Continue questioning Brenda Lyons :- (B) “What did you do after you heard the message Mr. Tanner left you?” Defense Cross Examination. [153] Object to Duncan’s statement – “So you killed Dr. Ramos to rid the world of another bio-nazi!” [154] Object to Duncan’s statement – “Admit it. You jumped to conclusions when Mr. Tanner was simply warning you of these dangers when he left that message!” Select Donny Morales from the witness list. (A) “Mr. Morales, how do you know the defendant?” (B) “Did Mr. Tanner take time off from work during the past year?” (C) “What were the circumstances of Mr. Tanner's return to Airways?” (D) “When did the defendant arrive for work on the night in question?” (E) “Do you remember anything about Mr. Tanner's behavior that evening?” Defense Cross Examination. [156] Object to Duncan’s question – “Were you that callous not to see that the loss of his child was the only reason he was unresponsive? [157] Question Dr. Blythe :- (A) “Dr. Blythe, how do you know the defendant?” (D) “Did the Tanners talk with you about Dr. Ramos?” (E) “Did you continue to work with the Tanners?” Select Shirley Cho from
witness list. [158] Question Shirley Cho :- (A) “Ms. Cho, were you an accountant for Avery Labs?” (C) “Were you aware that Mr. Tanner was investing money with Dr. Ramos?” (D) “When did you last speak with Mr. Tanner?” (E) “Do you recall Dr. Ramos returning any funds to Mr. Tanner?” Defense Cross Examination. Don’t object to ANY questions during Shirley Cho’s cross examination by the Defense. Select Paul Kim (crime lab tech) from the witness list. (A) “Did you test both the photograph from Tanner's locker and Dr. Ramos' car for fingerprints?” Select the handwriting analyses on the check and the note. (B) “Did you compare the handwriting on the check written by Martin Tanner to the anonymous note to Dr. Ramos?” Defense Cross Examination. [161] Object to Duncan’s question – “Mr. Kim, isn't it true that the prints on the victim's car were left by my client months before the victim's death?” Select Scott Donovan (researcher) from the witness list. [162] Question Scott Donovan :- (A) “Could you explain to the jury your findings from the background check of Martin Tanner's financial state?” Select Lennie Briscoe from the witness list. [163] Question Lennie Briscoe :- (A) “What can you tell the court about the handwritten note entered into evidence?’ Select the answering machine tape. (B) “How did the police come to possess the answering machine message entered into evidence?” Select the $20,000 check. (C) “Where did you find the check from Mr. Tanner to Dr. Ramos entered into evidence?” Select Kathleen McDonnell from the witness list. [164] Question Kathleen McDonnell :- (A) “Can you explain to the jury what you found while conducting the autopsy of Dr. Ramos?” Select the bullet fragments. (B) “What can you tell the court about these bullet fragments? [165] Select “REST CASE” [166] Read the notice :- “Are you sure you’re ready to rest your case?” Press on “YES” ! If you have not presented your case well enough, it will be summarily dismissed -(“This case is dismissed”) … FAILURE ! You must start Part-2B again. If however you have presented your case satisfactorily, you’ll have further time for investigation … SUCCESS (“..… court is adjourned ..… will reconvene to hear the case for the Defense”).
Part-2C :- PROSECUTION INVESTIGATION~2. [167] View the surveillance report on Diana Quinn (the results have been held over until now!) Choose the map and go to Diana Quinn. [168] Question Diana Quinn :- (A) “What is the nature of your relationship with Mr. Pappas and the Paragons?” (B) “Were you receptive to Mr. Pappas' overtures, even though you worked at Avery?” (C) “Weren't you concerned about how the Paragons planned to apply their work in genetic engineering?” (D) “Where did Dr. Ramos leave his cloning project at the time he was killed?” [169] Add Diana Quinn to your case file. Choose the map and go to Arias Pappas. [170] Question Arias Pappas :- (A) “What was the Paragon's relationship with William Ramos?” (B) “Were you working with Ramos to clone Jamie Tanner?” (C) “Why did Ramos pass on your offer to collaborate?” (D) “Did Ramos' attitude make you angry?” (E) “Did you have any contact with the Tanners?z” (F) “Why did Ramos cancel his cloning project with the Tanners?” [171] Add Arias Pappas to your case file.
Part-2D
:- CASE FOR THE DEFENSE. Choose the map and go to the Court House. Press on “YES” ! Donald Kent ~ Direct Examination (By Miles Duncan – Defense). [173] Object to Duncan’s question – “And you were infuriated when you found out Ramos sought outside investors?”. [174] Question Donald Kent :- (A) “What is the current state of Avery Labs?”. (B) “The cloning breakthroughs made by Dr. Ramos, where are they today?”. (C) “When you met with Ramos on the night of the murder, what did you talk about?” (D) “With Ramos dead, how much money will you make?” [175] Object to Duncan’s question – “When did you publicly confront your husband about his affair with Dr. Quinn?”. [177] Question Celia Ramos :- (A) “Did you and your husband discuss the possibility of a divorce?” (B) “Was waiting to file for divorce honestly about keeping the relationship alive or about tracking down hidden assets?” (C) “Now that William is dead, have you uncovered all the assets?” (D) “What have you gained from his death” [178] Object to Duncan’s question – “And you were infuriated when he told you he wasn’t divorcing his wife, weren’t you?” [180] Question Diana Quinn :- (A) “Did you discuss with Dr. Ramos why he decided not to work with the Paragons?”. (D) “Did you speak with the Tanners the day of the murder?” Cindy Tanner ~ Direct Examination (By Defense). Cindy Tanner ~ Cross
Examination (By
Prosecution). [182] Question Cindy Tanner :- (A) “What were you and your husband fighting about prior to the phone conversation with Diana Quinn?” (B) “What did you two do after the fight?” (C) “Since you hadn’t received your money from Dr. Ramos, why didn’t you contact a lawyer?” (D) “Why call Ramos daily, send him threatening letters, and then assume the check was in the mail?” Martin Tanner ~ Direct Examination (By Defense). [183] Object to Duncan’s question – “And you had a cordial conversation about this with him, didn’t you?” Martin Tanner ~ Cross
Examination (By
Prosecution). [185] Question Martin Tanner :- (A) “If Ramos was a hero to you, why did you write him a threatening note?” (B) “Why not say ‘Please return my money now or I’ll contact a lawyer?” (C) “How did your fingerprint end up on Dr. Ramos’ car door?” (D) “Why did Dr. Ramos visit you at work?”
Part-2E
:- PROSECUTION INVESTIGATION~3. Watch the cut-scene between the D.A. and A.D.A. Choose the map and go to Dr. Richard Blythe. [186] Question Dr. Blythe :- (A) “How did you come to refer the Tanners to Dr. Ramos?” (B) “Can you think of any medical reason Dr. Ramos might have had for discontinuing the cloning experiment with the Tanners?” (C) “Would Dr. Ramos have to be an expert in every related scientific field in order to insure optimum conditions for cloning?” Choose the map and go to Dr. Rita Miller. [187] Question Dr. Rita Miller :- (A) “Have you had any recent contact with Dr. Ramos?” (B) “Anything unusual about the samples Ramos sent you?” (C) “Why did Dr. Ramos request the tests?” (D) “Where are the samples now?” (E) “How can we find out if Ramos picked up the samples?” [188] At the end of this discussion, you acquire the relevant laboratory log sheet. [189] Add this laboratory log to your case file. [190] Add Rita Miller to your case file. [191] Watch the cut scenes displaying the four-way ‘conference’ in the judge’s chambers, followed by a discussion between Southerlyn and Wade. Choose the map and go to Donny Morales. [192] Question Donny Morales :- (A) “Can you tell us more about Tanner's movements the night of the murder?” (B) “Do you know Cindy Tanner?” (C) “What did Cindy ask you about exactly?” Choose the map and go to Burt Lasky (at the Hudson Metal Works). [193] Question Burt Lasky :- (A) “Do you service Airways Delivery?” (B) “When was your most recent pickup?” [194] He points you to the Hudson Metal Works Scrap Yard. Look around there! (N.B. It’s rather difficult to distinguish the essential items from the surrounding junk here!). [195] View the bolt cutters … Next to what looks like an ancient near white refrigerator. [196] Add the bolt cutters to your case file. [197] View the crowbar … Leaning up against the front wheel of an old battered fawn colored car. [198] Add the crowbar to your case file. [199] View the back of the ‘Airways Delivery’ truck … “Locked up tight”. [200] See the Preface {5} … Open the back of the truck by clicking on the crowbar in your partial case file. {{{ Skip the next 4 actions if you’re playing in “faster-mode” ! }}} [201] View the filing cabinet. [202] Add the filing cabinet to your case file. [203] View the radiator. [204] Add the radiator to your case file. [205] View the toolbox … “Locked up tight”. [206] See the Preface {5}. Open the toolbox by clicking on bolt cutters … and see the gun! [207] Add the gun to your case file. Select the case file. [208] Submit the gun for lab tests. [209] You will almost certainly have to mark time around here for a short while … see the Preface {8}. [210] Choose the map and go to the Crime Lab. [211] View the lab test on the gun [212] Add the lab test on the gun to your case file
Part-2F
:- PROSECUTION REBUTTAL. Select case
file. [213] The Prosecution proceeds with rebuttal. (A) Click on (yellow) rebuttal tab … on the right. NOTE :- If you want to use more than 6 items, you can easily do so by utilizing the slider on the right side of the panel! [215] (C) should be lab test on gun. Select Paul Kim from witness list. [216] Question Paul Kim :- (A) “Mr. Kim, have you examined the handgun known as a .38 special entered into evidence?” (B) “Were there any fingerprints on the gun?” (A) “What is your expertise in medicine, Dr. Miller?” (B) “Did you run any tests recently for Dr. Ramos?” (C) “Can you tell us about the disease?” (D) “How did Dr. Ramos react to your findings?” (E) “Can you tell us about the log sheet from your laboratory entered into evidence?” [218] The Defense objects with “This document is clearly hearsay!”. The Prosecution must respond with :- “This document should be admitted as an exception to the hearsay rule since it’s an official business record”. This is accepted by the judge with “The document is admissible … the witness may answer”. [219] Continue questioning Brenda Lyons :- [220] Continue questioning Rita Miller. (F) “Could you explain the signature on the line below that?” (G) “What is ‘Bio 8’?” Rita Miller ~ Cross
Examination (By
Defense). [221] Object to Duncan’s question – “Did you intend to mislead this jury that this sample was from Jamie Tanner?” [222] Select “CLOSING ARGUMENT” Part-2G :- Prosecution & Defense Closing Arguments AND VERDICT ! If you’ve
done EVERYTHING ‘correctly’ in part-2, you will obtain
:- “Final
Score: ………..…. 100%”. But don’t
worry if you got less than this! So long as
you’ve succeeded in obtaining a verdict of “GUILTY”, you’ve finished the game
successfully. (YOU’VE
“WON”!).
* ~ * ~ * ~ * ~ * ~ * ~ * ~ * ~ * ~ * ~ * ~ * ~ * ~ *
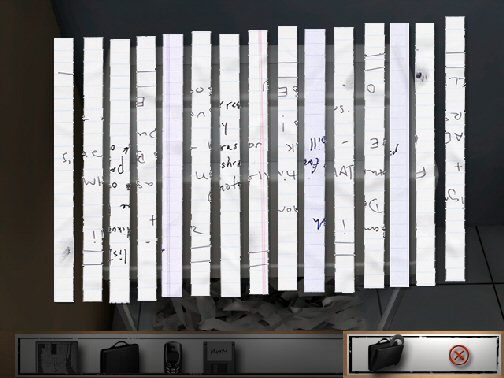
{a} The distribution of the strips is random and changes completely every time. There are 15 strips of paper. The tops and bottoms cannot be exactly aligned and form slightly ragged appearances. {b} There are 8 strips which have a double horizontal line across them. You will need all of these and one which has a single horizontal line across it. You will also need just one other strip of paper ( see {e} below ). ALL OF THE OTHER 5 STRIPS ARE SUPERFLUOUS!. {c} Any double lined strips (and the single lined one) which have their double line at the top should be (left) double clicked to up-end them to the bottom. {d} Start building up the note from the extreme left hand side. {e} The very first strip is the one which has a small round ink blot at the bottom and “F” higher up (if it’s upside down then flip it)! {f} The orientation of the 10 strips that you need are very roughly illustrated schematically in the diagram below … only the characters which can be seen unambiguously are included. When you get them very roughly into position, move them towards each other … they will soon combine into a complete note.
{g} The final note appears somewhat like this (it’s far from exact due to text spacing … but it’s reasonably close)! Ramos – Don’t ignore us . For the last time - GIVE US BACK WHAT’S OURS ! OR E L S E ! ! ! * -------------------------------- -------------------------------------
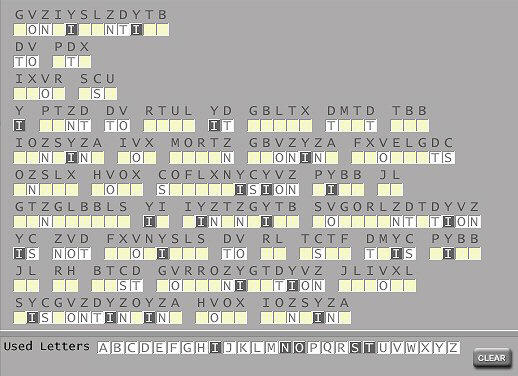
I solved this puzzle by ‘brute force’ only, using trial & error. There is quite likely a better method than the one I used … but although not elegant, this method at least succeeded. If/when you choose what turns out to be an incorrect letter, then sooner or later you obtain a group of letters which cannot under any circumstances form an English word (something like “YGA”). This means that you will have to backtrack and try some alternative letter somewhere! If anybody is stuck, maybe (1) or (2) or (3) or whatever below alone, will be sufficient help to finish solving the whole puzzle.
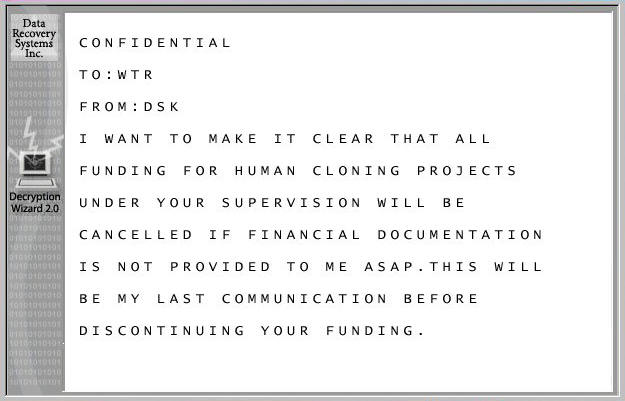
(1) Look at the 4th row down. The left hand word consists of one letter only. This letter can only be “A” or “I”. Try whichever you prefer. Fill in the correct one which is “I”. (2) Now look at the fifth word along the same line. It consists of two letters only of which the first is “I”. The second letter can only be “F”, “N”, “S” or “T”. Try whichever you prefer. Fill in the correct one which is “T”. (3) Now look at the third word along the same line. It consists of two letters only of which the first is “T”. The second letter can only be “O” … so fill it in. (4) Now look at the first word along the eighth line. It consists of two letters only of which the first is “I”. The second letter can NOW only be “F”, “N”, or “S”. Try whichever you prefer. Fill in the correct one which is “S”. (5) The last word in the seventh line down is a long one … 13 letters. Four of the last six are as follows :- “T”, “?”, “T”, “I”, “O”, “?”. How about filling in the missing two letters making (most probably) “T”, “A”, “T”, “I”, “O”, “N”. (6) The seventh word in the fourth line down has now got only one letter missing which is almost certainly “H”. Fill it in! (7) The sixth ‘word’ in the eighth line down has now got only one letter missing which must be “P”. Fill it in! (8) The second word in the fourth line down has now got only one letter missing. The only letter which fits and makes (grammatical) sense is “W”. Fill it in! (9) The very first word of the email is missing five letters. The most likely word to fit in at the very beginning of such an email is “CONFIDENTIAL”. Fill in the five missing letters. (10) The third word in the eighth line down is missing two letters. They are “R” and “V”. Enter them correctly. (11) The first word in the third line down is missing one letter only. It must be “M” … so fill that in. (12) The fourth word in the fourth line down is also missing one letter. The only one which makes sense is “K” … so fill it in. (13) The third word in the fifth line down is missing one letter only. It must be “U” … so fill that in. There are by now only seven letters left and the email is almost completed … so finish it off! (14) When you have finished it, you get the following message on your screen with no boxes etc. CONFIDENTIAL ………….……. TO: WTR ……….…..…. FROM: DSK ………….….…..… “I want to make it clear that all funding for human cloning projects under your supervision will be cancelled if financial documentation is not provided to me ASAP. This will be my last communication before discontinuing your funding."
SHREDDED-NOTE Puzzle { Graphical }
BEGINNING (Random)
MIDDLE
END
ENCRYPTION Puzzle { Graphical }
BEGINNING
MIDDLE
END
|