The game begins with an introduction to Nancys world. We get to see her bedroom and her desk. For the newest game, there are several items on the desk. First is the scrapbook. All 13 previous cases are in the scrapbook. You can look flip through the book for a trip down memory lane. There is a book on How to be a Detective. This is a tutorial. It will walk you through all the mechanics of the game. It will tell you about new features and such. Most importantly is the case file which will tell you all you need to know about the case Nancy is about to crack. Click on the plane ticket and start the game.
DAY 1
Minettes Studio (Abbesses on map)
Outer office Speak to Heather. She will provide Nancy with a Metro pass. She has provided a list of to-do items on Nancys computer. Minette requests to see Nancy. At this point, you can either go to the desk and check out the to-do list or you can go see Minette. I handled Minette first. So, turn to the left and enter through the wooden door.
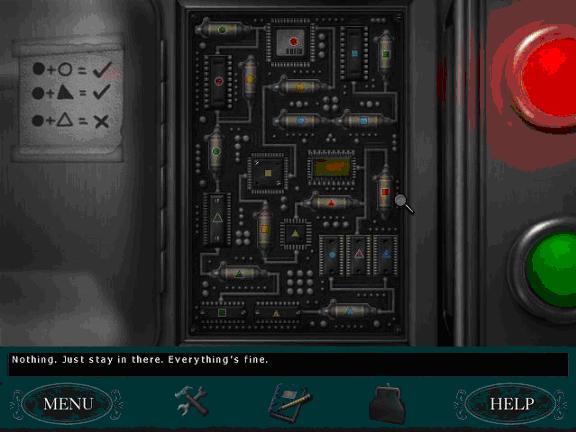
Minettes office Speak to Minette. She seems aggravated that Nancy is here. She wants Nancy to make her some herbal tea. To the left of the door is a tea station. Read the note card to find out how to make the tea correctly.
Tea Puzzle
There are a lot of criteria to follow when making this tea. Based upon the notes on the card, these are the important items:
If Minette is right handed add all herbs in the Gaviforme family. (Turn around to look and see that she is)
If Minette is not humming, add herbs with a potency of 7 or greater. Shes not humming.
If Minette says her favorite color is red, add all herbs that grow in marshy areas.
So, here is the correct list of ingredients:
Boojum rating of 10
Breland marshy
Callicula Gaviforme
Fennellery Gaviforme
Gibbering rating of 22
Hog Bone Gaviforme
Macrophylla rating of 7
Phyrigia rating of 9
Pipsweet rating of 8
Varvaine - Marshy
Yellow Buttons Gaviforme.
Place them in one by one. Then, click on the teapot to make the tea. Exit the tea station and then exit the room. If youve done it correctly, Minette will call Nancy back into the room and tell her the tea was totally rude.
Now Minette wants Nancy to go to Pont Neuf and buy more items with identical qualities to what she has collected. All the items seem to have circular qualities and the colors are red, orange, blue and green. Exit the room.
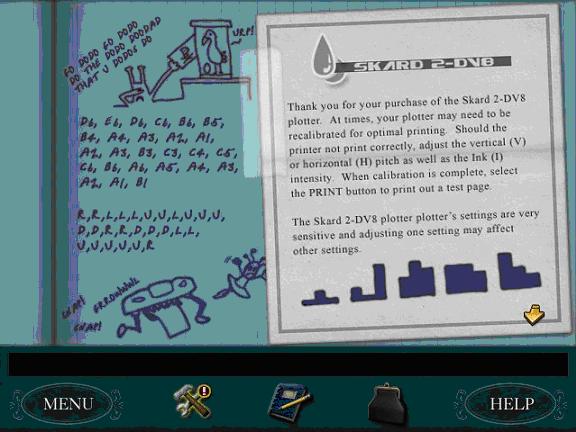
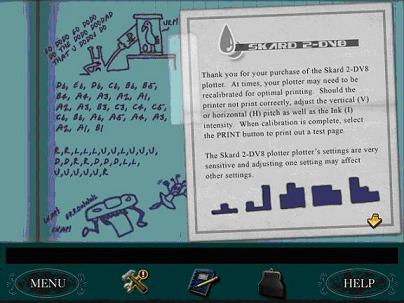
Outer Office - Time to check out Nancys desk. Examine the drawer on the left hand side first. Note the Koko Kringle bars in the drawer. If youve played all the ND games, this should look familiar. Pick up the blue notepad. Note the many references to Carol & rude. The most important pages are the 3rd & 4th page. The 3rd page shows a computer with the words Carol & rude coming out of it. The 4th page has some kind of codes written on it, but also has instructions about a plotter. Turn to the right and examine the rest of the desk.
Computer
Click on the computer. You can check out Janes Game Portal if you like. The user name is Carol & the password is rude.
Click on email. Read all the emails by clicking on each line under From. After you have read an email, you can click on Back to Inbox to return to the main email screen. From some of the emails, you can tell the Minette is difficult to deal with and that there are others out there who do not like her. Click on the X in the corner to exit.
Click on the To Do List:
Pick up envelop from JJ Ling (11085 Rue Malus, Metro stop Place Monge)
Pick up fabric photos from Dieter von Schwesterkrank (the corner of Rue du Bac and Boulevard St. Germain)
Deliver photos (see above) to Jean Michel Traquenard at the Café Kiki (on Rue des Mauvais Garcons, Metro stop Hotel de Ville)
Fix plotter
Do whatever Minette tells you to do and do it fast.
Exit out of the list and get started on the list. Turn to the right and see the plotter against the wall.
Plotter:
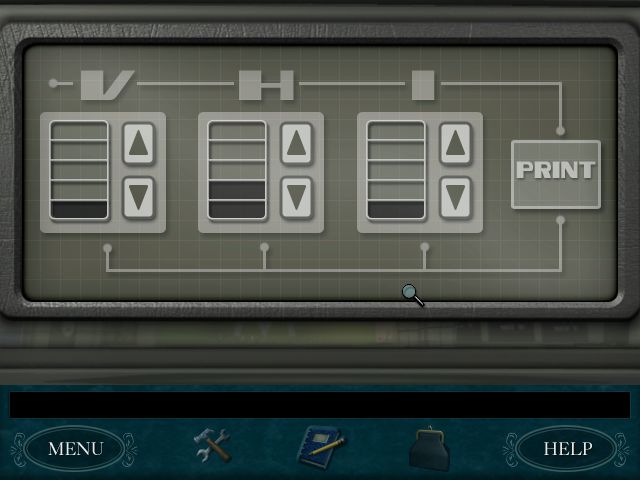
As the last page on the blue notebook explained, in order to calibrate the plotter, you will have to adjust the levels of the Vertical (V) and Horizontal (H) pitch. You will also have to adjust the ink (I) intensity.
Change the settings as follows:
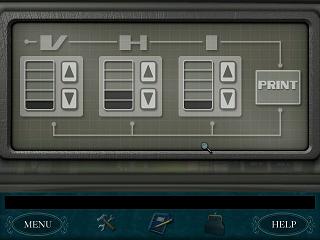
Click on Print. The test print should have ABCD on it. One item on the To Do list is done.
The phone rings and Heather will tell Nancy to get it. Go to the desk and click on the phone to answer it. It is a woman from the Modern History Department asking about Noisette Tornade. Heather will tell you what to answer. The phone number will be added to a Zippy calling card which will automatically pop up so it will be available if Nancy needs to call that number again.
Turn to the right and examine the drawing table. Its a project Heather is working on. You wont be able to do anything with it right now. Turn to the right again and speak to Heather. Find out about the studio, Minettes mask and Dieter von Schwesterkrank. Youll also get to learn about Jean Michael Traquenard who you will have to deliver photos to and that youll need to be extra nice to him.
Examine the coffee table and check out the GlamGlam Magazine. Read about Jean Michael. Turn to exit the building and someone will slip a note under the door. Read the letter. It seems Minette has been getting death threats for quite a while. Heather wants Nancy to put it in the DoDo box (which is supposed to deflect the negative energy). No matter what you choose, Nancy will do as requested. Exit the building again.
Map - Choose Rue du Bac.
Dieter von Schwesterkranks (Rue du Bac on map)
Dieter von Schwesterkranks - Speak to Dieter. He doesnt have the pictures ready yet. He will allow Nancy to do it herself. Turn to the right and read the book next to the fish tank. You wont be able to take it with you so take some notes.
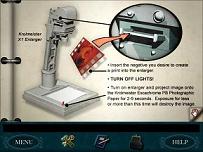
Walk to the door with the red circle on it. Before you enter, check out the camera on the table to the right of the door. Click on it and Dieter will let Nancy borrow it. Take the camera.
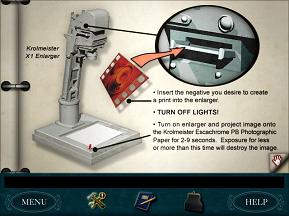
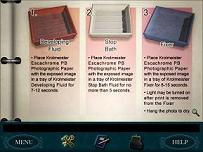
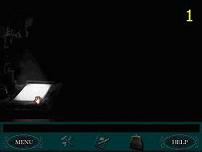
Dark Room Puzzle.
Pick up the first negative from the tray.
Place it in the machine up top.
Turn out the light (switch is on the wall above the 3rd tray)
Its important to use your tool bar and a guide. Place your cursor on the right side of the menu button and go straight up until you see the hand cursor. Click and the light will turn on. Count to 5. Click again to pick the photo up.
Now, place your cursor in between the tools and the notepad. Go straight up until you see the red highlight. Click to dunk into the first developing fluid. Count to 7 or 8. Click to pick the photo up.
Stay at the same height and move to the right until you are over the money purse. Click to dunk into the stop bath. Count to 5. Click to pick the photo up.
Move your cursor so it sits on the EL of Help. Move straight up until it turns red. Click to dunk into the Finisher. Count to 10. Click to remove. Nancy will say, All Done. Click on the photo once more and she will hang it to dry.
Start the process all over from 1. Be sure to choose in order the way you saw the negatives lying in the bin the first time. Some of the negatives dont disappear even after youve processed them leaving you to believe there are more. You only have to do 4.
Exit the dark room and speak to Dieter again about all topics. Exit Dieters. Another task complete
Because its completely dark and is difficult to figure out where the trays are, the pictures below show the exact locations:

Map - Choose Hotel De Ville
Café Kiki (Hotel De Ville on map)
Café Kiki - Enter the café and speak to Jean Michel Traquenard. Nancy will give him the photos. Learn about Hugo Butterly who is Minettes biggest competition. Nancy will get Hugos phone number. Jean Michel lets Nancy order food off the menu for free. I chose Crème de Glace because its ice cream. Finish the conversation with Jean Michel and leave. Another task is complete. Exit the Hotel De Ville and
Map - choose Pont Neuf.
Square Du Vert Galant (Pont Neuf on map)
Square Du Vert Galant - Walk forward and examine the monument. Note the dates on the cross monument (1940-5). You will need this later. Choose the path on the right and walk all the way down to the other end of the park. You can, if you choose, check out the water fountains or art pieces along the path.
Moniques stand - Buy the orange cone. I offered 3 Euros for it. I also bought the Lava lamp for 15 Euros.
Malikas stand - I bought the green rings for 8 Euros.
Monsieur Marchards stand - I bought the blue movie reel for 42 Euros. He will offer Nancy some money for painting reproductions. Accept and do as many as you want. You will get 15 Euros for each one. There are only 2 different pictures but you can repeat them. All you have to do is match the colors from the original to the blank one. Click on a color with your paintbrush and then click on the spot you want to color. Exit the Park. Its a bit late so Nancy will automatically go to JJ Lings.
DAY 2
JJ Lings (Place Monge on map)
JJ Lings - Meet JJ. She will spin a story about the airline losing her luggage for 5 years. Dont believer her. Exhaust all conversation with JJ. Get the envelope from JJ. Check out the book on the table next to the phone. Learn about the catacombs underneath Paris. Exit through the front door.
Map - Choose Abbesses.
Minettes Studio (Abbesses on map)
Outer Office - As soon as you walk in the door, the phone rings. Pick it up. It is Prudence Rutherford who someone you spoke to on another case. Shes looking for some designs. Finish up the call and exit the phone. Try to get into Minettes office. Heather tells Nancy that Minette is playing an online game and will be hard to talk to. Go in anyway. Minette is trying to get the high score.
Model Match Game
Go back out to your desk and log into Janes Games. Play model match. You have to line up 3 of the same models faces in a row either across or down. Click on a models face and click on any other models face to switch their places. There is no way to give the solution for this as it is random. However, if its taking too long to find a match, always click on Mix it up to give you new choices. Youll need to get over 1,000 points. When youve done that, Minette (who is also playing as Carol) will think she got the high score. Shell call Nancy in.
Minettes office - Talk to Minette. She looks at all the stuff youve bought and will take the cone, lava lamp, green rings and movie reel. Exit the office.
Outer office - Speak to Heather.
Drawing Table Puzzle
Click on the book and Nancy will ask Heather if the designs shes supposed to finish for Prudence Rutherford are under there. They are. Click on the book again and see what Minette designed for Prudence. Click through the pages until you get to the last page. Read the detailed notes from Prudence:
Summer:
 Chromatic consistency; 3 pieces of clothing must be of the same color
No purses!
Nothing white, blonde or Yellow.
I want my feet to be furry.
Need some sun protection on body
No patterns and no leather.
Rain gear would be completely inappropriate
Need green on legs and head.
Chromatic consistency; 3 pieces of clothing must be of the same color
No purses!
Nothing white, blonde or Yellow.
I want my feet to be furry.
Need some sun protection on body
No patterns and no leather.
Rain gear would be completely inappropriate
Need green on legs and head.
Cruise:
 No skirts
Show as much skin as possible
Must not include any clothing or accessories from my summer outfit
No jeans
My head and face must be consistently themed
No primary colors or yellow
One item thats tropical
Nothing black.
No skirts
Show as much skin as possible
Must not include any clothing or accessories from my summer outfit
No jeans
My head and face must be consistently themed
No primary colors or yellow
One item thats tropical
Nothing black.
Fall Ensemble:
 If my outfit contains something black, it must also contain something white.
The clothing I wear as a top cannot be a single color
No red for fall
A boa would be inappropriate
Only 1 piece of rain gear
Nothing sporty
No dark sunglasses and no braids
No clothing that would make me think of animals or plants
Black or white is ok but not above the neckline
No short sleeves or short pants.
If my outfit contains something black, it must also contain something white.
The clothing I wear as a top cannot be a single color
No red for fall
A boa would be inappropriate
Only 1 piece of rain gear
Nothing sporty
No dark sunglasses and no braids
No clothing that would make me think of animals or plants
Black or white is ok but not above the neckline
No short sleeves or short pants.
The 3 outfits are done. Go to Nancys desk. Minette will be freaking out because she cant get JJ.
Map - Go to Place Monge. Nancy will say its too late and the day will change.
DAY 3
JJ Lings (Place Monge on map)
JJ Lings house - Walk forward and read the paper on the kitchen table. Find JJ in the kitchen again and speak to her. You can play hangman with JJ if you like. Keep choosing letters until you guess the word before she draws the full picture of the hanging man. This is a diversion game only. It serves no purpose. Tell JJ that Minette wants to see her right away. Shell only go if Nancy makes mint cookies. But, Nancy will have to go out and find some mint. If you chose the ice cream when you saw Jean Michel last, youll remember a sprig of mint on it. (Other option is to go buy some at the park, but its much cheaper if you get the ice cream).
Café Kiki (Hotel De Ville on map)
Café Kiki - Go to the hotel and speak to Jean Michel Traquenard. Find out a little more about JJJ. Order Crème de Glace which is ice cream. Click on the money tray to pay 5 euros for it. It will be decorated with a sprig of mint. Take the sprig of mint, eat the ice cream and go make cookies.
JJ Lings (Place Monge on map)
JJ Lings House - First thing to do is put the mint on the counter. Nancy will automatically chop it up. Then, go to the cabinet to the right of the oven and get some molasses. Put in on the counter as well. Now, were ready to bake.
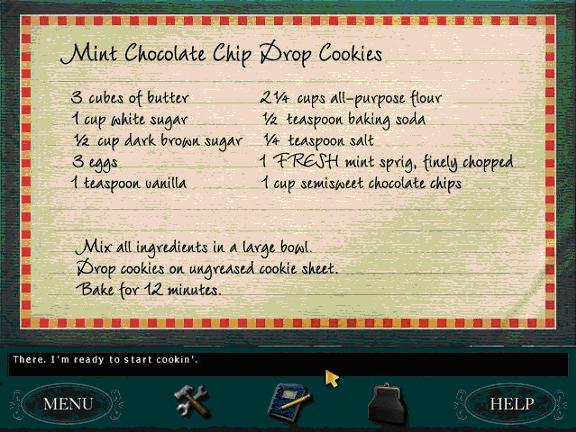
Heres the recipe:

Enter all the ingredients just as the recipe states. To add an ingredient, you must first click on the measuring cup or spoon & then click on the item you wish to add. Click on the bowl and Nancy will mix it in. Now, remember that you dont have brown sugar. JJ told you there was a way to substitute with molasses. You can get this information 2 ways. I actually looked it up on internet cooking site. But, I found out later that Monsieur Marchard has a cooking substitution book for sale at his stand. Either way, brown sugar is the same as white sugar with a little molasses for coloring and flavor. So, the conversion would be œ cup of white sugar and 1 teaspoon of molasses.
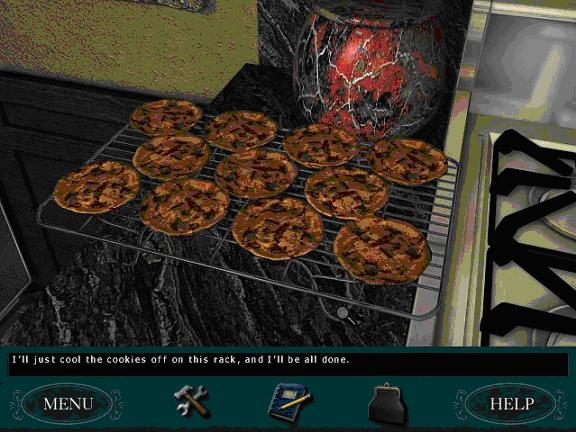
After adding all the ingredients, click on the baking tray and Nancy will put them in the oven. If youve made them correctly, they will look like this:

JJ will immediately phone and want to verify the unusual way the cookies look. Once she hears that, she will be satisfied and head over to Minettes as required. Lets get out of here and get over to Minettes.
Minettes Studio (Abbesses on map)
Outer Office - The phone will immediately ring. Its a man with a German accent who wants to speak to Minette. Either tell him Minette is unavailable or put him on hold, but shell be unavailable anyway and he will hang up.
Go to Heathers desk and check out her design book. Go to Nancys desk and read the pink note from Heather. Nancy has to go to Square Du Vert Galant (Pont Neuf) and buy a stuffed parrot.
Minettes office - Speak to Minette. Ask about the mask and about why Minette broke up with Dieter and she will get very upset. Exit her office and the studio.
Map - Choose Pont Neuf
Square Du Vert Galant - Head for Monsieur Marchards booth. Nancy will see Dieter sitting on a bench. He takes off pretty quickly. He leaves some things on the bench. Pick up and read the newspaper article about Noisette. Also pick up the watch. Go back to Monsieur Marchands booth and purchase a stuffed parrot. I paid 15 Euros for it. Go back to Minettes.
Minettes Studio (Abbesses on map)
Minettes office - As Nancy enters, Minette is screaming. Someone sent her a box that was filled with bugs. The bugs are all over her office. Nancy will have to catch them all. Enter the room and pick up the box the bugs were in. One bug will be running around. Try to click your cursor close enough to it to catch it. Turn left and see another one. You will also find a letter from the Lynn Manrique of Dept. of Modern History. She still wants to talk about Noisette Tornade. Noisette was of great importance to the French Resistance and owned the old windmill that Minette has made her studio in. She is planning to visit and hopes Minette will let her wander around. Take the letter and continue the search for bugs. I just kept going in circles until I found 8 of the nine bugs.
One bug will be found on Minettes desk. Examine the note about fonts. Also check out the red dress. Check out the wall that has red paint splattered all over it. Examine the magazine on the coffee table. If the bug sighting seems to slow down, try and leave the office. Minette will slam the door. She wont let Nancy leave until she has caught them all. You should find the remaining ones quite quickly after that. Now, Nancy can exit the room.
Outer office - Go back to Nancys desk. Call Lynn at the Dept of Modern History (Zippy #). She will explain how Noisette supposedly hid art work somewhere and that she dated Dieters grandfather. Before she died, she kept muttering red, left green. Use the phone again to call Hugo Butterly. You wont get much out of him, but it was worth a shot. Exit the office. Exit the studio. Its late so Nancy will head home.
DAY 4
JJ Lings (Place Monge on map)
JJ Lings - Read the newspaper on the kitchen table. Exit JJs.
Map - Choose Pont Neuf
Square Du Vert Galant (Pont Neuf on map)
Square Du Vert Galant - Click on the box of cockroaches in inventory and Nancy will release them. Exit the location.
Map - Choose Abbesses
Minettes Studio (Abbesses on map)
Minettes office - Speak to Minette. She has no idea who would have sent her the box of cockroaches. Exit the room.
Outer Office - Speak to Heather. Shell ask if youve got the parrot. Ask Heather about the paint on the wall. Exit the studio and go see Dieter.
Dieter von Schwesterkranks (Rue du Bac on map)
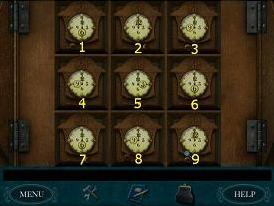
Dieter von Schwesterkranks - Dieter is in the darkroom. Speak to Dieter through the darkroom door. He tells Nancy the little clock opens a panel next to the bookcase. Find the brown panel section that has a small indentation in it. Use the clock on the circular indentation and the panel will open.
Clock Puzzle
The goal is to get all the clocks point at 3:00. Changing one clock may cause another to change. A couple of the clocks affect only themselves. So, first click on all the clocks to see what each one moves.
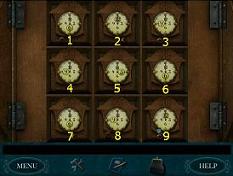 Clock 1 moves 2, 4 and 6
Clock 2 moves 7
Clock 3 moves 6 and 9
Click 4 move 7
Clock 6 moves itself only
Clock 7 moves 9
Click 8 moves 1 and 3
Clock 9 moves itself only
Clock 1 moves 2, 4 and 6
Clock 2 moves 7
Clock 3 moves 6 and 9
Click 4 move 7
Clock 6 moves itself only
Clock 7 moves 9
Click 8 moves 1 and 3
Clock 9 moves itself only
Click on the clocks in the following order: 8,8,1,4,6,6,7,7,9,9,9 A secret passageway is opened up. Enter the passage.
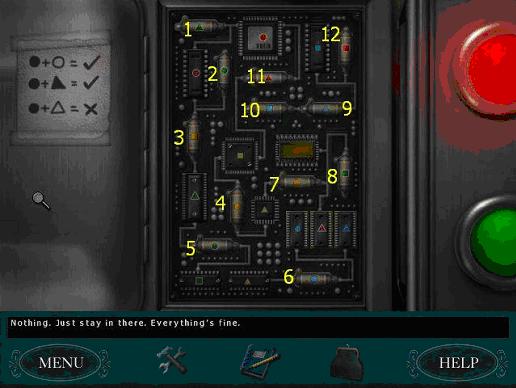
Passage - Follow the passage until you come to a small metal panel on the wall. Open the panel. The clue is: The year when the despair ended - the year when my despair began. If you remember the cross monument in the park, it had 1940-5 on it. So, enter 1945 by clicking on the arrows to the left of each number. Get a diary with the letter N on it. Could this be Noisettes diary? Read the diary. Take the paper that is in the front of the book. See the picture of the machine and the code beneath it. Turn the page and take the instructions on how to use the M380 coding machine. Exit the passage and Dieters place.
Map - Choose Abbesses.
Minettes Studio (Abbesses on map)
Minettes office - Check out the round objects that have the blood all over them. They look just like the dials on the M380 machine.
Outer Office - Go back to Nancys desk and use the phone to call Zu. His phone number is 01 01 61 45 60. Hes the one who you read about in the magazine at JJs. Ask him about the symbol you saw in the passage. He wants an autograph from JJ that you must deliver to him in the catacombs. Exit the office.
Map - Choose Place Monge.
JJ Lings (Place Monge on map)
JJ Lings - Ask her for an autograph. She wont give it. Shes afraid someone will steal her identity.
Map - Choose Hotel DeVille.
Café Kiki (Hotel De Ville on map)
Café Kiki - Ask Jean Michel Traquenard if the picture he took of Minette was cropped. Ask to see the un-cropped picture. In order to do that, he wants you to make parfaits for the owner of the café..
Parfaits Puzzle
For each parfait, look at the picture in the book and duplicate it.
Aixois - Whipped Cream, Strawberry ice cream, caramel ice cream, bananas, caramel ice cream. Ring bell.
Lenfer - Chocolate ice cream, Whipped Cream, Chocolate ice cream, Whipped Cream, strawberries. Ring bell.
Tropical - Bananas, colored candies, strawberries, strawberry ice cream, chocolate ice cream.
Corbeau - Chocolate ice cream, caramel ice cream, bananas, caramel ice cream, chocolate ice cream. Ring bell.
Mystique - Colored candies, Strawberries, Bananas, Whipped Cream, Colored Candies.
Fantaisie - Strawberries, Vanilla Ice cream, Colored Candies, Strawberry Ice cream, whipped Cream.
Loulou - Bananas, Caramel Ice Cream, Bananas, Caramel Ice Cream, Bananas
Jean Michel shows you the picture. Each of the stone circles has roman numerals on them. There are arrows pointing to specific numbers. Starting from the left: 9, 5, 3
Minettes Studio (Abbesses on map)
Outer Office - Call Lynn at the Department of Modern History. Find out that Noisette was a translater for the Germans by day and a decoder for the French by night during World War II. She also had an affair with a German soldier Hans von Schwesterkrank. Before she died, Noisette kept muttering red, left, green. End the call and leave the office. Nancy will automatically end the day.
DAY 5
JJ Lings (Place Monge on map)
JJ Lings - Talk to JJ. Play hangman with JJ. Choose the letters so that JJ will write Zu my love Jing. JJ will give Nancy the paper. Now we can go to the catacombs.
Map - Choose Denfert Rochereau.
Catacombs (Denfert Rochereau on map)
Catacombs - Walk forward until you see the skull. Use JJs autograph on the skull. Exit the catacombs.
Map - Choose Abbesses
Minettes Studio (Abbesses on map)
Outer Office - Call Zu on the phone. He tells Nancy the symbol is a Noisette and there is another Noisette in the catacombs. You will need to lift the skull and press a wet button. But, the actual location is underwater. Nancy will need to buy a wetsuit. Exit the office.
Map - Choose Pont Neuf
Square Du Vert Galant (Pont Neuf on map)
Square Du Vert Galant - Go directly to Monsieur Marchands stand. Purchase the wetsuit. I paid 63 euros for it. Remember, if you run low on money, you can always paint more pictures. Buy the coding book for 8 euros. See the decoding machine. Marchand wont part with it for anything less than a bottle of Mouton Fouette 1968.
Make sure you take a moment to read the coding book. You will need the information later. See how codes can be made from metro stops and addresses or dates.
The temptation will be there to go to the catacombs right away, but I did and realized I had missed something. So, go to Dieters place first.
Dieter von Schwesterkranks (Rue du Bac on map)
Dieter von Schwesterkranks - Knock on the dark room door. Dieter says hes too busy, but if you take some photos for him, hell answer your questions. Get the list from Dieters desk. Unfortunately, its all in French. Youll need a dictionary. Head over to Pont Neuf and see if anyone has one.
Square Du Vert Galant (Pont Neuf on map)
Square Du Vert Galant - Go to Moniques stand. Buy the dictionary for 23 euros. Go back to Dieters place.
Dieter von Schwesterkranks (Rue du Bac on map)
Dieter von Schwesterkranks - Read the list again and look each item up in the dictionary. The items you have to take pictures of are:
Agrafeuse - stapler
Araignee - spider
Bougie - candle
Crane - skull
Croix - cross
Theiere - teapot
 Well, it looks like were going to be going all over the place to take these pictures. Just great!!! To use the camera, click on it in inventory. Press on the biggest button at the top. You will get a square box that serves as your viewfinder. Center each item and click your left mouse button to take the picture. Start by going into the secret passage again. Upon entry, there is a spider on the right hand side. Take a picture of the spider. Exit Dieters.
Minettes Studio (Abbesses on map)
Outer Office - Take a picture of stapler on Nancys desk.
Minettes office - Take a picture of the teapot sitting on the tea station.
Square Du Vert Galant (Pont Neuf on map)
Square Du Vert Galant - Take a picture of the cross monument in the park
Catacombs (Denfert Rochereau on map)
Catacombs - Take picture of the skull. I took picture of all the candles just in case Dieter was picky.
Dieter von Schwesterkranks (Rue du Bac on map)
Dieter von Schwesterkranks - Dieter will now be standing at his desk. Talk to him about JJ and Noisette. He will give Nancy a postcard that his uncle gave him. His uncle couldnt remember what it meant. Find out that Dieter began dating Minette to find the art Noisette supposedly hid. But, he ended up falling in love with Minette.
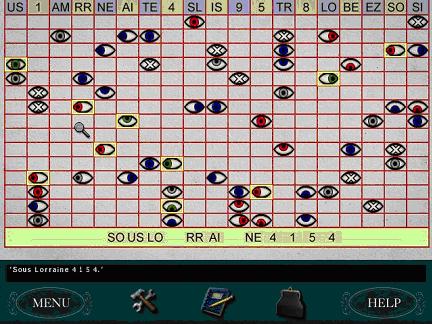
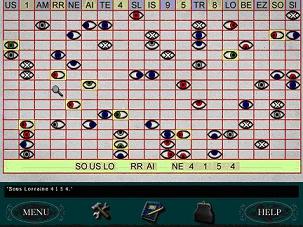
Examine the postcard. There are 4 keyholes each with a symbol. The one with the clock is the one you solved already at Dieters. Now , Nancy will need to find the others. Turn the postcard over. There are a whole bunch of eyes in different colors with the eyes looking in different directions. While the postcard is viewable, open your inventory and click on the grid that you found in Noisettes book. It will be placed over the postcard. Remember what the woman at the Museum of History told Nancy. Noisettes last words were red, left, green.
So, the way to solve the puzzle is to click on all the red eyes that are looking to the left and all the green eyes. You will get the following message: Sous Lorraine 4154.
Exit Dieters and the day will end.
DAY 6
JJ Lings (Place Monge on map)
JJ Lings - Read the newspaper on the kitchen table. Exit JJs.
Square Du Vert Galant (Pont Neuf on map)
Square Du Vert Galant - Examine the date on the cross monument. The numbers can now be changed. Your last clue was Sous Lorrain 4154. Change the numbers on the cross to read 4154. The section will flip down and reveal another clue. There are 3 pictures:
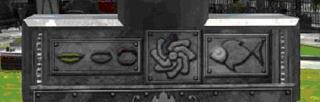
These pictures relate to the art scattered around the park.
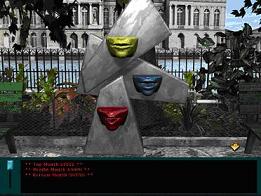
Singing Puzzle:
The goal is to get all 3 mouths to reflect what is shown on the cross. To do this, you will need to turn the handle 10 times. They should look like the picture below:
Pinwheel Puzzle
The cross shows the purple fan is the one you want to be top dead center. To do this, you need to turn the crank handle 6 times. But, there is a problem. As soon as you turn around, a squirrel will jump down and reset the pinwheel. Youll need to get rid of the squirrel.
Malikas Stand - Purchase a stake for 10 euros and string for 5 euros.
Monsieur Marchands Stand - Purchase a pie tin for 5 euros.
Pinwheel Puzzle Continued
Place the stake to the left of the pinwheel. Then, use the string and pie tin on the stake. This will scare the squirrel away. Reset the pinwheel by turning the crank 6 times again.
Water Fountain
Go to the water fountain and press the red button. The fishs eye will light up and a passage way will open up underneath the fountain. Enter the passage but realize its too dark.
Moniques stand - Purchase a flashlight for 10 euros.
Secret Passage - Enter the passage. Walk forward and Nancy will automatically use the flashlight and travel through the tunnel. Examine the small chest at the end of the tunnel. Take the key. Exit the tunnel.
*** Important - Save your game now. In the catacomb puzzle, you will need to refer to something later and it will be important to return to this save***.
Catacombs (Denfert Rochereau on map)
Catacombs - Enter and find the skull. Click on it to get to the red button underneath. Click on the red button and a passage will open up on the right. Enter the passage on the right. If you hear the police coming, turn around and go back into the darkness until they pass. Go straight across the plank to the other side until you cant go any further. Make a right. Walk to the end, make another right. Go straight until you reach the open again. Turn left, go straight 2 times, turn left and you will find the water.
Swimming Nightmare
Enter the water. In the first room youll have 3 tunnels to choose from. Choose the top one on the left. When you enter the next room, turn right and head for the #2. Go up for air. Go back down and make an immediate left. Go straight to the fan. Take the bottle of Mouton Fouette 1968. Turn around and go directly towards the #1 so you can get some air.
Go down, Right, Straight, Left, Straight 6 times and you will be back at the beginning tunnel to get some air, but facing the wrong direction. Turn around and go down under the water again. This time go straight to the bottom left tunnel. Go straight through and go right, straight, left , straight, straight, right, straight, left, straight Take the 2nd tunnel on the right hand side. Go straight, left, straight, straight, straight through right tunnel, straight, left, straight, straight, right, straight. See the #1 and a ladder.
Go up the ladder. See the Noisette symbol on the wall. Open the panel. Click on the puzzle. Nancy will read the French phrase written there.
Noisette Puzzle
En Europe, pres de Pont Neuf, habite Blanche neige dans un Chateau Rouge
In Europe, near the new bridge, Snow White lives in a Red Castle.
Since Noisette was into codes, youll want to check out the code book in your inventory. Now, I remember reading in the code book that they used number lines and metro stops to make up codes. There is no way that I could see that you can open up the code book right now or figure this out without leaving so as I suggested above, save your game here and open your last save. Open the book and take another look. Then exit the location so you can see the map of the metro station. The important words are Europe, Pont Neuf, Blanche & Chateau Rouge. See what train line each word is listed under.
Europe: 3
Pont Neuf: 7
Blanche: 2
Chateau Rouge: 4
Load the saved game that had you right at the Noisette puzzle. Enter the number 3724. The panel opens. Take the windmill looking item. Go back down the ladder.
Swimming Nightmare in Reverse:
Once you hit the water go left, straight, straight, right, straight, straight, straight, straight, right. Straight, left, straight, straight, right, straight, left, straight, straight, right, straight left, straight to the end.
Climb out of the water. You will see Nancys clothes on the floor. Take them and she will change out of the wetsuit.
To get out of the catacombs:
Go straight, right, straight, straight, right, straight, straight, left, straight, straight, left, straight across the plank to darkness. Click on the door and Nancy will open it. Exit the catacombs. Nancy is tired and goes home.
DAY 7
JJ Lings (Place Monge on map)
JJ Lings - Read the paper on the kitchen table if you want. Exit JJs. Remember, we have that bottle of wine Monsieur Marchand wants.
Map - Choose Pont Neuf Go to Pont Neuf on the map.
Square Du Vert Galant (Pont Neuf on map)
Square Du Vert Galant - Speak to Monsieur Marchard. He gives Nancy the coding machine.
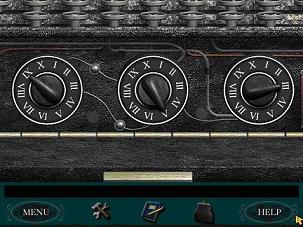
Coding Machine Puzzle:
You will need to set the dials first. Click on the short bar which is underneath the letters. From the picture you looked at, the dials should be set at 9, 5 & 3 starting at the left.
Click the up arrow to go back to the keys. You will need to use your own keyboard for this puzzle to type. In Noisettes book, there were 3 lines of what seems to be a code. You will need to type all 3 lines on your own keyboard. If you make a mistake, the machine will reset and you will have to start all over again. Here are the 3 lines of code. In the book, it kind of looks like they wrote a #1, but it is actually and I. A circle with a line through in the book it is a zero.
XTI0SMKPQQLNOREZ
A7LXTI0SMKPQQLN
OR3AS7LXTI0SMK3A
The decoder will give you this message: Rouge Blanc Rouge Bleu Rouge: Red, White, Red, Blue, Red. Hmmm
.not sure what that means. But, lets check in at work.
Minettes Studio (Abbesses on map)
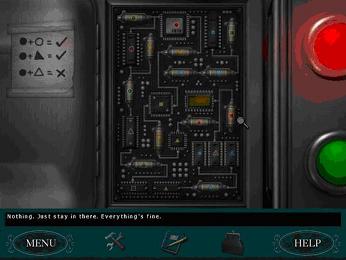
Outer Office - See something on the door to Minettes room. Its a bomb. Nancy will need to disarm it before Minette tries to open the door.
Bomb Puzzle:

The first thing to note is the instructions provided on the left hand side. Its telling you what scenarios are ok for fuses that are next to each other.
The same shape, but 2 different colors is ok.
The same color, but 2 different shapes is ok.
You can trade fuse places by clicking on one fuse and then clicking on the fuse you want to trade positions with. A horizontal fuse can only be traded with another horizontal fuse. Vertical has to trade with vertical.
Below are detailed explanations of the thought process to determine some of the fuses. Once you understand the concept, you will be able to figure out the rest of them by continuing along the fuse lines. There will be some trial and error.
Fuse #1 - To start you off, trade the green triangle for a green circle.
Fuse #11 - This fuse is connected to a red circle and a yellow square. Look at the horizontal fuse choices.
Blue and green triangles - these do not fit any of the correct scenarios.
Red Triangle - This would work with the color scheme for the red circle but will not work with the yellow square.
Blue circle and blue square - Blue circle would work with a red circle, but wont work with a yellow square. Reverse that for the blue square.
Yellow circle - This is the only one left. It works because it is a circle so it works with the red and its yellow so it works with the square.
Fuse #4 - This fuse is connected to a yellow square and a yellow triangle. Since they are both yellow, a yellow vertical shape should work here. You have a choice of a yellow circle or yellow square. This one is hard to tell right away. I actually chose the circle first, but ended up switching when the other position didnt work with the square. So the answer is a yellow vertical square.
There will be trial and error. So, you should work this out on paper. The puzzle is timed, so you will end up dying while you try to solve it. So, draw it out on paper. There are some fuses that will only have one possibility. Mark those down. When you have 2 possibilities, mark them both down so you know what to change if it doesnt work. Just so you dont feel so frustrated, I did finally solve this, but I died about 20 times. I would just let the time run down so I could stare at the puzzle and work it out on paper.
Here is the final solution:
Minettes office - Walk straight ahead and see the post to the right of the blue barrel. This is where you put the wind mill thing you got from the Catacomb Noisette. Put the windmill thing on and a puzzle will pop up.
Column Puzzle:
You need to change the colors. Each row has one large colored block with 2 smaller colored blocks on each side. You only need to worry about the large blocks of color.
From the top, change to red, white, red, blue, red.
The whole building starts to move and a trap door opens.
Secret Passage - Enter the new tunnel and follow it all the way around until you reach a steel door. Use the key you got from the small chest you found underneath the fountain. Enter the room and see all the stained glass. Walk forward and see a stand with a small glass top. Click on it and take the letter. Nancy will read the letter written by Noisette about everything that happened. Its signed NT and has XIVIII written at the bottom.
Exit out of the letter and the stand will turn and Nancy is now locked in. Click on the gate and it looks like you have to figure out another code.
Final Noisette Puzzle:
It says Une Derniere Enigme, Cher Ami
Remember, Noisettes book had Cher Ami written on the picture of the M380. So, 380 is an important number. There are a couple of pages devoted to using a certain number over and over again to code and decode. So, first we need to try and decode the first message.
On a piece of paper, write out the message and repeat 380 over and over as shown:
| U | N | E | D | E | R | N | I | E | R | E | E | N | I | G | M | E | C | H | E | R | A | M | I |
| 3 | 8 | 0 | 3 | 8 | 0 | 3 | 8 | 0 | 3 | 8 | 0 | 3 | 8 | 0 | 3 | 8 | 0 | 3 | 8 | 0 | 3 | 8 | 0 |
Like the books tells you, move each letter to the right the spaces listed underneath it. So, U moved 3 spaces right in the alphabet would be X. Where it says 8, move the letter forward 8 places. For the 0s, the letter would stay the same.
Here is the translation:
| U | N | E | D | E | R | N | I | E | R | E | E | N | I | G | M | E | C | H | E | R | A | M | I |
| 3 | 8 | 0 | 3 | 8 | 0 | 3 | 8 | 0 | 3 | 8 | 0 | 3 | 8 | 0 | 3 | 8 | 0 | 3 | 8 | 0 | 3 | 8 | 0 |
| X | V | E | G | M | R | Q | Q | E | U | M | E | Q | Q | G | P | M | C | K | M | R | D | U | I |
Now, you will need to use the decoder to translate it to completion. Noisette gave you the dial settings in her letter: X IV III So, set the dials to 10, 4 and 3
Type on your own keyboard the 3rd line listed above. You will get:
Deux..Un
Cinq
Sept = 2 1 5 7. Enter this number into the door puzzle and it will open. Go up the stairs and click on the trap door. Nancy will overhear a conversation between Noisette and 2 men. Nancy needs to get her hands on the red dress.
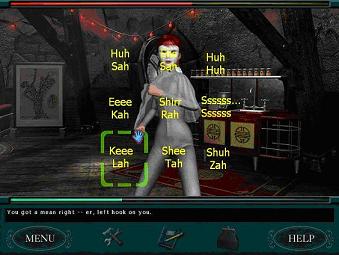
Minettes office - Go through the trap door and go right to the red dress. Touch it and Nancy will be confronted by Minette. She wants to fight. Your goal is to block her punches. Minette has a specific fight phrase for each location. Knowing the phrases will help you to anticipate where shell hit you. This puzzle is timed also so you may die a few times before you can beat her. This is a picture of the phrases and the punch locations:
Once you beat Minette, the game will end.
|