I can honestly say that this is the only game I have played that actually made me jump. As you collect items, they are placed in two areas. If you move your cursor to the top of the screen, you will find items that you can use anytime and in any place. They are on the right end. In the center, you will find items that you have made. You can access the Menu at the top left of the bar. Moving your cursor to the bottom of the screen will show you items that will be used in certain places. You will automatically use an item at the required place just by clicking on it in your inventory. The Sentry Stone appears randomly. When you see it, do not touch it or linger in the area. Turn your back and walk away. From time to time the phone will ring. Answer it. This is a walkthrough. Anything that did not contribute to the end game was left out.
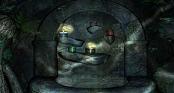
Keep a lookout into the darkness...
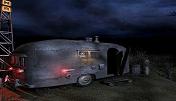
Adventure Lantern and Southern Belle invite you to turn out the lights, get someone to watch your back and be prepared to flinch as you creep through the woods solving the mystery of "Barrow Hill".
You are alone in the dark and your car has stalled . . .
| Move forward 18 times to go to the gas station. |
| Look at the red mailbox on the left. |
| Approach the mailbox and take the card from Elsie. |
| Once you have read it, click on it to put it down. |
| Move the cursor to the bottom of the mailbox so that it shows a minus sign and click to back away. |
| Turn right and move forward 3 times. |
| Turn left and move forward 3 times. |
| Look at the ground by the car. |
| Click on the blue crayon. Click again to put it in inventory. |
| Look at the ground to the right at the pile of debris and take the Cornish Fungi Kingdom book. |
| Turn right and go in the Men's Room. |
| Go into the stall and take the matches. |
| Exit the rest room. |
| Go forward and turn left. |
| Enter the building. |
| Go forward, turn left and knock on the door. Visit Ben and he might give you clues. |
| Back away from the door, turn right and go forward to the bulletin board. |
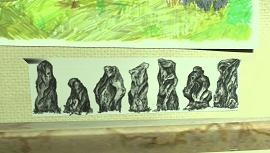
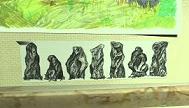
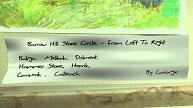
| Look and the picture of the stones. Click on it to get the names of the stones. |
| Back away from the bulletin board and turn left. |
| Read the pamphlets there. |
| Turn left, go forward and turn left again. |
| Enter the diner. |
| Go forward, turn left twice and go behind the counter. |
| Look at the cash register. |
| Look at the note under the cash register. The code for the door in this game is 451. The code is random. |
| Back away, turn left and go in the kitchen. |
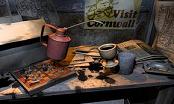
| Turn right and look at the lantern. |
| Click on the lever on the top of the lantern. |
| Click on the base of the lantern to turn the reflector. |
| Use the matches in your inventory to light the lantern. |
| Pick up the lantern and turn around. |
| Look closely at the fuse box. |
| Click on the button at the bottom of the fuse box. |
| Click on the fourth fuse from the left. Click again to remove the top. |
| Click on the wire in the upper left corner. Click on the bottom contact point. |
| Click on the top to put it back on. |
| Click on the button on the bottom to turn on the lights. |
| Back away from the fuse box, turn right and go forward. |
| Turn right, go forward, turn left and see the radio. Tune in 15.3 and hear Emma Harry. Leave the radio on. You are able to get clues from the radio. Once you have turned the radio on, you have to wait until Emma is done before you can back away. |
| Back away and turn right. |
| Go forward and open the cupboard. Take the basket. |
| Look down and open the box. Take the eggcups. |
| Exit the kitchen and go talk with Ben. Talk with him again. |
| Leave the building and go past the gas pumps to the motel. |
| Enter the motel using the steps on the right by the picnic table. |
| Go to door 2 and enter the code you got at the cash register on the keypad above the doorknob. The code is random. In this game it was 451. |
| Go to the desk. |
| Turn on the radio and leave it on. |
| Open the tool box and take the trowel. |
| Read the letter in the box behind the toolbox. |
| Open the right hand drawer and take the cell phone. Read the letter that was under the cell phone. |
| Back away, turn left twice and put the cell phone on the charger. Read the letter to Lucy from Pete that is under the pencil. |
| Look at the bed. |
| Read the journal. |
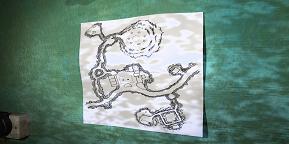
| Look at the map on the wall next to the nightstand. |
| Exit the room, go back in and the cell phone is charged. Take it. |
| Go back outside, turn left and go toward the fence. |
| Turn left just past the picnic table. |
| Go forward and turn on the lantern. |
| Go forward until you have a close view of the sign that says Stop The Dig on your right. |
| Turn right, then go forward twice to the trail sign. |
| Turn right, go forward. |
| When the Sentry Stone appears, don't touch it. And don't linger. Turn your back and move away. |

| Go straight down the path, past the trail sign and out to the road. |
| Turn left and go back to the gas station. |
| Go forward to the playground. |
| At the edge of the fence with the poster on it, turn left. |
| Enter the playground and click on the fence slat. |
| Go through the fence. |
| Turn right, then left and go forward. |
| Go forward, turn left and look at the trashcans. |
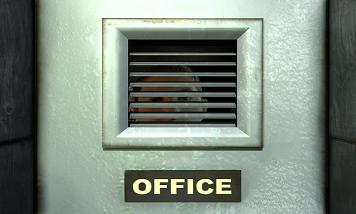
| Turn right, go forward, turn left and look in Ben's window. |
| Back away, turn left, go forward, turn left and read the newspaper. |
| Back away and go to the fence by the tower. |
| Enter through the hole in the bottom of the fence. |
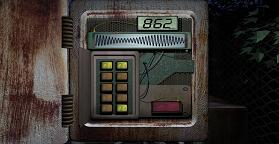
| Go forward, turn left and open the box on the tower. |
| Look closely at the manufacturer's label. |
| Back away from the label and open the gray box. |
| The goal is to get the output to be between 830 and 865 MHz. |

| Press the red button. |
| Leave the tower and go back inside the building to talk with Ben. |
| Get the code for room one. The code for this game is 871, but it is a random number. |
| Exit the building and go to room one. |
| Enter the code Ben gave you into the keypad. |
| Enter the room, go forward, turn around and take the GPS by the wall on the left. |
| Leave the motel room and go out to the road. |
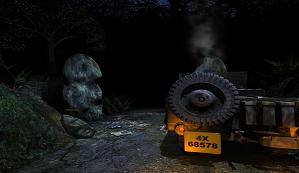
| Turn left and follow the road. Find Conrad Morse's jeep. |
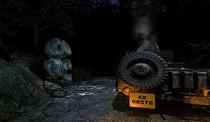
| Look at the ground next to the Jeep. |
| Pick up the PDA. |
| Back away, turn right and see a radio. Turn it on using the button at the bottom. Tune into Emma, you have to wait until she is done talking before you can continue. |
| Turn right, move forward, turn right and enter the woods. |
| Go to the barn door. |
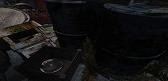
| Turn left and go to the drum. |
| Click on the crate to pick it up. |
| Turn right and put the crate on top of the drum under the window. |
| Move your cursor towards the top of the screen and click to go up. |
| Go forward towards the table. |
| Turn right twice and look in the box in the cart. Take the gas torch. |
| Turn right and look at the ground to the right of the drum. Take the black tubing. |
| Back away and turn right. |
| Click on the gas tank. |
| Click on the black tubing in inventory and attach it to the gas tank. |
| Click on the gas torch in inventory and attach it to the black tubing. |
| Click on the valve next to the gauge to turn on the gas. |
| Use a match to light the gas torch. |
| Before exiting, use the ladder to go upstairs. When you get to the top, back away and look at the table. Look at these items, if you would like. There is a camera in the pot that pictures in it if you would like to look at them. |
| Turn left and look in the niche on the left. |
| Pick up acorns. |
| There are items in the niche on the right that you may look at if you wish. |
| Turn right and go back down the ladder. |
| Exit the building. |
| Turn right and go back out to the road. |
| Look at the notes in the PDA and get the code to Conrad's room. |
| Go back to the motel and go to room 3. |
| Enter the code from the PDA. In this game it was 766. |
| Look around the room. |
| Open the drawer in the desk and listen to the tape player. |
| Read all the papers in the room that you can pick up. |
| Look in the trash can and put the torn paper together. |
| The combination to the briefcase is related to the license plate on Conrad's Jeep. |
| Go to the briefcase and enter the result of multiplying 4 x 68578, Conrad's license number. |
| Enter 274312. |
| Read everything in the briefcase. |
| Exit the room and go stand in front of the Men's Room facing the pumps. |
| Activate the GPS. |
| Walk forward. |
| Click on the fire extinguisher and take the piece of the broken seal. |
| Call Emma at the radio station. 585-2131. |
| Go listen to Ben. |
| Back away from the door, turn around and go through the diner. Use the exit directly in front of you. |
| Turn left, go forward, turn left and go through the fence. |
| Go around the back of the building to Ben's window. |
| Enter, turn around and play all the videotapes. |
| Back away from the videotapes, move forward, turn around and go through all three drawers in the filing cabinet. |
| Go to the desk. Take the blank paper from the right drawer and the batteries from the left drawer. |
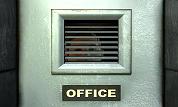
| Back away, turn around, go forward, turn right and unlock the office door. |
| Exit the building and go to the road. |
| Turn left and continue down the road to the scarecrow. |
| Turn right. |
| Go over the fence. |
| Go forward past Wincey and over the fence. |
| Continue forward. |
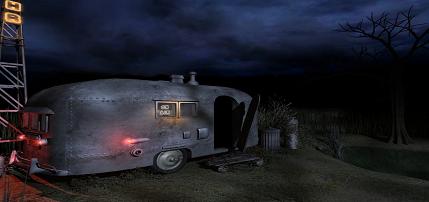
| When you get to the planks, go forward once then turn right. Continue forward to the trailer. |
| Enter the trailer. |
| Go left to the computer. |
| Enter Wincey. The password is case sensitive. |
| Go through all of Emma's favorite places. |
| Back away from the computer and turn around. Listen to all the tapes, in particular the one top center. |
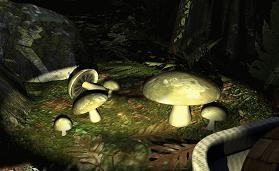
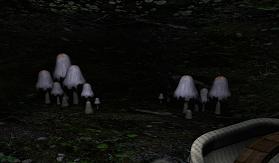
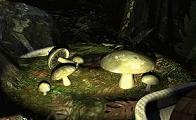
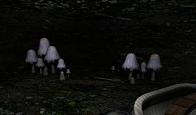
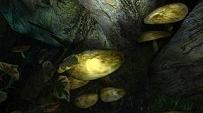
| Exit the tapes and look at the mushrooms closely. Take mushrooms from the two left most pots on the bottom shelf. You can identify them using the book you picked up at the gas station. They are Destroying Angel and Liberty Cap. |
| Read the Metal Detecting Beginners Guide. |
| Turn right, go to the bed and put the metal detector together. Place the wire on the rod, the rubber handle on the right end of the rod, the black box on the rubber handle, the black rubber piece on the left end of the rod and the ring on the left end. |
| Open the battery compartment and insert the batteries. |
| Exit the trailer and go back across the planks and take the first right. |
| Move forward and then left toward the ruined church. |
| Go forward and turn left to look at the monument. |
| Go forward and left to get behind the monument. |
| Click on the trowel and you will open the back of the base. |
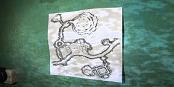
| Read the red book, take the metal artifact and look at the picture of St. Anneka's well. |
| Go across the planks to the church ruin. |
| Click on the metal detector at the top of the screen. Turn it on. |
| Move forward until the metal detector's needle goes to the right and you hear a buzzing noise. |
| Look closely at the ground and use the trowel to dig up a piece of the seal. Read the note you find with it. |
| Turn off the metal detector, turn around a go forward to the planks. |
| Turn right and go straight back to the road. |
| Turn left and go to the phone booth. |
| Turn right and go forward and take the False Death Cap mushroom. |
| Turn around, go back to the road and go right toward the gas station. |
| Pass the gas station and go to the mailbox. Move forward three times and turn right. |
| Look at the bush on the left of the tree. Pick the red berries. |
| Turn left and go back to the stalled car. |
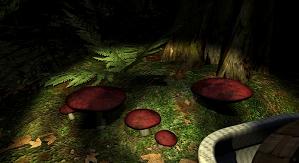
| Take the Saggy Ink Cap mushrooms on the left. |
| Turn left and go forward to St. Anneka's well. Take the stairs on the left. |
| Go forward, turn right and take the Dryad Slumber mushrooms. |

| Back away from the mushrooms and turn left. |
| Go forward until the path is blocked and turn left. |
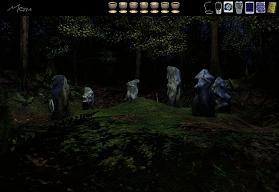
| Go forward to the stones. |
| Pass the stones and the tent to the pile of debris next to it. |
| Turn on the metal detector and use the trowel to unearth the hip flask. |
| Click on the eggcups and get an offering. Take the offering. Turn off the metal detector. |
| Back away from the debris and turn left. |
| Go straight down the path and go down the stairs and turn right. |
| Take the Parasol mushrooms. |
| Back away from the mushrooms, turn right, climb the stairs and go back to the tent. |
| Turn right. Go past the four stones. When the lantern lights, turn left and go back to the gas station. |
| Go into the diner. |
| Go all the way to the back table and turn right. Move the menu. Click on the shaker in the back. Click on the eggcups and get the salt offering. Take the offering. |
| Back away from the table and turn right. Go to the cash register. |
| Use the trowel on the cash register to get some coins. |
| Enter the kitchen, go forward to the stove, turn right and click on the basket in your inventory. |
| Put the berries, acorn and Dryad Slumber mushroom in the mortar. If you make a mistake, click on the trashcan and begin again. |
| Click on the pestle, then click on the eggcups. |
| Take the offering. |
| Exit the kitchen and go into the office. |
| Turn left, go forward and go out the back door. |
| Turn right, turn around and look at the Mini Casino. |
| Click on the gold coins in your inventory and put one in the slot. Pull the handle. You need silver coins. Continue to play the slots until you get silver coins. To play a subsequent time, back away and then look closely again. |
| Back away from the slot machine and go forward, turn right, forward, right, forward and then right again. |
| Look down and take the headlight lens. |
| Back away, turn around and see a ladder. |
| Go forward and pick up the ladder. Turn left and click on the ladder to place it against the building. |
| Go up the ladder until you are on the roof. Turn left and go forward to the metal ladder. Turn right and go up the metal ladder. |
| Look closely at the skylight and unlatch it. |
| Enter the garage through the skylight and turn right. |
| Enter the office. |
| Turn left and pick up the oil can. Click on the eggcups. Click on the lever on top of the oil can. Take the offering. |
| Exit the office. Turn right and click on the ladder. Go down the ladder turn around, go forward and turn right. |
| Click on the latch on the door. Click on the doorknob and exit the garage. |
| Turn right and go back through the office and out to the motel. |
| Go past the rooms to the corner and turn right. |
| Go to the vending machine. |
| Use the silver coins to purchase drinks. You need pear, gooseberry and blackberry. Remember to take the drinks after you buy them. |
| Back away from the vending machine and turn around. |
| Go out to the car and look at the debris on the right side. |
| Pick up the Omega 3 Regeneration Tonic. Click on the eggcups. Click on the lid of the bottle. Take the offering. |
| Go to the kitchen. |
| Enter the kitchen and turn right. Go forward and turn right to look at the blender. |
| Look closely at the blender and take off the lid. |
| Click on the blender in the following order, blackberry twice, pear once and gooseberry once. Take the juice offering. |
| Exit the diner and turn right. |
| Go to St. Anneka's well. |
| Turn left, then right and look at the stone monolith. |
| Turn on the lantern. |
| Use the paper on the stone. |
| Use the crayon on the paper. |
| Take the paper. |
| Turn left and light the lantern. |
| Enter St. Anneka's well. |
| Turn left as soon as you enter and open the tin can. |
| Read the visitor's register. |
| Back away and turn right. |
| Enter the grotto. |
| Go forward and turn right. |
| Go in the alcove and see the hole in the wall. |
| Click on the metal artifact you picked up at the monument near the church ruins. |
| Click on it again. |
| Turn right and look at the box behind the stone. |
| Click on the box and open. Study the contents of the box. |
| Back away from the box, turn right and enter the grotto. |
| Turn right. |
| Using the matches in inventory, light the blue candle and then the brown candle. |
| Click on the eggcups. |
| Take the water. |
| Turn around and exit St. Anneka's well. |
| Go back out to the road and take the stairs across from the well. |
| Go up the stairs and follow the path until it is blocked. Turn left. |
| Go forward to the stones. |
| Go to the first stone and turn left. Look closely. |
| Use the paper on the stone. |
| Use the crayon on the paper. Take the paper. |
| Do this for all four stones. The paper is on the top bar now. |
| Go forward past the tent to the stone circle. |
| Save your game here. You are about to make offerings to the stones. If you make a mistake, you will have to go back and get a new offering. It is advisable to save your game after each offering so that you don't have to start over. |

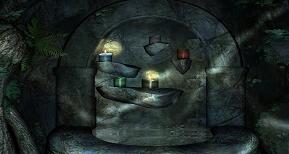
| The first stone on the left is Fish. The second eggcup in your inventory. |
| Turn right and go to the next stone and turn left. It is Oil. Oil is the first eggcup on the top inventory bar. |
| Turn right. The third stone is Plant. Choose the sixth eggcup in inventory. |
| Go right again and look at the fourth stone. Whiskey is the offering here and it is the fourth eggcup. |
| Go right and look left at the fifth stone. The Blessed Water should be used at this stone. Select the third eggcup. |
| Turn right, then left to see the sixth stone. You will need fruit Juice for this stone. It is the seventh eggcup. |
| Turn right, then left for the last stone. Salt is required for the offering. It is the only remaining eggcup. |

| Exit the stone ring and answer the phone. |
| Go back to the tent area and pick up the third piece of the seal. |
| Do not use the pieces of the seal at the dig site yet. The game will end before you are done. |
| Go forward twice and turn right. |
| Follow the path and go down the stairs to the altar stone. |
| The altar stone is on your left. Go forward to the end by the stone pillar. Turn left to get behind the altar stone. |
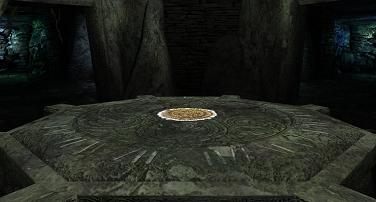
| Look closely at the altar stone and place the three pieces of the seal in the depression in the stone. |
| Back away and turn left. |
| Look closely at the hole in the top of the stone. Put the headlight lens in the hole. |
| Turn right and go to the other stone pillar. Place your hand in the handprint. |
| Take the restored seal and go back to the stone circle. |
| Go around to the back of the mound and see a dig site. |
| Look closely and use your trowel. |
| Turn right and click on the table. Look closely at the center. Place the restored seal in the center. |
|