Part I ñ Arrival at the Manor
You will start the game as you walk into the manor. Open your notebook and take a look at the letters. It seems Elisabeth was somehow unable to give you the keys needed to explore the manor. We will need to figure out a way to leave this initial area and explore the building on our own.
Walk up to each of the sarcophagus. You will note that there is a date inscribed underneath each of them. These dates will provide the hint for the first puzzle. The complete list is:
| - | Old Kingdom 2706 ñ 2200 B.C. |
| - | Late Dynastic Period 664 ñ 332 B.C. |
| - | New Kingdom 1550 ñ 1069 B.C. |
| - | Middle Kingdom 2033 ñ 1650 B.C. |
| - | XIX Dynasty 1279 ñ 1213 B.C. |
You will notice two small sphinxes on either side of the entrance. The sphinx that was on your left as you entered the manor has a hotspot on its head. Click on it to open a panel on the wall and reveal the first puzzle. The puzzle will ask you to enter four numbers. Each number is labeled with a two-character initial. The initials correspond to the periods noted on the labels in front of each sarcophagus. To solve the puzzle, simply enter the end date of each period. The correct solution is:
| - | OK: 2200. This is the end year for the Old Kingdom. |
| - | MK: 1650. This is the end year for the Middle Kingdom. |
| - | NK: 1069. This is the end year for the New Kingdom. |
| - | LD: 332. This is the end year for the Late Dynastic Period. |
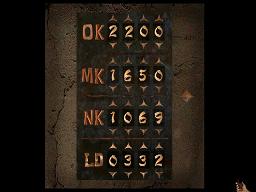
When you enter all four of the years, click on the diamond-shaped button on the right. A panel on the stairs will open. Walk up to it and pick up the key hidden inside. Now walk to the locked door at the far side of the entrance hall. There is a plant directly across from the locked door and close to the stairs. Walk up to the plant and take seal in the pot. Go to the locked door and open it with the key you found after solving the date puzzle. Enter the next room.
You will see a mummy in front of you. To the right of the mummy, you will find a box. Walk up to this box and open it by clicking on it. Take the oil flask, hammer with lever, and screwdriver from the box. Walk up to the door to your left as you face the entrance. There is a stool to the right of this door. Take the tie pin from underneath the stool. Do not go through the door yet. We will explore that area later. Instead, walk across the room towards the other door.
When you are standing in front of the door, look at the ground to the left. You should see a seal. Put it in your inventory. Now go through the doors. You should find yourself in a room with four statues lined up against the wall to your right.
Click on the second statue from the left. The statue will move to the right and reveal a locked box. Use your screwdriver on the padlock to break it. Open the box and take the key inside. Go to the far end of the room. There should be a door on your left and another door on your right. At the corner between the two doors, there is a seal on the ground. Take it.
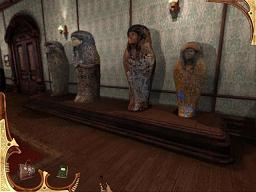
Try to use the key you just found on the locked door to your right. Sherlock will point out that the lock is too rusty. Use your oil flask on the lock. Now unlock the door with your key. Enter the next room.
Walk up to the mirror and click on it. After the short cut scene examine the crates in the center of the room. You can click on one of these crates. Use your hammer to break the box open. Take the three gear wheels, a third seal, and the pieces of wood. There is a locked cupboard against the wall. Use the tie pin from your inventory to open it. Take the whisky bottle. We are done with this room. Return to the previous area.
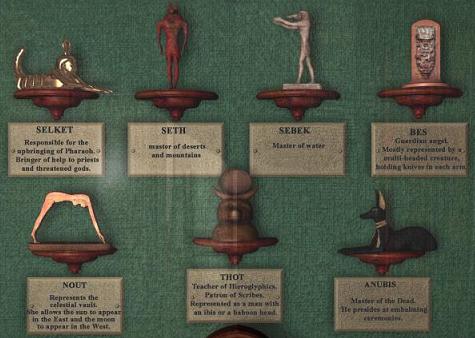
When you enter the statue room again, you should see a glass cabinet in front of you. Walk up to it and examine the small sculptures inside. They are depicting various characters from Egyptian mythology. Make a note of the different symbols used to depict individual figures. This is the hint for the seal puzzle we will be solving in a moment.
Leave the statue room through the door at the far end and go back to the room with the mummy lying in the center.
Walk directly across and enter through the doors in front of you. When you go through the doors, you will be in a room with a large statue at the center and two doors.
Move forward once to the left side of the statue. Look at the ground to your right. You should see another seal. Put it in your inventory.
Now walk up to the doors at the end of the room. Take the piece of bandage in front of the door to your right.
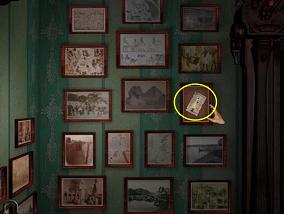
There is a collection of pictures on the wall between the two doors. Take a closer look at these pictures.
On the right column, you can click on the third picture from the top to reveal a hidden picture of Elizabeth Montcalfe.
Click on it to add it to your collection of documents.
Look at the door to your left. You should see four rectangular symbols and four circular slots.
You need to use the seals in your inventory on these four slots. The descriptions and small statues we saw earlier provide the hint for this puzzle. The correct arrangement is:
| - | The Anubis seal should be placed at the top. This is the seal with a wolfís head. |
| - | The Thoth seal should be second from the top. This is the seal with a storkís head. |
| - | The Nout seal should be the third. This is the seal with an arching woman. |
| - | The Bes seal should be at the bottom. This is the seal with two heads. |
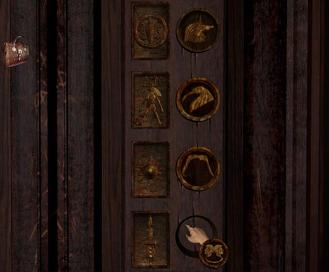
When you insert all four seals, the door will be unlocked. Go into the next room. Take the papers and the small note Lord Montcalfe from the desk at the center. At the other side of the room there is another desk where you will find matches and a candle. Take the matches and use them on the candle. Walk to the door next to the desk. Use all three geared wheels on the mechanism next to the door. Sherlock will automatically place the wheels in the correct position.
To your left, there is a wood-burning heater. Click on the panel at its bottom to open it. Use the papers in your inventory on the opening. Use the pieces of wood you had taken from the crate you broke open earlier. Pour out the whisky from the bottle you found inside the cupboard in the mirror room. Finally, use the matches to start the fire. The machine will start working and the doors will open.
Part II ñ Exploring the Library and the Second Floor
Sherlock Holmes will enter the library. Take the blue history book hidden behind a column to your right.
Climb up the stairs to the next level. Find the bookcase containing blue books similar to the one in your inventory.
You will notice that one of the books on a shelf is green. Use the blue book from your inventory to replace the green book.
Now you will have a green religion book in your inventory.
As you probably guessed, there is a bookcase full of green books on the other side of the second floor.
There is a single red book among the green ones. Use the green religion book from your inventory to replace the red book.
Now you have a red geography book in your inventory.
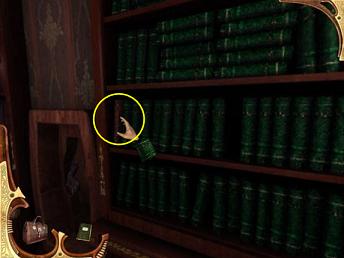
Go back down the stairs to continue our cleanup efforts. On the first floor there is a bookcase with red books.
Much to our astonishment, there is a single gray book on one of the shelves. Replace it with the red book in your inventory.
The newest book in your inventory is a gray philosophy book.
Since Holmes does not quite have the time to read the book, letís take it to its proper shelf instead.
At the opposite end of the room from the red books, there is a bookcase of gray books. Replace the single black book here with the gray one from your inventory.
The black books are on a bookcase on the second floor. This time replace the single yellow book on the bookcase with the black law book from your inventory
Return to the first floor and find the bookcase with yellow books. Replace the single white philosophy book on this bookcase with the yellow one from your inventory.
Now turn around and take another look at the bookcase with gray philosophy books. Use the philosophy book in your inventory on the hotspot at the center of the bookcase.
Holmes will finally find a book with a key hidden inside it.
There is a locked door on the second floor of the library. Use your newly found key to unlock the door. Go into the next area.
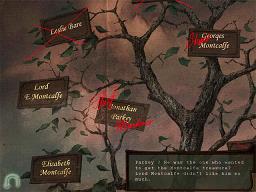
Go through the door in front of you. On the left side of the next room, you will see a family tree, a table with several smoking pipes, and a few pictures on the wall.
Click on the family tree to take a closer look. Holmes will point out that Lord Montcalfe did not like Parkey much.
The words thief and murderer are written next to his name. Also make note of the picture depicting Lord Montcalfe in Egypt with two other people.
Take a look at the cabinet underneath the shelf with the smoking pipes. You will see a pipe cleaner. Put it in your inventory.
 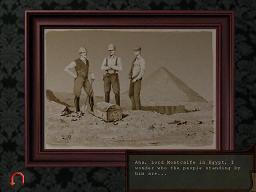
Walk up to the curtains on the side of the room across from the family tree. To your right, there is a glass cabinet.
Click on it to take a look inside. Holmes will point out that the mummy is missing and sand is left in the casket.
To the right of the curtains, there is a letter hidden under a small coffee table. Click on the letter to read it.
Now click on the curtains to reveal a locked door. For now, we are done in this room. Return to the corridor.
Once you are back in the corridor, turn left and move forward once.
Across from the door, there is fork next to the carpet on the ground.
You will need it in the next room. Walk through the door on your right to enter Lord Montcalfeís study.
Immediately to your left, there is a document on the floor. Click on it to take a look at the Collection Register.
Walk up to Montcalfeís desk. Walk around the desk and click on the window. A cut scene will follow.
After the cut scene, turn around and take the letter from Montcalfeís desk. Before leaving the study, take a close look at the painting over the fire place.
There is a hole at the bottom center part of the painting. Use the fork you found in the corridor on this hole.
Holmes will find a hidden compartment behind the painting. Take the correct Collection Register and the cane.
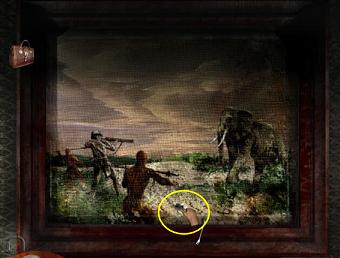
Exit the study. Turn right and continue down the corridor. Enter the bathroom through the door on your right.
Click on the clog inside the bathtub to drain the water. Zoom in and take a look at the sand.
Holmes will note that it is the same sand that we saw earlier in the living room. Take the bar of soap next to the sink.
Return to the living room. Walk up to the lion trophy hanging over the fireplace.
Use the cane you found in the study on the lion. Holmes will find another hidden compartment.
Take the package hidden inside. Open your inventory and click on the package. You will find several puzzle pieces.
You will need these to solve the puzzle in the next room.
It is time to unlock the door that was behind the curtains. First, use the bar of soap on the lock.
Now use the fake register on the hotspot underneath the door. Finally, use the pipe cleaner to push the key.
Holmes will manage to get the key to land on the fake register. Take the key and use it to unlock the door.
You are now in the bedroom. There is a small table to the left of the bed. When you look at the top of the table, you will see that some pieces are missing.
Use the wooden puzzle pieces from your inventory on the correct slots to complete the puzzle.
Once all the pieces are in place, click on the drawer to open it. Click on the three documents inside the drawer.
Holmes will find a letter from Dr. A. Bigoudin, a cryptic note, and the answer to the next puzzle.
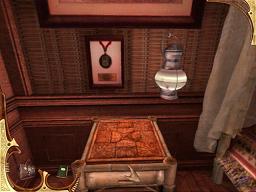
To your left, there is a painting on the wall. This painting has several hotspots.
You need to click on them in the correct order. The illustration you found in the drawer provides the hint for this puzzle. Click on the hotspots in the following order:
| - | Click on the eye of Ra. |
| - | Click on the woman. |
| - | Click on the cat. |
| - | Click on the man. |
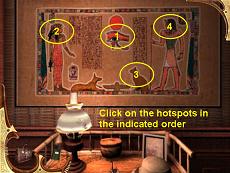
The painting will move up and reveal a scepter. Turn around and look up. Use the scepter on the ceiling fan.
A vase will break on the far side of the room. Take the golden scarab that falls out of the broken vase. Go back to the study.
There is a hotspot on the left side of Montcalfeís desk. Click on it to reveal a small contraption.
Use the golden scarab to complete it. Click on the two dials. Click on the machine one more time to reveal a gun and two documents.
Read the documents to find out more information about what might have happened to Montcalfe. Holmes will refuse to take the gun.
Unlocking the hidden part of the desk actually gave Holmes access to another puzzle.
Note the small wooden box to the left of the door leading out of the study and into the corridor. Click on it to reveal a slider puzzle.

To help you solve the puzzle, I have numbered the positions as shown in the image above.
Click on the positions in the indicated order to solve the puzzle. This is not necessarily the quickest solution, it is simply the one I used to get past the puzzle.
If you make a mistake, you can reset the puzzle by backing away and attempting it for a second time. Now for the solution:
| - |
To complete the top row, click on the numbered positions in the following order:
15, 11, 10 , 14, 13, 9, 5, 6, 10, 9, 5, 6,
2, 1, 5, 6, 7, 3, 2, 6, 7, 8, 4, 3, 7.
The puzzle should look like the image.to the right |
 |
|
| - |
To complete the second row:
6, 5, 9, 13, 14, 10, 6, 5, 9, 13, 14, 15, 16, 12, 8, 7, 6, 10,
14, 15, 16, 12, 8, 7, 11, 10, 9, 5, 6, 7, 8, 12, 11, 7, 6, 5, 9.
The puzzle should look like the image to the right |
 |
|
| - |
To complete the third row:
10, 11, 12, 16, 15, 14, 13, 9, 10, 11, 15, 14, 13, 9,
10, 11, 12, 16, 15, 14, 10, 11, 12, 16.
The puzzle should look like the image to the right: |
 |
|
| - |
To complete the final row:
15, 14, 13, 9, 10, 11, 12, 16, 15, 14, 13, 9, 10, 11, 12, 16, 15, 11, 10, 9, 13, 14, 15, 16, 12, 11, 10, 9, 13, 14, 15, 16. |
|
|
The box will open and a key will be revealed. Put it in your inventory. Go back to the living room. Use the key you got from the slider puzzle on the locked cabinet in this room. You will find a second scepter inside the cabinet.
Go back to the corridor. Walk up to the statue on the right end of the corridor. Use both of the scepters on the statue. Click on the statue to open a hidden door. Holmes will walk down the stairs into the next area.
Part III ñ Exploring the Basement
You are in a wine cellar. Look at the space between the two wine racks on the ground directly in front of you. Take the rag you will see here.
Turn right and walk up to the small table. Take the box of matches and jug of water on the table. Click on the hotspot on the mattress next to the table. Take the stick on the ground next to the table. A wooden panel will be revealed. Walk up to the wine kegs at behind you on the far side of the room. Take the hammer on the ground next to the kegs. Go back to the mattress and use the hammer on the wooden panel. Holmes will find a statue. Turn around and walk up to the rack of wine shelves closest to the door you came through.
Take the stick that is on the second row of shelves from the bottom. Also take a bottle of Spain vine on the shelf next to the stick. Move forward once along the wine racks. At this spot, turn slightly to the right while still facing the shelves. The second shelf from the top contains a bottle of Bourgogne Holmes can take. Now turn slightly to the left. Once again from the second shelf from the top, take a bottle of touraine. There is another hotspot on the column of shelves at the corner of the room. Take a bottle of Bordeaux from the top shelf. Finally, turn around and take an empty bottle from the rack at the center of the room.
Continue along the shelves. Move forward one more time and turn around to take a look at the wine rack at the center of the room. In the area between the two sides of the wine rack, you can find a second rag. Put it in your inventory.
When you move forward one more time, you will be in front of a shelf where Sherlock can take a bottle of gin and a bottle of liqueur. When you remove these items, click on the back of the shelf. Holmes will point out that the bottom is made to fit circular objects.
Take the bottle of Bordeaux from your inventory and use it on the empty shelf. Holmes will place it on the far left side. Now take the bottle of Bourgogne and use it on the shelf. Holmes will put it next to the Bordeaux. Use the bottle of touraine on the shelf. Now use the bottle of Spain vine. Finally, use the bottle of liqueur. A second slider puzzle will be revealed.
Once again, I have numbered the tile positions. Note that the center piece is the one missing in this case. Click on the indicated positions to solve the puzzle.
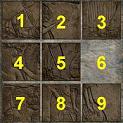 |
| - | To complete the top row: 3, 2, 1, 4, 7, 8, 5, 2, 1, 4. |
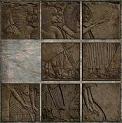 |
| - | To complete the rest of the puzzle: 5, 6, 9, 8, 5, 4, 7, 8, 5 |
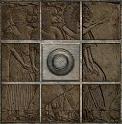 |
| - | Click on the button that will be revealed at the center. |
Once you solve the second slider puzzle, walk up to the kegs where you found a hammer. Combine a rag with a stick in your inventory to make a torch. Pour gin on your torch. Finally, light the torch with the box of matches. Turn around and face the wall. Use lit torch from your inventory on the hidden door and Holmes will go through.
You will find yourself in a laboratory. Your torch will stay lit for a limited amount of time. However, if it dies out, you can combine the second stick and rag in your inventory with gin and matches to make another torch. Immediately to your right as you enter the laboratory, there is a small pot on the ground against a cabinet. Use your hammer on the pot to find a key.
Walk up to the desk to the right of the entrance. Take the key from the box. Move along the desk. Take the document lying to the middle of the desk. Also take a look at the notebook next to the document. You can also examine the container of laudanum. Turning around at the spot where you find the documents, you can find a study on reincarnation. After examining the study, walk around the table at the center of the room. When you get to the other side, you will be able to click on a hotspot near the center of the table. It has the following note:
| - | D = Clock Wise |
| - | S = Anti Clock Wise |
| - | At the same time or you will be dead. |
Turn around and examine the cabinet with the broken glass. Take a look at the books inside the cabinet. Holmes will comment that the books are about mysticism. After you examine the books, look for a spot to your left on the ground where you can go forward. Click on this spot and you will be able to look underneath the table. Take the oil flask you will find underneath the table.
Walk up to the desk at the far end of the table. There are four notes scattered on this table that will give you some insight into the investigation. You can also click on one of the two books to read some information about the curses cast upon those who would dare defile a pharaohís tomb. The second book will have information about the primary elements and their symbolic representations.
Once you are done reading through the notes and the books, click on the chair in front of the table. Sherlock will pick up the chair. Turn around and find the hotspot on the left side of the table. Drop the chair here and climb on top of it. Sherlock will be able to reach the opening on the wall and take the key.
Now that you have both of the keys, take another look at the desk where you found the notes and the books. There is a locked drawer. Click on the hotspot to take a closer look. Put the key with a G inscribed on it into the slot to the right. Click on the key with a C inscribed on it into the slot to the left. Click on the arrow pointing clockwise on the right side. Click on the arrow pointing counter-clockwise on the left side. Finally, click on the turn button. Sherlock will open the drawer and find a statuette. Click on the document inside the drawer.
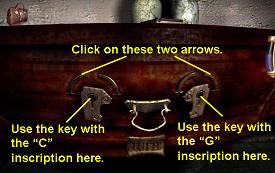
Walk up to the door on the right side of the desk. You can find a pile of sand on the floor here. Click on it to add it to your inventory. Now walk up to the door on the other side. Use your oil flask on the door. The key you found by crashing a pot will unlock this door. Go inside to a room with many artifacts and five small pillars. On the opposite side of the room from the entrance, take the oil lamp on the floor. Across from the wall where you find the oil lamp, you will find an oil flask.
If you will remember, one of the notes we found at a desk in the laboratory mentioned ancient symbols used to depict prime elements like fire and water. The document pointed out that:
| - | Water was typically illustrated as a droplet or waves. |
| - | The ground was depicted as a tree or a triangle. |
| - | Fire was drawn as a flame. |
| - | Air was drawn as a whirlwind. |
We will have to put this information to use in order to solve the puzzle in the restoration room.
Note the five small pillars scattered around the room. There is one in each corner and one at the center.
The four pillars at the corners have symbols on them. These symbols are your guide to solving the puzzle. Here is the solution:
| - | Walk up to the pillar with a red flame symbol. Use your matchbook on the opening at the top. |
| - | Go to the pillar with a water droplet symbol. Use your water jug on the opening at the top. |
| - | Go to the pillar with a whirlwind symbol. Place the empty bottle on the opening at the top. The idea is that the empty bottle contains air. |
| - | Walk up to the pillar with a triangle symbol. Use the sand in your inventory on the opening at the top. |
Once you place the items to represent all four elements, a panel will open up next to the entrance. Click on this area to start another puzzle. The puzzle gives us the following hint: Five fingers in one hand. One is cut but still present. The last will be the first. The idea is to take the four stone circles and place them in the correct position. Once again, one of the articles from the laboratory provides the hint. At the desk along the right wall of the laboratory, there was an article about the Indian caste system. The document pointed out that:
| - | Brahman is the highest caste |
| - | Ksatriya is the second caste. |
| - | Vaisya is third. |
| - | Sudra is fourth |
The information on the castes can be used to solve the puzzle. Just put the letters in the order of the castes starting with the lowest. Here is the solution:
| - | Put the S in the first slot from the left. |
| - | Put the V in the second slot. |
| - | Put the K in the third slot. |
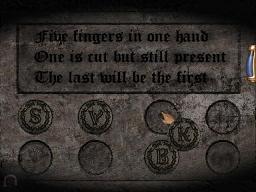
The fire pillar will move aside and reveal an opening. The stone circle inscribed with the letter B will remain in Sherlockís inventory. Walk up to the opening on the ground. You will find a third Anubis statuette inside. You can now leave this storage room.
The locked door on the right side of the desk inside the laboratory is now open. Go through the door into the new area.
You should be in a room with four statues along the walls. The floor of the room will move every time Sherlock takes a step.
Follow these instructions to get to the door on the other side:
| - | Face the two statues on the far side of the room. Move forward once. |
| - | You will end up next to two of the statues. Click on both of them. |
| - | Face the statues on the far side again. Move forward once. |
| - | You will now be next to the wall with two chains. Turn around and face the wall on the opposite side. Move forward once. |
| - | You should now be next to the remaining two statues. Click on both of them. A panel will open next to the entrance. Ignore if for now. We will come back for it in a moment. |
| - | Face the wall with two statues opposite from you. Move forward once. |
| - | Face the wall with the chains. Move forward once. You will arrive at the center of the room. |
| - | Face the statues next to the entrance door. Move forward once. You will finally get to the door on the opposite side of the entrance. Click on the inscription on the door to take a closer look. In order to answer the riddle, you need to go back to the room with the five pillars. |
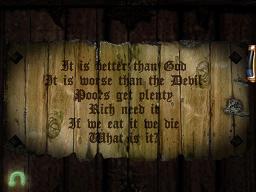
Move forward twice to return to the entrance of the room with the moving floor. Before you leave, take a fourth Anubis statuette from the opening on the floor. Return to the pillar room. Sherlock is now able to put an object inside the center pillar. Use the stone with the B inscription on the opening at the top of the pillar. Now go back to the room with the moving floor. Retrace your steps to get to the door on the opposite side:
| - | Face the two statues on the far side of the room. Move forward once. |
| - | Face the statues on the far side again. Move forward once. |
| - | You will now be next to the wall with two chains. Turn around and face the wall on the opposite side. Move forward once. |
| - | Face the wall with two statues opposite from you. Move forward once. |
| - | Face the wall with the chains. Move forward once. You will arrive at the center of the room. |
| - | Face the statues next to the entrance door. Move forward once. The door is now unlocked. Walk through it and enter the next area. |
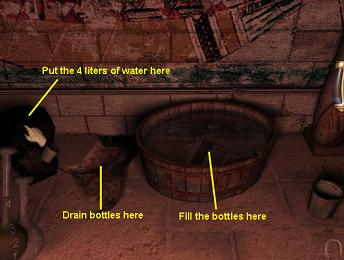
Turn right and walk up to the water tub and the two buckets. Click on the tub to start the puzzle. You have a five liter bucket and a three liter bucket. The goal is to fill the five liter bucket with four liters of water and put it on the rock to the left of the tub. You can use the following solution:
| - | Fill your three liter bucket with water. Empty it into the five liter bucket. |
| - | Fill your three liter bucket with water again. Now transfer as much water as possible to the five liter bucket. |
| - | This will leave five liters of water in the large bucket and one liter of water in the small bucket. |
| - | Empty your five liter bucket by using the drain on the right. |
| - | Transfer the one liter of water from the three liter bucket to the five liter bucket. |
| - | Fill your three liter bucket from the tub one last time. |
| - | Transfer the three liters of water from the small bucket to the large bucket. |
| - | Now the large bucket has four liters of water. Put it on top of the rock to the right. |
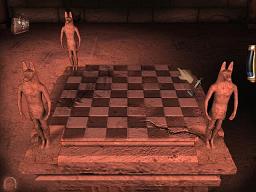
Turn around and look at the newly raised pedestal. Place your four Anubis statuettes around the corners. Save your game before placing the fourth statuette as the next section has a time limit. When you place the fourth statuette, a cut scene will follow.
Part IV ñ After the Destruction
There is a time limit so you will have to do the first part very quickly. Turn around and take the bucket to the left of the tub. There is a scorpion at your feet. Use the bucket to trap the scorpion. Now take the second bucket on the right side of the tub. Walk up to Parkeyís corpse. Take the bag on the ground. Instead of leaving the room, turn to the right and move forward once. You will end up in front of a second scorpion. Use the second bucket to cover it. Take the wooden plank on the floor next to the bucket. Now leave through the door.
You are back in the moving floor room. Unfortunately, the room is now demolished. Open your inventory to take a look at Parkeyís bag. Sherlock will find an envelope. Click on the envelope to reveal a letter.
Use the wooden plank on the hotspot to your right. Walk across the plan and you will end up in front of one of the four statues. Take the geared wheel at the statueís feet. Take the chains from the wall to your left. Walk back to the entrance.
Face the center of the room and move forward once. There is a hotspot on the ceiling. Use the chain here. Turn around and face the opening on the wall. Click here and Holmes will use the chain to leap across.
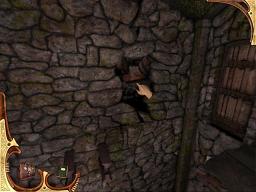
You are back at the wine cellar. Take lantern from the table. Turn around and face the wine kegs next to the sealed doorway. Take the brush that is sitting on one of these wine kegs. Move away from the table and towards the kegs once. One of the wine kegs here has a hotspot. Click on it to pour out gunpowder. Use the bag you found next to Parkeyís corpse to gather the gunpowder. Walk by the pile of broken wine bottles. You can pick up one of them.
Now face the sealed up doorway. Use your newly found brush on the stone at the top of the doorway. You will be able to remove the dust and see the number three. To solve the puzzle, start with the stone at the bottom right. Working your way counter-clockwise, click on every third stone. Make sure you include the stone with 3 inscribed on it when counting. When you press all of the correct stones, you will be able to go through the doorway.
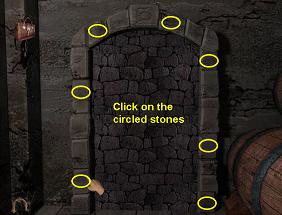
You will find yourself at the entrance of the manor, where we first started the game. Move forward once to stand in front of the chandelier. Use your lantern on the chandelierís only lit candle. Walk back to the coffee table near the entrance. Click on the quill on the table. Read the note on the floor in front of the table.
Walk up the first set of stairs. Before continuing onto the second floor, note the hotspot on the wall. Click on it to reveal three levers. We will need a hint to tell us the correct positioning for the levers. Turn to your right and look at the first step of the second set of stairs. There is a hairpin on this step. Put it in your inventory.
Walk up to the mirrored cabinet to the right of the manor entrance. Use your hairpin on the hotspot near the center of the cabinet. Initially, you will not be able to read the document. Take it to the chandelier where we lit the lantern earlier. Using the document on the chandelier will allow you to read it.
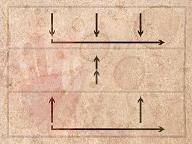
Use the document as a hint to arrange the three levers:
| - | Move all three levers down. Start with the lever on the left and continue to the right. |
| - | Move the middle lever up twice. |
| - | Move the left lever up once. |
| - | Move the right lever up once. |
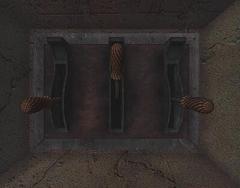
When you solve the puzzle, the red lights will fade. You can now go up the stairs to the second floor. Once you arrive at the second floor landing, turn left and continue down the hallway. You will eventually get to a door. Open it to reveal wall with a groove. Since you solved the lever puzzle, you will be able to walk through to the next area.
You will be back at the corridor we had explored earlier. Turn left and click on the painting on the floor. Click again to view a hidden message. Turn around and click on a second painting on the floor. This painting also has a hidden message. You will also find a piece of cloth on the wall next to the second painting. Put it in your inventory. Walk all the way to the opposite end of the corridor. There is another painting on the ground here next to the living room door. Click on it to reveal the last hidden message.
The bedroom is inaccessible and the bathroom is locked. So letís continue the investigation in the living room. Make sure you save your game before entering the living room. Sherlock can only stay here for a limited amount of time. If you are running out of time, just return to the corridor and start over. Once you are in the living room, our first order of business is to extend the amount of time you can spend inside. Walk up to the curtains on the right side of the room. There should be two sets of curtains on either side of a door. Look at the curtain on the right side of the door. There is a hotspot near the ground. Use the broken bottle from your inventory to cut a piece of cloth.
Now that Holmes can breathe better, walk to the fireplace where the lion trophy used to hang. The trophy is now on the floor and there is a spearhead close to it on the left side of the lion head. Take the spearhead and turn towards sofa inside the room. Note the shield hanging from the wall above the sofa. Click on it to start a puzzle. The notes we found in the corridor provide the solution.
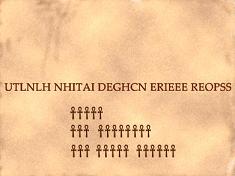 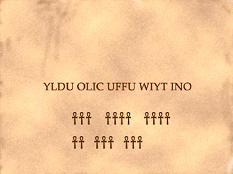
In order to answer the question, you will have to decode the encrypted message. The letters in each note have been scrambled. The ankh symbols at the bottom reveal the correct number of letters in each word of the decoded message. In order to decode the message, all you have to do is to read the scrambled letters in a specific order. Note that the scrambled letters are grouped into different words. Start by reading the first letter of each word. For the first encrypted message, this spells out YOUWI. Note that the ankhs point out that the first word of the first message should have three letters. So we actually end up with YOU WI. Now read the second letter of each word. The phrase will become YOU WILL FIN. Continuing in this fashion, you can decode both messages.
| - | The first message is: You will find if you cut |
| - | The second message is: Under the religion the place shines |
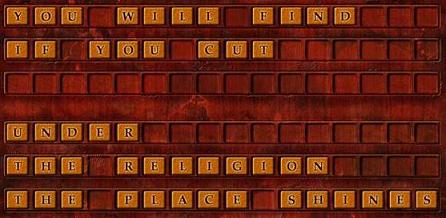
Enter these messages into the puzzle exactly as illustrated by the ankh symbols. Once you enter the message correctly, back away from the puzzle and click on it again to reveal a hidden picture. The picture is showing an X on a spot right next to the family tree. Turn around and walk up to the family tree painting. Note the small hole on the wall next to the painting. Use the spear in your inventory to cut an opening. Take the three weights, a key, and a document from the opening.
It is time to go back to the study. After exiting the living room, you will have to turn left and move forward once. The door to your right will be the study. When you enter the study, note the clock hanging from the wall to the right of the entrance. Click on the clock to take a closer look.
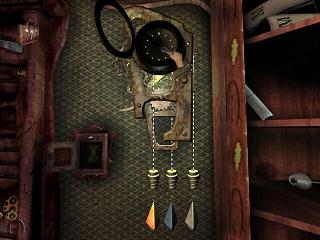
| - | Use the geared wheel we had found at the feet of a statue in the moving floor room. Sherlock will place the gear in its appropriate position on the clock. |
| - | Next, attach the hooks in your inventory to the strings at the bottom of the clock. |
| - | Now attach the weights at the end of the hooks. |
| | o Attach the yellow weight to the left. |
| | o Put the blue weight in the middle. |
| | o Place the gray weight to the right. |
| - | The clock will open up. Now use the key to wind it. The clock will start functioning. |
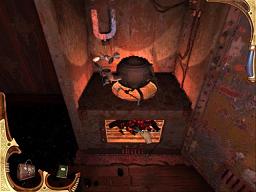
Walk up to the small opening to the right of the room. Use your bag of gunpowder on the lock. Use your lit lantern on the gunpowder bag. A cut scene will follow.
Part V ñ Another Mystery Solved
Save your game as this entire level has a time limit.
You are back at the library. The bullet that was fired in the cut scene is stuck on the doorway. Click on the top right corner of the doorway to take the bullet. Walk around to the door next to the stairs. The rifle is on the ground. Take a close look at it. Zoom in on the area close to the trigger. Click on the fingerprints.
After examining the rifle, continue along the walkway until you are on the side across from the small opening connecting the library to the study. You will find a blue book sticking out on the farthest bookcase to the left. Click on the book to reveal a hidden room.
Enter the small room. Take the shovel on the right. Use the shovel to take the coal out of the stove and put out the fire. Click on the lever on the side of the boiler. The machine will stop. You can now safely climb down the staircase and return to the ground floor.
When you return to the first floor, take the ladder standing next to the staircase. Go to the corner of the library with the red books. Use your ladder on the bookcase. Climb on top of the ladder. Move the red books blocking your way. You will find a copy of Alfred Nobelís book on dynamites, a receipt for explosives, and a pipette.
Leave the library through the door on the first floor. You will be back at the study we had investigated towards the beginning of the game. Take the candle on the desk. You will notice that a cabinet has been knocked over to the left of the entrance.
Walk around until you get to the opposite side of the cabinet. You should now be able to see an opening on the wall. Click on it to take a look at the puzzle. Before we can solve it, we need some additional items. Walk out of the study. You will be back at the room with the large statue at the center. Move forward once towards the statue. Look at the pedestal on your right. Click on the large vase standing on the pedestal to move it to the right. You will find a batcher inside the opening. Move forward one more time. Take the knife from the broken glass cabinet. Next to the cabinet where you find the knife, there is an orange cabinet with locked drawers. Use your knife on the drawers to open them. Take the white squares hidden inside. Continue on to the next room.
You are back in the room where a mummy was lying down at the center at the beginning of the game. Move forward once. You will be next to a locked set of drawers. Use your knife to open them. Take the white squares and the black squares from the drawer. Walk forward one more time. Take the oil flask on the ground to the right side of the door. Now move forward for a third time. Take the ax that is lying on the ground. There are two more sets of drawers in this room that can be opened with the knife. They contain nothing, so you can just ignore them and proceed to the next room.
Now you are in the room with the four statues lined up against the right wall. There are some cabinets along the left side of the room. Open the first one using your knife. You will find some more black squares and a bowl. The third cabinet along the left wall can also be opened with your knife. Take the second bowl hidden inside. Walk all the way to the doors at the end of the room. You cannot go through, but to the left of the door you will find a lamp. Take this item.
Make your way back to the study that is just outside the library where we saw the tile puzzle earlier. Now that Holmes has enough black and white squares, he can finally attempt the puzzle. The numbers along the left side at the puzzle and across the top tell you how many black tiles should be in each row and column. For instance, the 26 at the bottom row means 26 of the tiles have to be colored black. 17 1 means that 17 tiles have to be colored black, followed by some number of white tiles, and 1 more black tile. You have to use your deductive skills and combine the hints to figure out exactly which tiles need to be covered. The correct solution is:
| - | Initially none of the tiles will be covered black or white. Note that each row has 29 tiles and each column has 31 tiles. |
| - | There are five columns labeled with a 31 at the top. This means all of the tiles in these columns have to be colored black. Start solving the puzzle by coloring the tiles in these columns. Note that you can click on the left mouse button and drag the pointer to color multiple tiles at a time. |
| - | Now that the five columns have black tiles in them, you have also solved the hint from the first row, which indicated five black tiles. Color all of the remaining tiles white in this row. |
| - | The next step is to take care of the columns labeled with a 30. Since the first row is complete, just color all of the remaining tiles from these columns. |
| - | Note the column that is labeled 8 21. We already have one white tile at the top of the column from the first row. Fill the next 8 tiles with black. Fill a single tile with white and the remaining 21 tiles with black. |
| - | Now we also solved the second row. It was calling for 10 black tiles. Color all of the remaining tiles white. At this point the puzzle should look like the image below: |
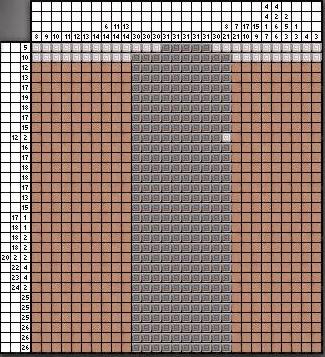 |
| - | Proceed with the column labeled 7 21. The top two tiles are already white. Color the next seven tiles black. Color one tile white and the remaining 21 black. |
| - | Now letís take a look at the last six columns. The three at the bottom are labeled 26. We already have 11 black tiles at the center. That leaves 8 tiles on the right and 10 tiles on the left. We cannot yet determine which tiles to the right have to be colored black. However, even if they were all colored black, that would only add up to 11+8=19 tiles. Since 26-19=7, there has to be at least seven tiles colored in black to the left of the center. |
| - | We can use the same logic for the rows labeled with 25. Even if all the tiles to the left are colored black, we would only have 11+8=19 tiles. Since 25-19=6, there must be at least six tiles to the left of the center that have to be colored black. |
| - | Filling in the bottom rows partially should allow you to complete columns 4, 5, 6, and 7. These columns are labeled 11, 12, 13, and 14. You already have some tiles colored black starting at the bottom. Just color enough tiles from the bottom with black squares to match the indicated numbers. Color all the remaining tiles in these columns white. |
| - | Using a similar logic, you can also solve part of the columns 8, 9, and 10. These columns are labeled 6 14, 11 14, and 13 14. Since you already have some black tiles at the bottom, color enough of them to add up to 14 for each of the columns. You can also deduct that the tiles immediately following the sets of 14 must be white. The puzzle will now look like this: |
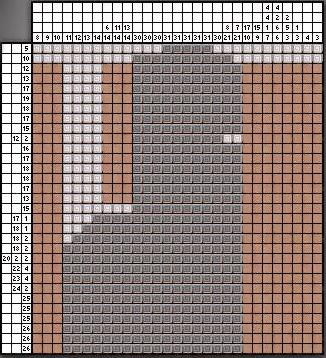 |
| - | Now take a look at the third row from the top. We already know the area where the black rows will reside here. We also have some white rows on the left side. Since there is a single number on the row, we know that none of the tiles to the left of the existing white tiles can be colored black. Thus, we can color the empty tiles on the left side of the row with white. |
| - | We use similar reasoning all the way down to the second row marked 18 2. |
| - | Now take a look at the first row from the bottom that is labeled 15. We already know where the black tiles will begin on this row. Color 4 more tiles on the right of the existing black tiles to add up to 15. The remaining tiles to the right should be colored white. |
| - | Similar reasoning can be applied to the rows immediately following the one we just finished. For the next three rows, labeled 17 1, 18 1, and 18 2, color enough tiles to the right to bring the total to 17 or 18. When you have marked the 17 or 18 tiles, also color a single tile white to the right of them. |
| - | Note the second row labeled 18 2. We already have the 18 black tiles here. Mark all the empty tiles on the left with white. Also mark a single tile to the right of the 18 black tiles white. |
| - | Now take a look at the column labeled 17 10. We already know where the first set of black tiles will end. Color 13 more tiles above the existing black tiles to add up to 17. The tile remaining at the top portion of the row should be colored white. |
| - | You can apply the same technique to the column labeled 15 9. Color 12 tiles adjacent to the existing black ones to bring the total to 15. Color the remaining two tiles at the top with white. |
| - | Proceed with the row labeled 12 2. We already have 2 white tiles on the right adjacent to the 9 black tiles. Color the empty tiles on the left to add up to 12. There should also be two black tiles on the right side of the two white tiles. This completes the row. Just color the remaining tiles on the right with white. |
| - | You can now complete the third and fourth rows from the top. The third row is labeled 12. You already have 11 black tiles here and a single white tile to the right. Color one empty tile black on the left to bring the total to 12. Color the rest of the row white. Use the same logic on the fourth row. This time color enough black tiles to bring the total to 13. Color the rest of the row white. |
| - | We now know where the black tiles begin on the column labeled 13 14. Complete the section with 13 tiles. The section with 14 black tiles are already filled. Color the only remaining tile white. |
| - | Note that the second row labeled 13 from the top already has 13 tiles colored in black. Complete the row by filling the rest of the tiles with white. |
| - | We can now complete the column labeled 11 14. We already have 14 black tiles at the bottom. We also have some white tiles at the top and the middle. This leaves us only 11 tiles. Color them in black to complete the column. |
| - | In filling the 11 14 column, you also completed the first row from the top labeled 15. Just fill all the remaining tiles in this row with white. At this point, the puzzle should look like this: |
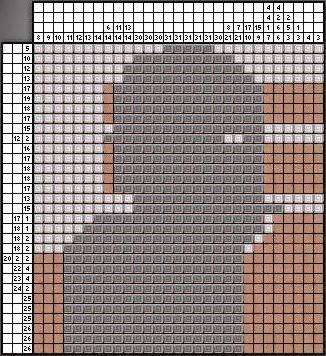 |
| - | You can now complete the column labeled 17 10. Just fill all the empty tiles at the bottom with black. |
| - | Note the columns labeled 4 4 1 7 and 4 2 6 6. You should have four empty tiles towards the top of each of these columns. Color them with black. |
| - | You now have 17 black tiles on the second row labeled 17. Color the rest of the row white. |
| - | You should have a section of the 6 14 column where there is a single black tile. Color the remaining tiles in this section black to bring the total to 6. Color the remaining empty tiles in this column white. |
| - | Now we finally know where the black tiles begin on the first row labeled 17 and the two rows underneath it labeled 19 and 18. Complete the black regions of these rows as needed. Color any remaining tiles with white. |
| - | Repeat the same technique with the five rows underneath the one labeled 12 2. |
| - | Now take a look at the column labeled 4 2 6 6. You already marked the 4 and the 2. You also know where the section of 6 black tiles will begin. Complete that section by adding 5 black tiles. Also add a single white tile after the black tiles. |
| - | You just completed entering the black tiles for the rows labeled 17 1 and 18 1. Fill the empty tiles in these rows with white. |
| - | Take a look at the column labeled 22 4. Fill the tiles to the right of the single white tile with black. |
| - | Note that there are only 10 empty tiles left in the column labeled 10. The rest of the column is white. Color all the empty tiles with black. |
| - | The row labeled 20 2 2 now has 20 black tiles. Fill the left side of this row with white. Also put a single white tile to the right of the black section. |
| - | The column labeled 9 will now have a total of 9 empty tiles. The rest of the column will be white. Color the empty tiles with black. |
| - | The column labeled 15 9 also has only 9 empty tiles. Color all of these in black. |
| - | We now have the set of 22 black tiles completed on the 22 4 row. Color the remainder of the row white. |
| - | You have eight empty rows remaining in the first column. Color all of these black. |
| - | We finally know where the black tiles on the bottom 6 rows will begin. Complete the sets on the rows marked 26 and 25. Colored the remainder of the row with white. |
| - | You can also complete the sets of 23 and 24 on the rows labeled 23 4 and 24 2. Put a white tile at the end of each set of black tiles. |
| - | All the black tiles of the 4 4 1 7 column should be filled in. Color the remainder of the column with white. Repeat the same for the column labeled 4 2 6 6. |
| - | You finally know where the sets of two tiles begin on the 18 2 rows. Complete the sets of two tiles by adding a black tile to the right of the existing ones. Color the remaining empty tiles on these rows with white. |
| - | Now you discovered the beginning of the 5 tile section of the 2 5 3 column. Complete the section with black tiles. Color the single remaining tile white. |
| - | The 20 2 2 row now has the set of 20 and the first set of 2 completed. Put a white tile after the first set of 2 black tiles. Fill the two remaining tiles in this row with black. |
| - | You now have the beginning of the black sections in the columns labeled 4 and 3. Complete these sections. Fill any remaining tiles on these columns with white. |
| - | You should only have the 1 3 column left. Just color the remaining two tiles black. |
| - | The puzzle should look like this right before entering the last black tile: |
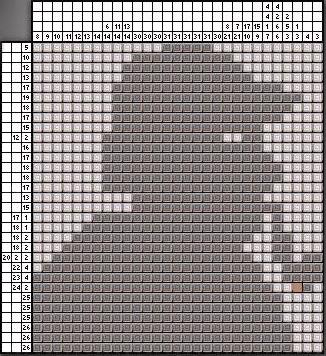 |
When you finally complete the puzzle, you will be able to take the lever hidden behind it. Leave the study with the tile puzzle and go back to the exhibit room with the large statue at the center. Walk up to the sarcophagus lying inside a glass cabined. On the ground, to the left of the glass cabinet, you can move the carpet. Once the carpet is out of the way, you will be able to see a trap door. Open the trap door. Use the lever from the tile puzzle on the machine inside. When the lever is in place, pull it to reveal a hidden entrance in one of the other rooms. Before leaving however, combine the lamp and the oil flask in your inventory. Light your lamp by using it on the gas lamp hanging over the glass cabinet with the sarcophagus.
Leave the room through the door in front of you. You should be back at the room where our friendly mummy used to reside. Walk through this room and enter the next one. You can find the hidden entrance here. Since your lamp is lit, Holmes will be able to walk inside.
We are back at the storage room with the pillars. Take the rope on the far left corner of the room. Leave the room through the door and you will be back at the laboratory. Walk forward once, turn right, and walk forward again. You should end up in front of a desk. Take one of the boxes from the desk.
Turn around. You should see a small opening and some dynamites in the distance. Walk into the small room and a cut scene will follow.
It is time to defuse the bomb. Enter the room and walk up to the boiler. Combine the axe and the rope. Use the combination on the hook that is attached to the wall over the boiler.
Use the box on the crate at the far corner of the bomb room. Use your batcher on top of the box. Holmes will automatically combine the batcher with two of the bowls in your inventory and create a balance. Our contraption is finally close enough to the rope. Use the candle on the side of the balance closer to you. Use the last empty bowl in your inventory on the other side of the balance. There is a hotspot directly above the balance and the rope. Use your pipette here. Finally, light the candle by using your lamp. Walk out of the room into the laboratory.
Congratulations! You just finished Mystery of the Mummy. Enjoy the final cut scene with a classic Sherlock Holmes explanation of what was really going on in the manor.
|

